티스토리 뷰
개요
급격하게 확대되고 있는 오픈소스 시장에서 소프트웨어 업그레이드를 이용한 공격사례가 증가하고 있다. 어떠한 악성 코드가 반영되어 있는지 확인하기 어렵고, 어떠한 소프트웨어가 설치되어 있는지 확인하기 어려운 상태에서 인터넷 상에 떠도는 오픈소스 소프트웨어를 업그레이드 하거나, 파일을 반입하는 것은 공격의 대상으로 타켓팅 될뿐 아니라, 때로는 심각한 정보들를 유출하는 심각한 문제를 초래하기도 한다.
따라서 오픈소스를 구축하고 운영할 경우 업그레이드 관리에 많은 비용과 시간을 투자해야 함을 반드시 인지해야한다.
도커 이미지 역시 마찬가지이다. 이미지 내부에는 어떠한 파일과 소프트웨어가 설치되어 있는지 판단하기 어려운 상태에서 반입하는 경우가 많다. 따라서 이미지는 도커 허브와 같은 공식 사이트에서 검증된 official 이미지라고 하더라도 가능한 직접 origin 이미지로부터 생성하는 과정을 거치는 것이 중요하며, 생성한 이미지를 Signer를 통해 서명하고 서명된 이미지만이 반영될 수 있도록 관리체계를 수립해야 한다.
지금부터는 Docker Image를 서명하는 과정에 대해 살펴보고, 이를 Harbor Notary를 적용하여 Private 환경에서 관리하는 방법에 대해 알아보자.
포스팅 순서
- TUF (The Update Framework)
- Docker Signer (docker trust sign)
- Notary (by Harbor)
TUF (The Update Framework)
먼저, 이미지 서명관리에 대해 알아보기 전에 TUF (The Update Framework)에 대해 알아보자. TUF (The Update Framework)는 개발자가 소프트웨어 업데이트 시스템의 보안을 유지하도록 지원하며, 저장소나 서명 키를 손상시키는 공격자로부터 시스템을 보호하는 프레임워크를 통칭한다.
지금부터 살펴볼 Notary가 대표적인 TUF 프레임워크라 볼 수 있다.
Docker Signer (docker trust sign)
Docker 이미지에 서명하는 방법에 대해 먼저 알아보도록 하자.
- 이미지 다운로드 (docker pull)
- 이미지 태그 생성 (docker tag)
- public key 생성 (docker trust key)
- 이미지 서명자 생성 (docker trust signer)
- 이미지 서명 생성 (docker trust sign)
- 이미지 서명 확인 (docker trust inspect)
- 이미지 서명 취소 (docker trust revoke) - OPTION
- 이미지 push (docker push)
- DCT 적용 (DOCKER_CONTENT_TRUST)
- 서명된 이미지 다운로드 (docker pull)
> 이미지 다운로드 (docker pull)
[root@ip-192-168-93-115 harbor]# docker pull ubuntu:latest
latest: Pulling from library/ubuntu
35807b77a593: Pull complete
Digest: sha256:9d6a8699fb5c9c39cf08a0871bd6219f0400981c570894cd8cbea30d3424a31f
Status: Downloaded newer image for ubuntu:latest
docker.io/library/ubuntu:latest
[root@ip-192-168-93-115 harbor]#
> 이미지 태그 생성 (docker tag)
[root@ip-192-168-93-115 sign]# docker tag ubuntu:latest sonnaraon/waspro-signed-ubuntu:latest
[root@ip-192-168-93-115 sign]# docker tag ubuntu:latest sonnaraon/unsigned-ubuntu:latest
[root@ip-192-168-93-115 sign]#
서명을 위한 waspro-signed-ubuntu 이미지와 서명하지 않은 unsigned-ubuntu 태그를 생성한다.
> public key 생성 (docker trust key)
[root@ip-192-168-93-115 sign]# docker trust key generate waspro
Generating key for waspro...
Enter passphrase for new waspro key with ID dda1569:
Repeat passphrase for new waspro key with ID dda1569:
Successfully generated and loaded private key.
Corresponding public key available: /root/sign/waspro.pub
[root@ip-192-168-93-115 sign]# ls -la total 4
drwxr-xr-x 2 root root 24 Aug 29 14:41 .
dr-xr-x--- 9 root root 250 Aug 29 14:37 ..
-rw------- 1 root root 192 Aug 29 14:41 waspro.pub
[root@ip-192-168-93-115 sign]#
인증을 위한 public key를 생성한다. 생성한 키를 기반으로 notary 인증서버를 통해 서명을 진행한다.
> 이미지 서명자 생성 (docker trust signer)
[root@ip-192-168-93-115 sign]# docker trust signer add --key waspro.pub waspro sonnaraon/waspro-signed-ubuntu:latest
Adding signer "waspro" to sonnaraon/waspro-signed-ubuntu:latest...
Initializing signed repository for sonnaraon/waspro-signed-ubuntu:latest...
Enter passphrase for root key with ID 721b098:
Enter passphrase for new repository key with ID ef5aae1:
Repeat passphrase for new repository key with ID ef5aae1:
Successfully initialized "sonnaraon/waspro-signed-ubuntu:latest"
Successfully added signer: waspro to sonnaraon/waspro-signed-ubuntu:latest
[root@ip-192-168-93-115 sign]#
Docker는 Notary와 함께 이미지 서명을 관리한다. Notary 서비스는 이미 DockerHub 내 구축되어 있어 별도 구성이 필요하지 않다. (default 4443 port) 다만, Private 환경에 별도로 구축할 경우 notary 서버 접근을 위한 환경변수를 구성해야 한다.
위는 DockerHub와 연계되어 있는 notary 서버를 이용하여 이미지 서명을 위한 signer를 추가하는 과정이다.
> 이미지 서명 생성 (docker trust sign)
[root@ip-192-168-93-115 sign]# docker trust sign sonnaraon/waspro-signed-ubuntu:latest
Signing and pushing trust data for local image sonnaraon/waspro-signed-ubuntu:latest,
may overwrite remote trust data The push refers to repository [docker.io/sonnaraon/waspro-signed-ubuntu] 7555a8182c42:
Pushed latest: digest: sha256:1e48201ccc2ab83afc435394b3bf70af0fa0055215c1e26a5da9b50a1ae367c9 size: 529
Signing and pushing trust metadata
Enter passphrase for waspro key with ID dda1569:
Successfully signed docker.io/sonnaraon/waspro-signed-ubuntu:latest
[root@ip-192-168-93-115 sign]#
> 이미지 서명 확인 (docker trust inspect)
[root@ip-192-168-93-115 sign]# docker trust inspect --pretty sonnaraon/unsigned-ubuntu:latest
No signatures or cannot access sonnaraon/unsigned-ubuntu:latest
[root@ip-192-168-93-115 sign]# docker trust inspect --pretty sonnaraon/waspro-signed-ubuntu:latest
Signatures for sonnaraon/waspro-signed-ubuntu:latest
SIGNED TAG DIGEST SIGNERS latest 1e48201ccc2ab83afc435394b3bf70af0fa0055215c1e26a5da9b50a1ae367c9 waspro List of signers and their keys for sonnaraon/waspro-signed-ubuntu:latest
SIGNER KEYS waspro dda1569ada1c Administrative keys for sonnaraon/waspro-signed-ubuntu:latest
Repository Key: ef5aae1bbd9bf9e918844c7677614cc3c077dd81fcc90f03ca0b8e90e0ea9546
Root Key: b1bd363918ffc19e256ce9ae11fe47fc8311766771153129ede6cd0db2a10f76
[root@ip-192-168-93-115 sign]#
앞서 생성한 두개의 태그를 기반으로 서명 여부를 검사한다.
- unsigned-ubuntu:latest 이미지의 경우 "No signatures or cannot access sonnaraon/unsigned-ubuntu:latest"로 서명되지 않은 상태임을 확인할 수 있다.
- waspro-signed-ubuntu:latest 이미지의 경우 signer와 sign을 확인할 수 있다.
이와 같이 서명된 이미지를 repository에 업로드 하여 관리하고 이를 재 다운로드 받을 경우 DCT(Docker Content Trust)를 통해 제어하도록 한다.
> 이미지 서명 취소 (docker trust revoke)
[root@ip-192-168-93-115 harbor]# docker trust revoke sonnaraon/my-ubuntu:latest
Enter passphrase for waspro key with ID ced2399:
Successfully deleted signature for sonnaraon/my-ubuntu:latest
[root@ip-192-168-93-115 harbor]# docker trust inspect sonnaraon/my-ubuntu:latest --pretty

No signatures for sonnaraon/my-ubuntu:latest


List of signers and their keys for sonnaraon/my-ubuntu:latest

SIGNER    KEYS
waspro    ac80c0dc7b14, ced23995604a

Administrative keys for sonnaraon/my-ubuntu:latest

  Repository Key:       768bb6ff476ab13c57629aeae2e648b8133bef16778206d01f406d4873f84411
  Root Key:     8719c895b67196527a96a59453fe9abe76fe80050b6dc66ac0bacf9dee9668b1
[root@ip-192-168-93-115 harbor]#
위와 같이 앞서 등록한 태그 서명이 취소된 것을 확인할 수 있다.
> 이미지 push (docker push)
[root@ip-192-168-93-115 ~]# docker push sonnaraon/unsigned-ubuntu:latest
The push refers to repository [docker.io/sonnaraon/unsigned-ubuntu] latest:
digest: sha256:1e48201ccc2ab83afc435394b3bf70af0fa0055215c1e26a5da9b50a1ae367c9
size: 529
[root@ip-192-168-93-115 ~]# docker push sonnaraon/waspro-signed-ubuntu:latest
The push refers to repository [docker.io/sonnaraon/waspro-signed-ubuntu] 7555a8182c42:
Layer already exists latest:
digest: sha256:1e48201ccc2ab83afc435394b3bf70af0fa0055215c1e26a5da9b50a1ae367c9
size: 529
Signing and pushing trust metadata Enter passphrase for waspro key with ID dda1569:
Successfully signed docker.io/sonnaraon/waspro-signed-ubuntu:latest
[root@ip-192-168-93-115 sign]#
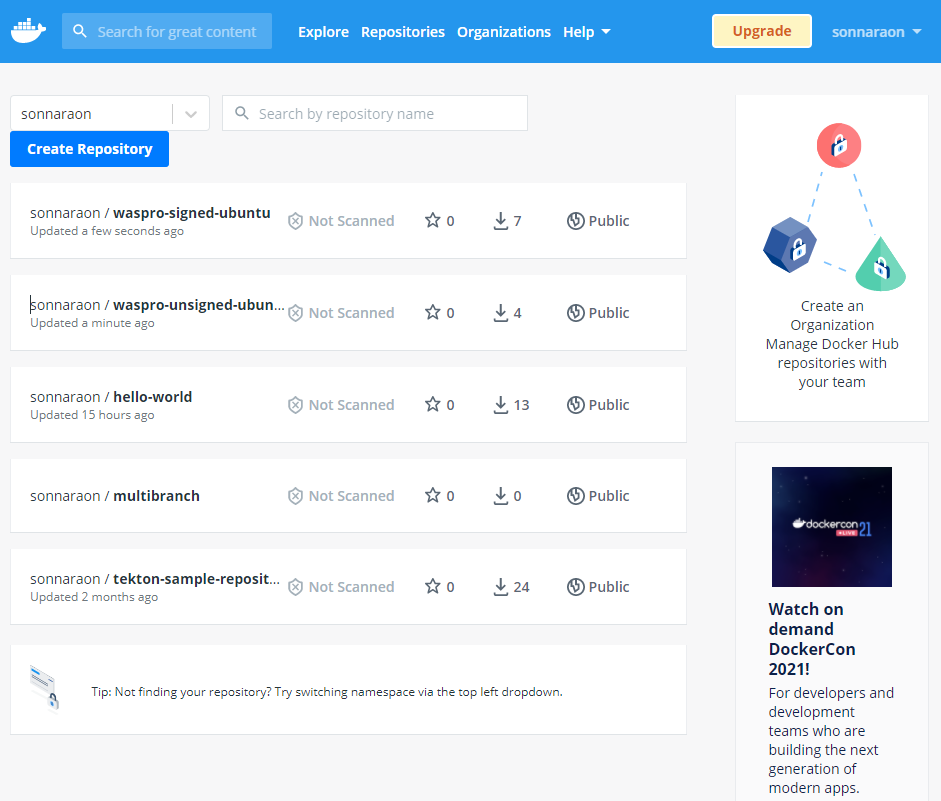
이미지를 push하면 다음과 같이 DockerHub에 업로드 된 것을 확인할 수 있다.

> DCT 적용 (DOCKER_CONTENT_TRUST)
[root@ip-192-168-86-253 ~]# cat .bash_profile
# .bash_profile
# Get the aliases and functions
if [ -f ~/.bashrc ]; then
. ~/.bashrc fi
# User specific environment and startup programs
PATH=$PATH:$HOME/bin
export PATH
export DOCKER_CONTENT_TRUST=1
[root@ip-192-168-86-253 ~]#
위는 서명된 이미지를 다른 workspace 환경에서 다운로드 받는 과정을 설명한다.
DOCKER_CONTENT_TRUST = 1로 적용할 경우 서명된 이미지만 다운로드 받는다. 서명되지 않은 이미지는 다운로드 되지 않도록 차단함으로써 무분별한 이미지 적용 및 이미지를 이용한 해킹으로부터 1차적으로 방어할 수 있다.
> 서명된 이미지 다운로드 (docker pull)
[root@ip-192-168-86-253 ~]# docker images
REPOSITORY TAG IMAGE ID CREATED SIZE
[root@ip-192-168-86-253 ~]# docker pull sonnaraon/waspro-signed-ubuntu:latest
Pull (1 of 1): sonnaraon/waspro-signed-ubuntu:latest@sha256:1e48201ccc2ab83afc435394b3bf70af0fa0055215c1e26a5da9b50a1ae367c9 docker.io/sonnaraon/waspro-signed-ubuntu@sha256:1e48201ccc2ab83afc435394b3bf70af0fa0055215c1e26a5da9b50a1ae367c9:
Pulling from sonnaraon/waspro-signed-ubuntu 16ec32c2132b: Pull complete
Digest: sha256:1e48201ccc2ab83afc435394b3bf70af0fa0055215c1e26a5da9b50a1ae367c9
Status: Downloaded newer image for sonnaraon/waspro-signed-ubuntu@sha256:1e48201ccc2ab83afc435394b3bf70af0fa0055215c1e26a5da9b50a1ae367c9
Tagging sonnaraon/waspro-signed-ubuntu@sha256:1e48201ccc2ab83afc435394b3bf70af0fa0055215c1e26a5da9b50a1ae367c9 as sonnaraon/waspro-signed-ubuntu:latest
docker.io/sonnaraon/waspro-signed-ubuntu:latest
[root@ip-192-168-86-253 ~]# docker pull sonnaraon/unsigned-ubuntu:latest
Error: remote trust data does not exist for docker.io/sonnaraon/unsigned-ubuntu:
notary.docker.io does not have trust data for docker.io/sonnaraon/unsigned-ubuntu
[root@ip-192-168-86-253 ~]#
waspro-signed-ubuntu:latest 이미지의 경우 앞서 서명을 진행했기 때문에 정상적으로 다운로드 받아 지는 것을 확인할 수 있지만, unsigned-ubuntu:latest 이미지의 경우 서명이 되지 않은 상태의 이미지로 다운로드가 되지 않고, error가 발생하는 것을 볼 수 있다.
위와 같이 적용할 경우 도커 이미지에 대한 서명 과정을 거쳐 레지스트리(Notary)와 이미지를 사용하는 환경을 모두 보호할 수 있다. 다만 서명은 정책적으로 차단하는 방식임을 인지하고, 근본적인 오픈소스(이미지 포함) 관리 체계를 구축하는 것은 반드시 필요하다.
지금까지는 DockerHub에 구축되어 있는 Notary 서버를 이용하여 Public 환경에 구성되어 있는 레지스트리 이미지 서명과정에 대해 알아보았다 다음으로 Private 환경에 구성되어 있는 Harbor(Notary)를 이용한 이미지 서명관리 방법에 대해 알아보자.
Notary (by Harbor)
Harbor는 여러 기능을 내장하고 있는 Registry이다. Docker 이미지 저장소는 물론 Helm 차트 관리, OPA(Open Policy Agent), Singularity 이미지 등과 같은 다양한 클라우드 네이티브 아티팩트를 저장할 수 있는 최초의 OCI(Open Container Initiative) 호환 오픈 소스 레지스트리이다. Harbor는 TUF와 같은 저장소 관련 서명 프레임워크를 지원하는데 바로 Notary이다.
Notary는 TUF 프레임워크를 구현한 오픈소스 프레임워크로 CNCF에 Icubating 프로젝트로 관리되고 있다. Notary는 사용자 콘텐츠의 무결성과 최신성을 보장하기위해 필요한 메타데이터를 생성, 관리 및 배포작업을 처리한다.
지금부터는 Notary를 활용하여 이미지 서명 관리 방법에 대해 알아보도록 하자.
1. 인증서 설치 (in Harbor)
Notary는 https 프로토콜을 사용하여 상호간 Handshake를 거쳐야 한다. 따라서 Notary를 구축하기 이전에는 반드시 인증서가 준비되어 있어야 한다.
> 인증서 준비
각 사이트 또는 프로젝트에서 사용하는 인증서가 존재할 경우 해당 인증서를 활용할 수 있으며, 인증서가 존재하지 않을 경우 Self Signed 인증서를 발급받아 구축하는 것이 일반적이다. (개발환경의 경우)
> CA 인증서 생성
[root@ip-192-168-93-115 harbor]# openssl genrsa -out ca.key 4096
Generating RSA private key, 4096 bit long modulus
................................................................................................................................++
.....................................................................................................................++
e is 65537 (0x10001)
[root@ip-192-168-93-115 harbor]# openssl req -x509 -new -nodes -sha512 -days 3650 \
  -subj "/C=KR/ST=Seoul/L=Seoul/O=example/OU=Personal/CN=www.swainno.com" \
  -key ca.key \
  -out ca.crt
[root@ip-192-168-93-115 harbor]#
> 서버 인증서 생성
[root@ip-192-168-93-115 harbor]# openssl genrsa -out www.swainno.com.key 4096
Generating RSA private key, 4096 bit long modulus
............................................................................................................................................................++
......................................................++
e is 65537 (0x10001)
[root@ip-192-168-93-115 harbor]# openssl req -sha512 -new \
     -subj "/C=KR/ST=Seoul/L=Seoul/O=example/OU=Personal/CN=www.swainno.com" \
     -key www.swainno.com.key \
     -out www.swainno.com.csr
[root@ip-192-168-93-115 harbor]# cat > v3.ext <<-EOF
 authorityKeyIdentifier=keyid,issuer
 basicConstraints=CA:FALSE
 keyUsage = digitalSignature, nonRepudiation, keyEncipherment, dataEncipherment
 extendedKeyUsage = serverAuth
 subjectAltName = @alt_names

 [alt_names]
 DNS.1=www.swainno.com
 DNS.2=swainno.com
 DNS.3=ip-192-168-93-115.ap-northeast-2.compute.internal
EOF
[root@ip-192-168-93-115 harbor]# openssl x509 -req -sha512 -days 3650 \
     -extfile v3.ext \
     -CA ca.crt -CAkey ca.key -CAcreateserial \
     -in www.swainno.com.csr \
     -out www.swainno.com.crt
Signature ok
subject=/C=KR/ST=Seoul/L=Seoul/O=example/OU=Personal/CN=www.swainno.com
Getting CA Private Key
[root@ip-192-168-93-115 harbor]#
> Docker에 인증서 반영
[root@ip-192-168-93-115 harbor]# openssl x509 -inform PEM -in www.swainno.com.crt -out www.swainno.com.cert
[root@ip-192-168-93-115 harbor]# mkdir -p /etc/docker/certs.d/www.swainno.com:8443
[root@ip-192-168-93-115 harbor]# cd /etc/docker/certs.d/www.swainno.com:8443
[root@ip-192-168-93-115 www.swainno.com:8443]# pwd
/etc/docker/certs.d/www.swainno.com:8443
[root@ip-192-168-93-115 www.swainno.com:8443]# ls -la
total 24
drwxr-xr-x 2 root root  143 Aug 31 16:21 .
drwxr-xr-x 3 root root   34 Aug 31 14:55 ..
-rw-r--r-- 1 root root 2037 Aug 31 14:55 ca.crt
-rw-r--r-- 1 root root 3243 Aug 31 16:21 ca.key
-rw-r--r-- 1 root root 2163 Aug 31 14:55 www.swainno.com.cert
-rw-r--r-- 1 root root 2163 Aug 31 16:21 www.swainno.com.crt
-rw-r--r-- 1 root root 1825 Aug 31 16:21 www.swainno.com.csr
-rw-r--r-- 1 root root 3243 Aug 31 14:55 www.swainno.com.key
[root@ip-192-168-93-115 www.swainno.com:8443]#
디렉토리 생성 및 인증서를 복사한 후 systemctl restart docker 도커를 재기동한다.
2. Harbor Notary 구성
> Harbor 설정
[harbor.yml]
...
...
# https related config
https:
  # https port for harbor, default is 443
  port: 8443
  # The path of cert and key files for nginx
  certificate: /root/harbor/harbor/www.swainno.com.crt
  private_key: /root/harbor/harbor/www.swainno.com.key
...
...
Notary를 기동하기 위해서는 반드시 https가 설정되어 있어야 한다.
> Harbor 설정 반영
[root@ip-192-168-93-115 harbor]# ./prepare --with-chartmuseum --with-notary --with-trivy
prepare base dir is set to /root/harbor/harbor
Clearing the configuration file: /config/portal/nginx.conf
Clearing the configuration file: /config/log/logrotate.conf
Clearing the configuration file: /config/log/rsyslog_docker.conf
Clearing the configuration file: /config/nginx/conf.d/notary.upstream.conf
Clearing the configuration file: /config/nginx/conf.d/notary.server.conf
Clearing the configuration file: /config/nginx/nginx.conf
Clearing the configuration file: /config/core/env
Clearing the configuration file: /config/core/app.conf
Clearing the configuration file: /config/registry/passwd
Clearing the configuration file: /config/registry/config.yml
Clearing the configuration file: /config/registryctl/env
Clearing the configuration file: /config/registryctl/config.yml
Clearing the configuration file: /config/db/env
Clearing the configuration file: /config/jobservice/env
Clearing the configuration file: /config/jobservice/config.yml
Clearing the configuration file: /config/chartserver/env
Clearing the configuration file: /config/trivy-adapter/env
Clearing the configuration file: /config/notary/server-config.postgres.json
Clearing the configuration file: /config/notary/server_env
Clearing the configuration file: /config/notary/signer_env
Clearing the configuration file: /config/notary/signer-config.postgres.json
Generated configuration file: /config/portal/nginx.conf
Generated configuration file: /config/log/logrotate.conf
Generated configuration file: /config/log/rsyslog_docker.conf
Generated configuration file: /config/nginx/nginx.conf
Generated configuration file: /config/core/env
Generated configuration file: /config/core/app.conf
Generated configuration file: /config/registry/config.yml
Generated configuration file: /config/registryctl/env
Generated configuration file: /config/registryctl/config.yml
Generated configuration file: /config/db/env
Generated configuration file: /config/jobservice/env
Generated configuration file: /config/jobservice/config.yml
loaded secret from file: /data/secret/keys/secretkey
Copying nginx configuration file for notary
Generated configuration file: /config/nginx/conf.d/notary.upstream.conf
Generated configuration file: /config/nginx/conf.d/notary.server.conf
Generated configuration file: /config/notary/server-config.postgres.json
Generated configuration file: /config/notary/server_env
loaded secret from file: /data/secret/keys/defaultalias
Generated configuration file: /config/notary/signer_env
Generated configuration file: /config/notary/signer-config.postgres.json
Generated configuration file: /config/trivy-adapter/env
Generated configuration file: /config/chartserver/env
Generated configuration file: /compose_location/docker-compose.yml
Clean up the input dir
[root@ip-192-168-93-115 harbor]#
> Harbor 재기동
[root@ip-192-168-93-115 harbor]# docker-compose down -v
Stopping harbor-jobservice ... done
Stopping nginx             ... done
Stopping notary-server     ... done
Stopping harbor-core       ... done
Stopping notary-signer     ... done
Stopping trivy-adapter     ... done
Stopping redis             ... done
Stopping registryctl       ... done
Stopping harbor-db         ... done
Stopping harbor-portal     ... done
Stopping harbor-log        ... done
Removing harbor-jobservice ... done
Removing nginx             ... done
Removing notary-server     ... done
Removing harbor-core       ... done
Removing notary-signer     ... done
Removing trivy-adapter     ... done
Removing redis             ... done
Removing chartmuseum       ... done
Removing registryctl       ... done
Removing harbor-db         ... done
Removing harbor-portal     ... done
Removing registry          ... done
Removing harbor-log        ... done
Removing network harbor_harbor
Removing network harbor_harbor-notary
Removing network harbor_harbor-chartmuseum
Removing network harbor_notary-sig
[root@ip-192-168-93-115 harbor]# docker-compose up -d
Creating network "harbor_harbor" with the default driver
Creating network "harbor_harbor-notary" with the default driver
Creating network "harbor_harbor-chartmuseum" with the default driver
Creating network "harbor_notary-sig" with the default driver
Creating harbor-log ... done
Creating chartmuseum   ... done
Creating harbor-portal ... done
Creating harbor-db     ... done
Creating registryctl   ... done
Creating redis         ... done
Creating registry      ... done
Creating trivy-adapter ... done
Creating harbor-core   ... done
Creating notary-signer ... done
Creating notary-server     ... done
Creating nginx             ... done
Creating harbor-jobservice ... done
[root@ip-192-168-93-115 harbor]#
> 로그인 테스트 및 Harbor UI 접속
[root@ip-192-168-93-115 harbor]# docker login www.swainno.com:8443
Username: admin
Password:
WARNING! Your password will be stored unencrypted in /root/.docker/config.json.
Configure a credential helper to remove this warning. See
https://docs.docker.com/engine/reference/commandline/login/#credentials-store

Login Succeeded
[root@ip-192-168-93-115 harbor]#
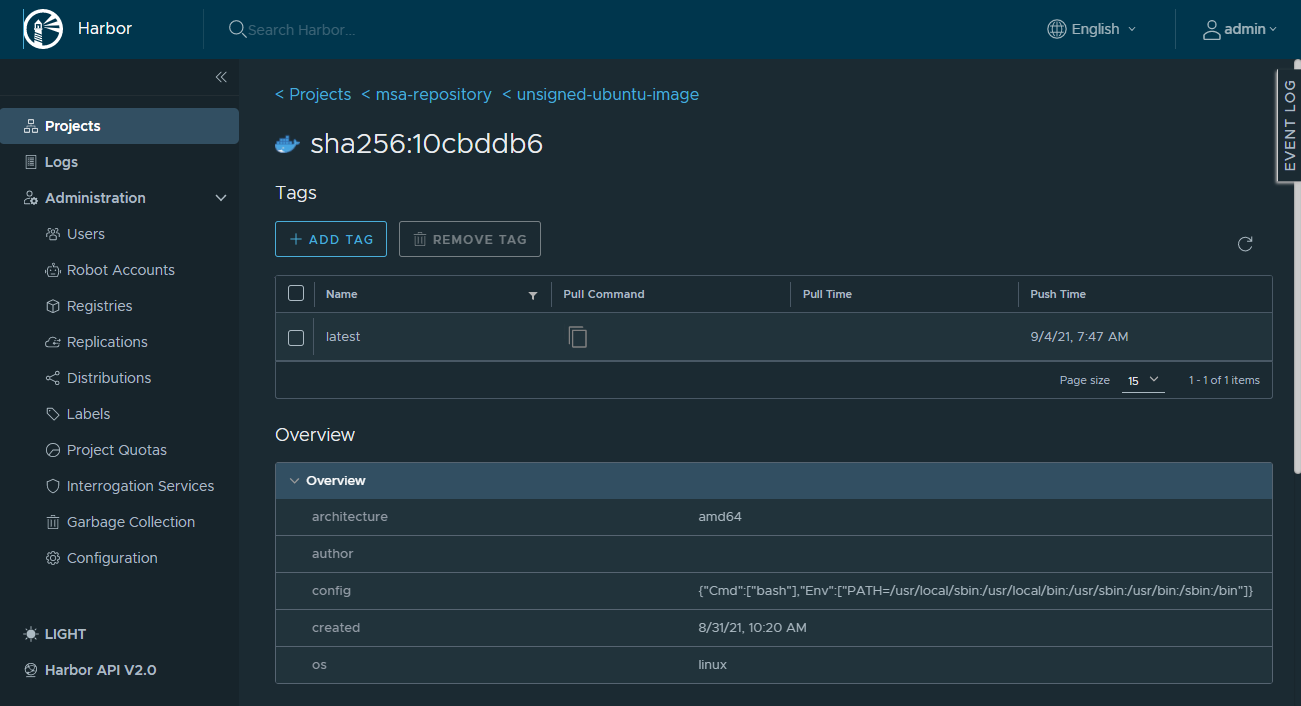
아래는 Notary가 포함되지 않은 Harbor 대시보드 이미지 정보이다.

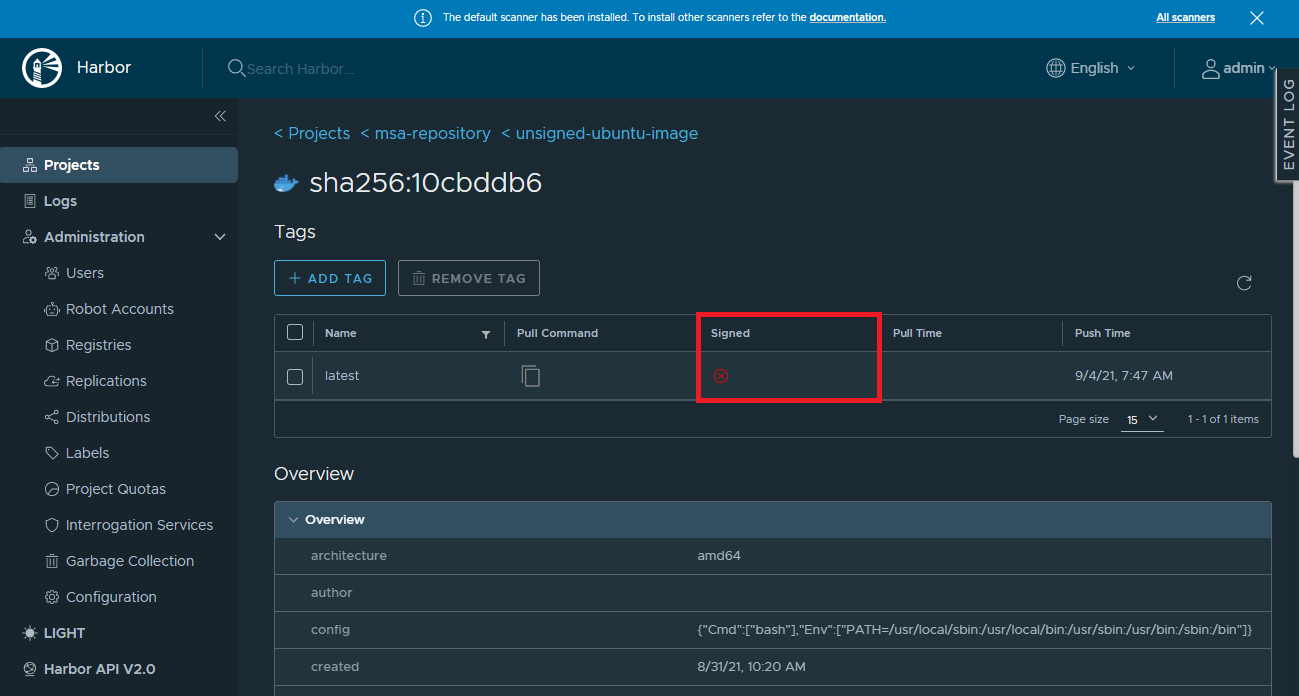
다음은 Notary를 포함한 Harbor의 대시보드 이미지 정보이다.

위와 같이 Signed 여부를 확인할 수 있는 Column이 추가된 것을 볼 수 있다.
마찬가지로 https로 대시보드에 로그인이 가능한 것을 볼 수 있다. 개발환경에서 신뢰할 수 없는 인증서라는 경고 메시지가 발생할 수 있으나, 직접 발급하였기 때문에 발생하는 것으로 개발환경에서는 무시하고 테스트를 진행하도록 하자.
# 참조 URL
https://docs.docker.com/engine/security/trust/
Content trust in Docker
docs.docker.com
https://docs.docker.com/engine/security/trust/trust_delegation/
Delegations for content trust
docs.docker.com
https://goharbor.io/docs/2.1.0/install-config/configure-https/
Harbor – Configure HTTPS Access to Harbor
Configure HTTPS Access to Harbor
goharbor.io
'③ 클라우드 > ⓓ Docker' 카테고리의 다른 글
| 컨테이너 이미지 생성시 고려사항 (2) | 2021.03.14 |
|---|---|
| docker container stack size 조절하기 (0) | 2021.02.15 |
| docker network 대역 변경하기 (172.17.0.0 - 10.10.0.0) (3) | 2020.08.29 |
| [Dockerfile] 애매한 명령어 파헤치기 (0) | 2020.07.04 |
| [Docker Image] 취약점 분석 (Anchore opensource) (0) | 2020.05.30 |
- Total
- Today
- Yesterday
- apache
- 아키텍처
- MSA
- OpenStack
- wildfly
- Docker
- JBoss
- Da
- openstack tenant
- 마이크로서비스
- TA
- kubernetes
- API Gateway
- jeus
- SA
- webtob
- aws
- aa
- node.js
- nodejs
- k8s
- 오픈스택
- Architecture
- 쿠버네티스
- JEUS7
- SWA
- JEUS6
- openstack token issue
- git
- 마이크로서비스 아키텍처
| 일 | 월 | 화 | 수 | 목 | 금 | 토 |
|---|---|---|---|---|---|---|
| 1 | 2 | 3 | ||||
| 4 | 5 | 6 | 7 | 8 | 9 | 10 |
| 11 | 12 | 13 | 14 | 15 | 16 | 17 |
| 18 | 19 | 20 | 21 | 22 | 23 | 24 |
| 25 | 26 | 27 | 28 | 29 | 30 | 31 |
