티스토리 뷰
서론
EKS는 Kubernetes 기반 Container Management를 제공하는 AWS 서비스이다. AWS는 EKS외에 ECS라는 독자적인 Container 서비스를 제공하지만, 이는 Lock In 요소와 선호도의 차이로 인해 사용률이 감소하고 있는 추세이다.
지금부터 EKS 구축 방법에 대해 알아보도록 하자. EKS는 크게 두가지 방법으로 구성해 볼 수 있다.
- EKS AWS Console 사용
- EKS CloudFormation 사용
기존 AWS Console을 활용한 구성 방법은 많은 웹사이트에서 소개되고 있어 이번에는 CloudFormation을 활용한 CLI 기반으로 구성해 보도록 하자.
EKS 구성과정
구성 과정은 크게 다음과 같이 구분해 볼 수 있다.
1) EKS VPC Network 구성
2) EKS Workstation Server 구성
3) EKS Cluster를 위한 IAM 구성
4) EKS Control Plane & Worker Node 구성 ← 여기까지 10 ~ 15분 (+ 설치 시간 10분) : 총 20 ~ 25분
5) ALB Ingress Controller 구성
6) Application 배포 및 테스트 ← 약 30분 소요
7) EFS Persistent Volume 생성 및 연동
EKS VPC Network 구성
먼저 EKS 구성을 위한 기반 VPC Network를 구성한다.
VPC 네트워크는 하나하나 직접 구축하는 것을 권장하지만, 어느 정도 익숙한 Admin의 경우 다음 URL에서 확인할 수 있는 AWS에서 공식으로 제공하는 Sample VPC를 적용하는 것도 하나의 방법이다.
Download URL : docs.aws.amazon.com/eks/latest/userguide/create-public-private-vpc.html
> amazon-eks.s3.us-west-2.amazonaws.com/cloudformation/2020-08-12/amazon-eks-vpc-sample.yaml
현재 기준 최신 amazon-eks-vpc-sample.yaml 파일이다.
이를 다음과 같이 CloudFormation을 활용하여 적용한다.
# CloudFormation > 스택 > 스택 생성
1) 템플릿 지정

다음과 같이 준비된 템플릿 > Amazon S3 URL > Amazon S3 URL 입력창 (https://amazon-eks.s3.us-west-2.amazonaws.com/cloudformation/2020-08-12/amazon-eks-vpc-sample.yaml) > 다음 버튼
2) 스택 세부 정보 지정
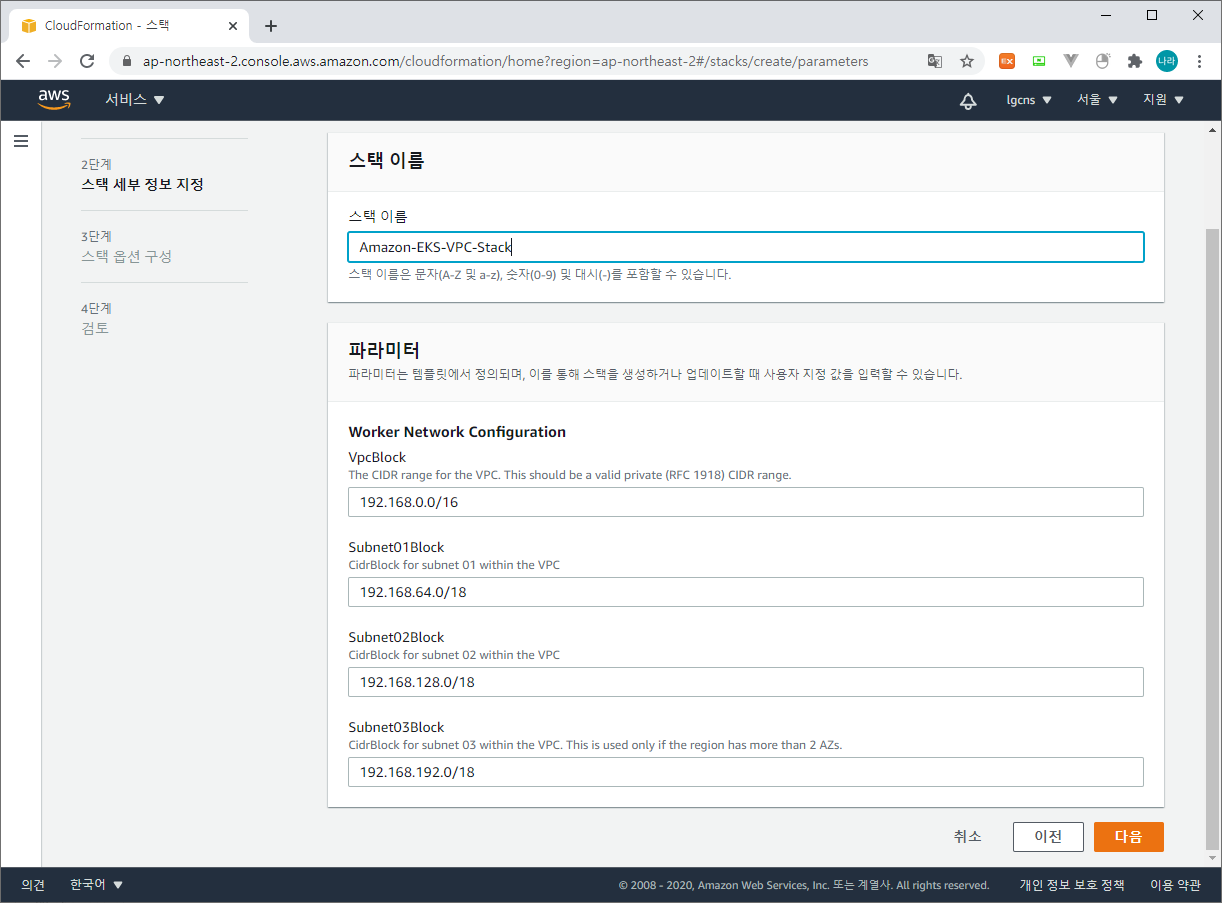
스택 이름과 Worker Network의 VPCBlock & Subnet Block을 지정한다.
그 밖에 태그 지정 등을 통해 스택 생성을 클릭하면 CloudFormation에 정의한데로 VPC가 생성된다.

본 CloudFormation을 통해 정의되는 VPC 서비스는 다음과 같다.
- InternetGateway
- VPC
- RouteTable
- SecurityGroup
- VPCGateway
- Subnet
- Route
EKS Workstation Server 구성
다음으로 동일 VPC 대역에 존재하는 Workstation EC2 Server를 구성한다.
앞서 구성한 VPC와 동일 네트워크로 구성하는 이유는 이후 Control Plane에 접속하여 kubectl 등의 명령을 수행하기 위함이다.
EC2 생성 방법은 본 장에서는 다루지 않도록 한다.
다만 Workstation Server에 이것저것 테스트 용도로 이후 많은 모듈들이 설치가 될 예정인데 이때 초기 구성한 디스크 볼륨이 부족한 경우가 발생할 수 있다.
따라서 간단히 EC2의 디스크 증설이 필요한 경우 어떻게 조치하는지 살펴보고 넘어가도록 하자.
1) EC2 스토리지 증설
EC2 > 스토리지 탭 > 스토리지 선택 > 작업 > 볼륨 수정


증설하고자 하는 EC2 인스턴스의 스토리지를 선택한다. 선택한 스토리지를 수정하기 위해 볼륨 수정을 선택한다.
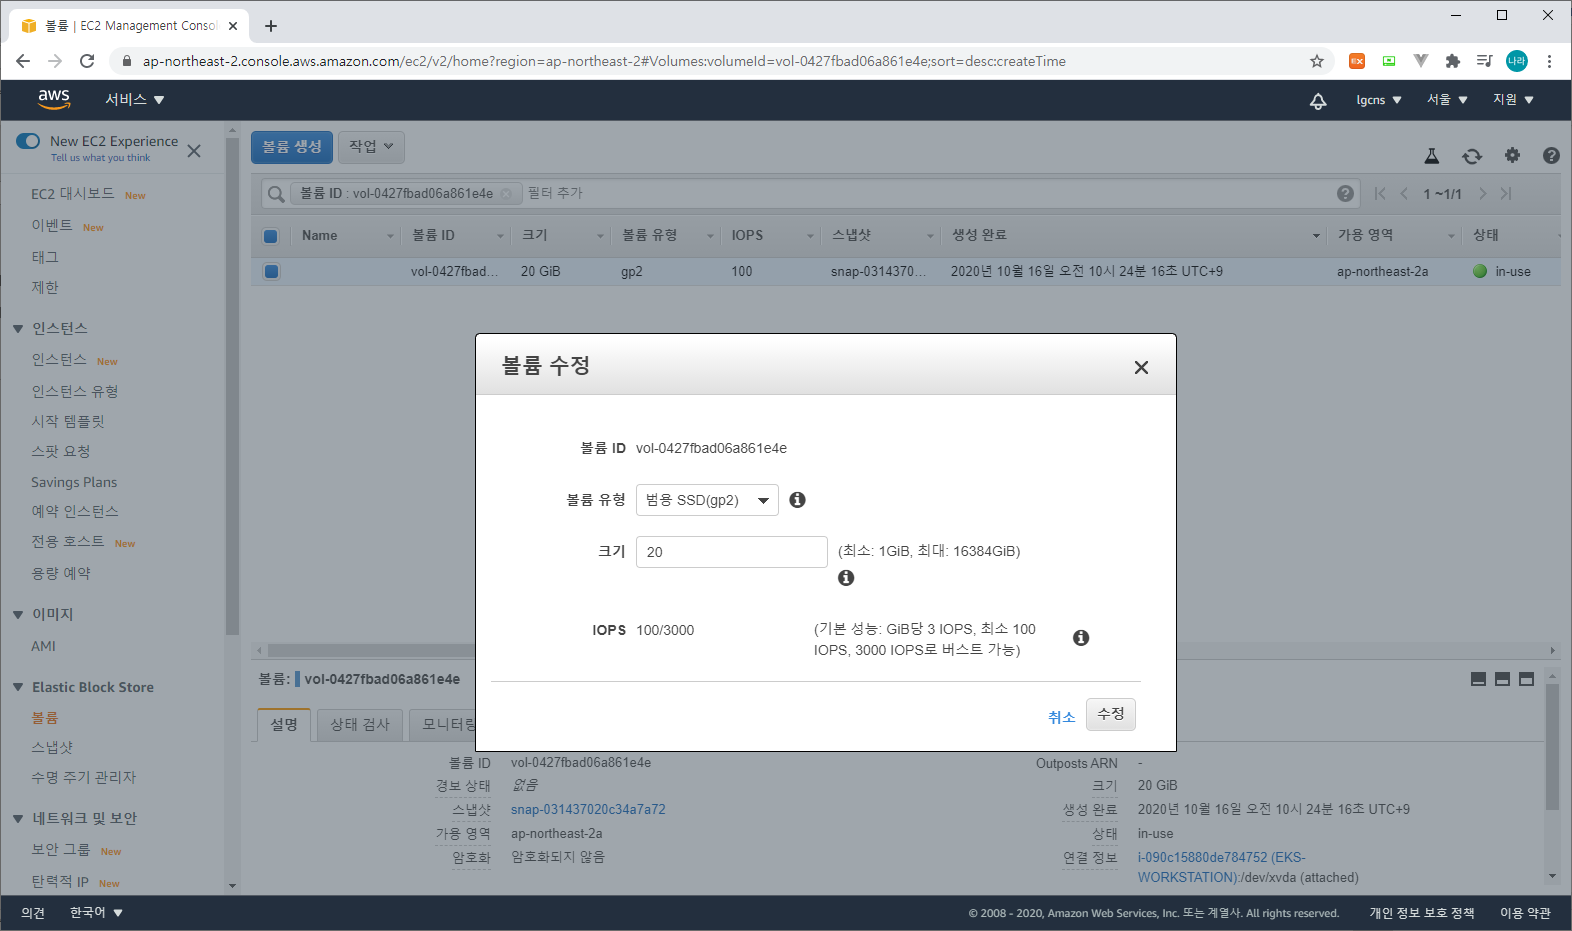
볼륨은 초기 구성한 크기보자 작게 줄일 수는 없으며, 할당 가능한 범위 내에서 증설하고자하는 디스크 사이즈를 입력한다.


2) 증설된 스토리지 반영
EC2에 접속하여 아래와 같이 스토리지를 반영한다. 먼저 df -hT를 이용해 볼륨의 파일시스템을 확인하고 lsblk 명령어로 현재 파티션을 확인한다.
[ec2-user@ip-192-168-114-198 ~]$ df -hT
Filesystem     Type      Size  Used Avail Use% Mounted on
devtmpfs       devtmpfs  474M     0  474M   0% /dev
tmpfs          tmpfs     492M     0  492M   0% /dev/shm
tmpfs          tmpfs     492M  400K  492M   1% /run
tmpfs          tmpfs     492M     0  492M   0% /sys/fs/cgroup
/dev/xvda1     xfs        20G  2.3G   18G  12% /
tmpfs          tmpfs      99M     0   99M   0% /run/user/1000
[ec2-user@ip-192-168-114-198 ~]$ lsblk
NAME    MAJ:MIN RM SIZE RO TYPE MOUNTPOINT
xvda    202:0    0  30G  0 disk
붴xvda1 202:1    0  20G  0 part /
[ec2-user@ip-192-168-114-198 ~]$
위와 같이 루트파티션인 /dev/xvda1 파일시스템은 20G 할당되어 있는 것을 볼 수 있으며, 파티션으로 xvda에 30G로 증설되어 있는것을 볼 수 있다.
[ec2-user@ip-192-168-114-198 ~]$ sudo growpart /dev/xvda 1
CHANGED: partition=1 start=4096 old: size=41938911 end=41943007 new: size=62910431 end=62914527
[ec2-user@ip-192-168-114-198 ~]$ sudo xfs_growfs -d /
meta-data=/dev/xvda1             isize=512    agcount=11, agsize=524159 blks
         =                       sectsz=512   attr=2, projid32bit=1
         =                       crc=1        finobt=1 spinodes=0
data     =                       bsize=4096   blocks=5242363, imaxpct=25
         =                       sunit=0      swidth=0 blks
naming   =version 2              bsize=4096   ascii-ci=0 ftype=1
log      =internal               bsize=4096   blocks=2560, version=2
         =                       sectsz=512   sunit=0 blks, lazy-count=1
realtime =none                   extsz=4096   blocks=0, rtextents=0
data blocks changed from 5242363 to 7863803
[ec2-user@ip-192-168-114-198 ~]$
growpart와 xfs_growfs 명령어를 이용하여 루트볼륨의 파티션을 확장한다.
[ec2-user@ip-192-168-114-198 ~]$ df -hT
Filesystem     Type      Size  Used Avail Use% Mounted on
devtmpfs       devtmpfs  474M     0  474M   0% /dev
tmpfs          tmpfs     492M     0  492M   0% /dev/shm
tmpfs          tmpfs     492M  408K  492M   1% /run
tmpfs          tmpfs     492M     0  492M   0% /sys/fs/cgroup
/dev/xvda1     xfs        30G  2.4G   28G   8% /
tmpfs          tmpfs      99M     0   99M   0% /run/user/1000
[ec2-user@ip-192-168-114-198 ~]$ lsblk
NAME    MAJ:MIN RM SIZE RO TYPE MOUNTPOINT
xvda    202:0    0  30G  0 disk
붴xvda1 202:1    0  30G  0 part /
[ec2-user@ip-192-168-114-198 ~]$
확장된 파일시스템을 확인한다. 위와 같이 /dev/xvda1 파일시스템이 30G로 증설된 것을 확인할 수 있다.
EKS Cluster를 위한 IAM 구성
IAM은 크게 4가지 서비스를 구성해야 한다.
구성 순서는 다음과 같이 진행한다. (역할 > 정책 > 그룹 > 사용자)
각각 구성된 기반 정보를 기반으로 최종 사용자에게 역할과 정책이 부여되는 방식이다.
1) 역할 생성
역할은 ControlPlane을 위한 용도와 WorkerNode를 위한 용도 총 2개를 생성한다.
먼저 ControlPlane을 위한 EKS-ControlPlane-Role이다.
IAM > 역할 > 역할 만들기 > EKS > 사용 사례 선택 - EKS Cluster

다음으로 WorkerNode를 위한 EKS-WorkerNode-Role이다.
IAM > 역할 > 역할 만들기 > EC2 > 사용 사례 선택 - EC2

WorkerNode를 위한 Role의 경우 위 AmazonEKSWorkerNodePolicy, AmazonEC2ContainerRegistryReadOnly, AmazonEKS_CNI_Policy를 추가해 준다.
2) 정책 추가
다음으로 eks iam과 access를 위한 정책을 추가한다.
먼저 POLICY-EKS-IAM-ACCESS이다.
{
    "Version": "2012-10-17",
    "Statement": [
        {
            "Effect": "Allow",
            "Action": [
                "iam:CreateInstanceProfile",
                "iam:DeleteInstanceProfile",
                "iam:GetInstanceProfile",
                "iam:RemoveRoleFromInstanceProfile",
                "iam:GetRole",
                "iam:CreateRole",
                "iam:DeleteRole",
                "iam:AttachRolePolicy",
                "iam:PutRolePolicy",
                "iam:ListInstanceProfiles",
                "iam:AddRoleToInstanceProfile",
                "iam:ListInstanceProfilesForRole",
                "iam:PassRole",
                "iam:DetachRolePolicy",
                "iam:DeleteRolePolicy",
                "iam:GetRolePolicy",
                "iam:GetOpenIDConnectProvider",
                "iam:CreateOpenIDConnectProvider",
                "iam:DeleteOpenIDConnectProvider",
                "iam:ListAttachedRolePolicies",
                "iam:TagRole"
            ],
            "Resource": [
                "arn:aws:iam::104818303680:instance-profile/eksctl-*",
                "arn:aws:iam::104818303680:role/eksctl-*",
                "arn:aws:iam::104818303680:oidc-provider/*",
                "arn:aws:iam::104818303680:role/aws-service-role/eks-nodegroup.amazonaws.com/AWSServiceRoleForAmazonEKSNodegroup",
                "arn:aws:iam::104818303680:role/eksctl-managed-*",
                "arn:aws:iam::104818303680:role/EKS-*"
                                                                                                                             ]
        },
        {
            "Effect": "Allow",
            "Action": [
                "iam:GetRole"
            ],
            "Resource": [
                "arn:aws:iam::104818303680:role/*"
            ]
        },
        {
            "Effect": "Allow",
            "Action": [
                "iam:CreateServiceLinkedRole"
            ],
            "Resource": "*",
            "Condition": {
                "StringEquals": {
                    "iam:AWSServiceName": [
                        "eks.amazonaws.com",
                        "eks-nodegroup.amazonaws.com",
                        "eks-fargate.amazonaws.com"
                    ]
                }
            }
        }
    ]
}
위 IAM 중 arn:aws:iam::aws사용자계정id:role/EKS-*는 앞서 추가한 EKS 관련 역할을 등록하는 구문이다.
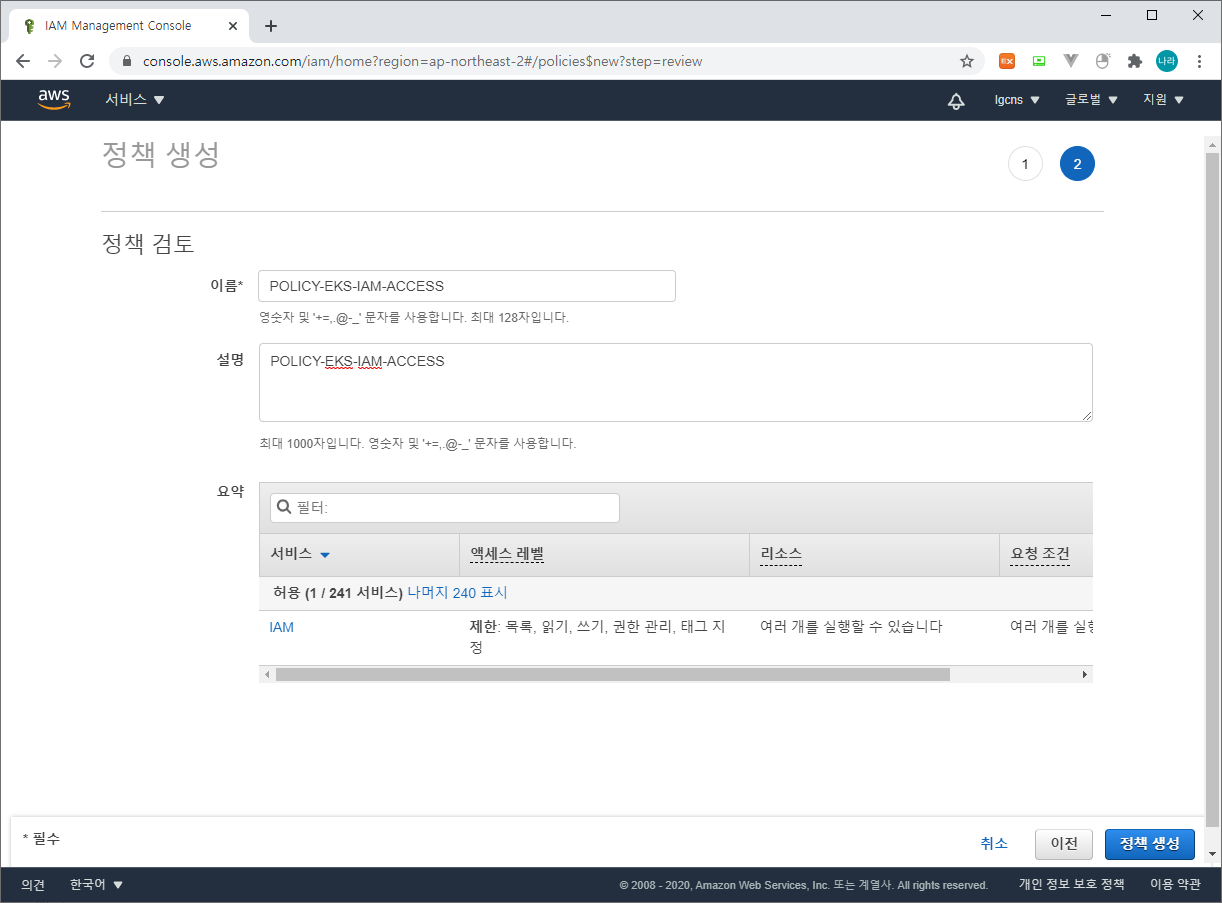
다음으로 POLICY-EKS-FULL-ACCESS이다.
{
    "Version": "2012-10-17",
    "Statement": [
        {
            "Effect": "Allow",
            "Action": "eks:*",
            "Resource": "*"
        },
        {
            "Action": [
                "ssm:GetParameter",
                "ssm:GetParameters"
            ],
            "Resource": [
                "arn:aws:ssm:*:104818303680:parameter/aws/*",
                "arn:aws:ssm:*::parameter/aws/*"
            ],
            "Effect": "Allow"
        },
        {
            "Action": [
                "kms:CreateGrant",
                "kms:DescribeKey"
            ],
            "Resource": "*",
            "Effect": "Allow"
        }
    ]
}
마찬가지로 정책을 등록해 준다.
3) 그룹 생성
다음으로 그룹이다. 사용자에게 직접 매핑해도 상관없지만, 추가되는 또 다른 접근권한이 필요한 사용자를 위해 그룹을 생성해 두도록 하자.

그룹에는 다음과 같이 AmazonEC2FullAccess, AWSCloudFormationFullAccess 그리고 앞서 생성한 정책 두개를 연결한다.
4) 사용자 생성
마지막으로 EKS Cluster를 생성할 사용자 계정을 생성한다.
사용자는 앞서 생성한 EKS-Group을 참조하여 다음과 같이 동일한 정책이 연결되도록 구성한다.

EKS Control Plane & Worker Node 구성
이제 VPC, Workstation Server, IAM이 준비가 완료되었으니, 마지막으로 EKS를 구축해 보자.
EKS는 대체로 완전 관리형 서비스인 ControlPlane은 AWS 대시보드에서 생성하고, Worker Node는 CloudFormation으로 구성하는 경우가 많지만, 본 장에서는 ControlPlane + Worker Node 구성을 One Step으로 동작하게 하는 CloudFormation을 활용해 보도록 하자.
본 작업은 앞서 생성한 Workstation 서버에서 실행한다.
1) aws configure
먼저 aws configure를 등록하여 (AWS Access Key / AWS Secret Access Key) AWS 서비스에 접근할 수 있도록 아래와 같이 등록한다.
[root@ip-192-168-96-117 ~]# aws configure
AWS Access Key ID [****************ZEOE]:
AWS Secret Access Key [****************HMLJ]:
Default region name [ap-northeast-2]:
Default output format [json]:
[root@ip-192-168-96-117 ~]#
AWS Access Key는 IAM > 사용자 > 보안 자격 증명에서 언제든지 확인할 수 있지만, AWS Secret Access Key는 생성 시점에 다운로드 받을 수 있는 CSV 파일에서만 확인이 가능하다. 만약 분실했다면, 엑세스 키 만들기를 통해 재 발급이 가능하다.
2) eks-cluster.yaml (CloudFormation) 작성
apiVersion: eksctl.io/v1alpha5
kind: ClusterConfig
metadata:
    name: NRSON-EKS-CLUSTER
    region: ap-northeast-2
vpc:
    id: "vpc-0693a88dd61d9230c"
    cidr: "192.168.0.0/16"
    subnets:
        private:
            ap-northeast-2a:
                id: "subnet-099ed985684ff4e14"
                cidr: "192.168.64.0/18"
            ap-northeast-2b:
                id: "subnet-0fd761039885db0a7"
                cidr: "192.168.128.0/18"
    nat:
        gateway: Disable
    clusterEndpoints:
        publicAccess: false
        privateAccess: true
iam:
    serviceRoleARN: "arn:aws:iam::104818303680:role/EKS-ControlPlane-Role"
managedNodeGroups:
    - name: EKS-NODE
      instanceType: m5.large
      instanceName: NRSON-EKS-CLUSTER-WORKER
      minSize: 2
      desiredCapacity: 2
      maxSize: 4
      availabilityZones: ["ap-northeast-2a", "ap-northeast-2b"]
      volumeSize: 30
      privateNetworking: true
      ssh:
        allow: false
      labels: {role: worker}
      iam:
        instanceRoleARN: "arn:aws:iam::104818303680:role/EKS-WORKERNODE-ROLE"
- vpc.id : 앞서 구성한 VPCID를 입력한다.
- vpc.cidr : 해당 VPC의 CIDR을 입력한다.
- vpc.subnets.private : private subnet을 등록한다. 각각 해당하는 az, subnet id, cidr을 올바르게 입력한다.
- vpc.nat : 사전 구성되어 있는 NAT Gateway가 있을 경우 Disable한다.
- iam.serviceRoleARN : ContolPlane을 구성하기 위해 앞서 구성한 EKS-ControlPlane-Role의 arn을 등록한다.
- managedNodeGroups : nodegroup에 대한 인스턴스 이름, 형태, min/desired/max 값을 지정할 수 있다. 그 밖에 ssh 접속 허용할지 여부를 결정하는 ssh.allow와 instanceRoleARN에는 WorkerNode를 구성하기 위해 앞서 구성한 EKS-WorkerNode-Role의 arn을 등록한다.
# 참조
Worker Node에 SSH 접속을 허용할 경우 managedNodeGroups의 ssh를 다음과 같이 수정한다.
managedNodeGroups:
    - name: EKS-NODE
      instanceType: m5.large
      instanceName: NRSON-EKS-CLUSTER-WORKER
      minSize: 2
      desiredCapacity: 2
      maxSize: 4
      availabilityZones: ["ap-northeast-2a", "ap-northeast-2b"]
      volumeSize: 30
      privateNetworking: true
      ssh:
        allow: true
        publicKeyPath: ~/.ssh/id_rsa.pub
        sourceSecurityGroupIds: ["sg-06bfff76c7d537079"]
      labels: {role: worker}
      iam:
        instanceRoleARN: "arn:aws:iam::104818303680:role/EKS-WORKERNODE-ROLE"
managedNodeGroups.allow : true
managedNodeGroups.publicKeyPath : ssh-keygen으로 생성한 public key 파일
[ec2-user@ip-192-168-114-198 ~]$ ssh-keygen -t rsa
Generating public/private rsa key pair.
Enter file in which to save the key (/home/ec2-user/.ssh/id_rsa):
Enter passphrase (empty for no passphrase):
Enter same passphrase again:
Your identification has been saved in /home/ec2-user/.ssh/id_rsa.
Your public key has been saved in /home/ec2-user/.ssh/id_rsa.pub.
The key fingerprint is:
SHA256:1sc1zqZnx33A3bXr28PqiOw9sDZheE2OG8bLJpWgSwU ec2-user@ip-192-168-114-198.ap-northeast-2.compute.internal
The key's randomart image is:
+---[RSA 2048]----+
|                 |
|     E           |
|      .       o .|
|       o . o = o+|
|      o S B o *.o|
|     o o % + o oo|
|    . . * B . +.=|
|     . ..Oo..o.+o|
|        =+.ooo.o+|
+----[SHA256]-----+
[ec2-user@ip-192-168-114-198 ~]$
managedNodeGroups.sourceSecurityGroupIds : ssh로 접근할 bastion server의 보안 그룹
[root@ip-192-168-114-198 ~]# ssh -i .ssh/id_rsa ec2-user@192.168.159.99
The authenticity of host '192.168.159.99 (192.168.159.99)' can't be established.
ECDSA key fingerprint is SHA256:htdaOSB230AYDhQFZ4qa1ogH0rfSSPhXvCc70vMu4Ro.
ECDSA key fingerprint is MD5:90:de:7d:76:8d:11:a7:57:c9:12:68:19:92:e3:40:6b.
Are you sure you want to continue connecting (yes/no)? yes
Warning: Permanently added '192.168.159.99' (ECDSA) to the list of known hosts.
Last login: Wed Oct  7 19:05:48 2020 from 205.251.233.50

       __|  __|_  )
       _|  (     /   Amazon Linux 2 AMI
      ___|\___|___|

https://aws.amazon.com/amazon-linux-2/
24 package(s) needed for security, out of 26 available
Run "sudo yum update" to apply all updates.
[ec2-user@ip-192-168-159-99 ~]$
위와 같이 구성 후 EKS CLUSTER를 구성하면 ssh로 Worker Node에 접근할 수 있다. .ssh/id_rsa는 pem 파일로 Private key이며, publicKey는 EKS CLUSTER 구축 시 각 워커 노드에 적용되도록 구성해 두었다.
3) eksctl 설치
eksctl은 다음과 같이 설치가 가능하다.
[root@ip-192-168-96-117 ~]# curl --silent --location "https://github.com/weaveworks/eksctl/releases/latest/download/eksctl_$(uname -s)_amd64.tar.gz" | tar xz -C /tmp
[root@ip-192-168-96-117 ~]# sudo mv /tmp/eksctl /usr/local/bin
[root@ip-192-168-96-117 ~]# eksctl version
0.29.2
[root@ip-192-168-96-117 ~]#
4) kubectl 설치
kubectl은 다음과 같이 설치가 가능하다.
[root@ip-192-168-96-117 ~]# curl -o kubectl https://amazon-eks.s3.us-west-2.amazonaws.com/1.17.9/2020-08-04/bin/linux/amd64/kubectl
  % Total    % Received % Xferd  Average Speed   Time    Time     Time  Current
                                 Dload  Upload   Total   Spent    Left  Speed
100 56.6M  100 56.6M    0     0  7366k      0  0:00:07  0:00:07 --:--:-- 9140k
[root@ip-192-168-96-117 ~]# chmod +x ./kubectl
[root@ip-192-168-96-117 ~]# sudo mv ./kubectl /usr/local/bin
[root@ip-192-168-96-117 ~]# kubectl version --short --client
Client Version: v1.17.9-eks-4c6976
[root@ip-192-168-96-117 ~]#
5) eksctl create
이제 모든 준비가 완료되었으니 Cluster를 생성해 보도록 하자.
생성 방법은 앞서 설치한 eksctl을 활용한다.
(eksctl create cluster -f eks-cluster.yaml)
[root@ip-192-168-96-117 ~]# eksctl create cluster -f eks-cluster.yaml
[  eksctl version 0.29.2
[  using region ap-northeast-2
[!]  warning, having public access disallowed will subsequently interfere with some features of eksctl. This will require running subsequent eksctl (and Kubernetes) commands/API calls from within the VPC.  Running these in the VPC requires making updates to some AWS resources.  See: https://docs.aws.amazon.com/eks/latest/userguide/cluster-endpoint.html#private-access for more details
[  using existing VPC (vpc-0693a88dd61d9230c) and subnets (private:[subnet-099ed985684ff4e14 subnet-0fd761039885db0a7] public:[])
[!]  custom VPC/subnets will be used; if resulting cluster doesn't function as expected, make sure to review the configuration of VPC/subnets
[  using Kubernetes version 1.17
[  creating EKS cluster "NRSON-EKS-CLUSTER" in "ap-northeast-2" region with managed nodes
[  1 nodegroup (EKS-NODE) was included (based on the include/exclude rules)
[  will create a CloudFormation stack for cluster itself and 0 nodegroup stack(s)
[  will create a CloudFormation stack for cluster itself and 1 managed nodegroup stack(s)
[  if you encounter any issues, check CloudFormation console or try 'eksctl utils describe-stacks --region=ap-northeast-2 --cluster=NRSON-EKS-CLUSTER'
[  CloudWatch logging will not be enabled for cluster "NRSON-EKS-CLUSTER" in "ap-northeast-2"
[  you can enable it with 'eksctl utils update-cluster-logging --enable-types={SPECIFY-YOUR-LOG-TYPES-HERE (e.g. all)} --region=ap-northeast-2 --cluster=NRSON-EKS-CLUSTER'
[  Kubernetes API endpoint access will use provided values {publicAccess=false, privateAccess=true} for cluster "NRSON-EKS-CLUSTER" in "ap-northeast-2"
[  2 sequential tasks: { create cluster control plane "NRSON-EKS-CLUSTER", 2 sequential sub-tasks: { update cluster VPC endpoint access configuration, create managed nodegroup "EKS-NODE" } }
[  building cluster stack "eksctl-NRSON-EKS-CLUSTER-cluster"
[  deploying stack "eksctl-NRSON-EKS-CLUSTER-cluster"
[  building managed nodegroup stack "eksctl-NRSON-EKS-CLUSTER-nodegroup-EKS-NODE"
[  deploying stack "eksctl-NRSON-EKS-CLUSTER-nodegroup-EKS-NODE"
[  waiting for the control plane availability...
[  saved kubeconfig as "/root/.kube/config"
[  no tasks
[  all EKS cluster resources for "NRSON-EKS-CLUSTER" have been created
[  nodegroup "EKS-NODE" has 2 node(s)
[  node "ip-192-168-141-85.ap-northeast-2.compute.internal" is ready
[  node "ip-192-168-66-136.ap-northeast-2.compute.internal" is ready
[  waiting for at least 2 node(s) to become ready in "EKS-NODE"
[  nodegroup "EKS-NODE" has 2 node(s)
[  node "ip-192-168-141-85.ap-northeast-2.compute.internal" is ready
[  node "ip-192-168-66-136.ap-northeast-2.compute.internal" is ready
[  kubectl command should work with "/root/.kube/config", try 'kubectl get nodes'
[  EKS cluster "NRSON-EKS-CLUSTER" in "ap-northeast-2" region is ready
[root@ip-192-168-96-117 ~]#
대체로 AWS 환경이 익숙하신 분들은 여기까지 약 10~15분 정도 소요될 것이다. 이후 클러스터는 환경에 따라 차이는 있지만, 대략 10여분 정도 생성 시간이 소요된다.
6) EKS ControlPlane Security Group 인바운드 규칙 추가

클러스터가 구성되는 동안 자동으로 추가되는 EKS ControlPlane의 Secutiry Group에 인바운드 443 포트를 Workstation Server의 Security Group으로 등록한다. 해당 포트는 ControlPlane & Worker Node가 모두 구성된 이후 Workstation Server에서 ControlPlane으로 API Call을 수행할 수 있도록 하는 포트이다.
7) EKS Cluster 설치 확인
설치 확인은 AWS Console을 통한 확인과 kubectl 명령어를 통한 확인으로 구분하여 볼 수 있다.
먼저 AWS Console > CloudFormation을 확인해 보자.


위와 같이 ControlPlane & NodeGroup이 각각 CloudFormation으로 생성된 것을 확인할 수 있다.
다음으로 EKS Cluster이다.
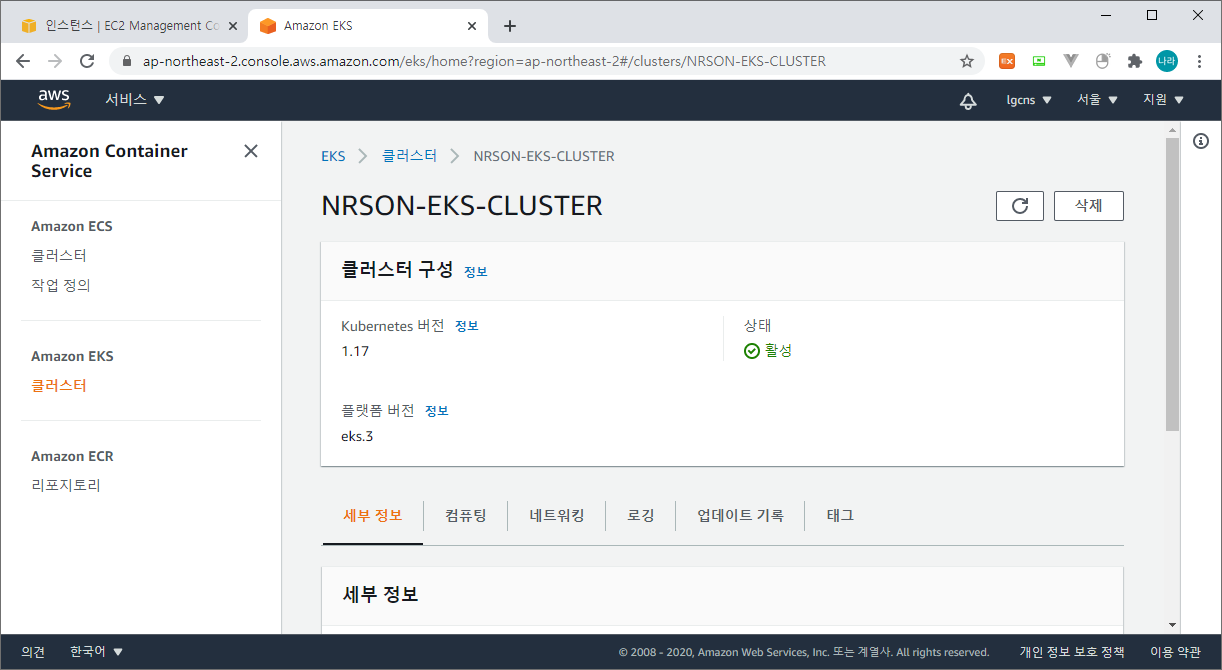
위와 같이 NRSON-EKS-CLUSTER가 활성 상태로 기동되어 있다.
마지막으로 kubectl 명령어로 EKS Node 상태를 확인해 보도록 하자.
[root@ip-192-168-96-117 ~]# kubectl get nodes
NAME                                                STATUS   ROLES    AGE     VERSION
ip-192-168-141-85.ap-northeast-2.compute.internal   Ready    <none>   8m30s   v1.17.11-eks-cfdc40
ip-192-168-66-136.ap-northeast-2.compute.internal   Ready    <none>   8m51s   v1.17.11-eks-cfdc40
[root@ip-192-168-96-117 ~]#
위와 같이 일반 private cloud의 kubernetes와 달리 worker node의 상태만 확인이 가능하다. EKS는 AWS에서 Master Node를 관리하는 완전관리형 서비스로 Master Node에 대한 접근 등은 수행할 수 없다.
ALB Ingress Controller 구성
Amazon EKS는 기본으로 Ingress Controller를 ALB로 사용한다.
1) IAM OIDC Provider 연결
먼저 이후 구성 편의를 위한 CLUSTER_NAME과 AWS_REGION을 환경변수로 등록한 후 클러스터에 대한 OIDC(OpenID Connect) 자격 증명 공급자를 만든다.
[root@ip-192-168-114-198 ~]# export CLUSTER_NAME=NRSON-EKS-CLUSTER
[root@ip-192-168-114-198 ~]# export AWS_REGION=ap-northeast-2
[root@ip-192-168-114-198 ~]# eksctl utils associate-iam-oidc-provider --region=$AWS_REGION --cluster $CLUSTER_NAME --approve
[  eksctl version 0.29.2
[  using region ap-northeast-2
[  will create IAM Open ID Connect provider for cluster "NRSON-EKS-CLUSTER" in "ap-northeast-2"
[  created IAM Open ID Connect provider for cluster "NRSON-EKS-CLUSTER" in "ap-northeast-2"
[root@ip-192-168-114-198 ~]#
2) POLICY 생성
EKS ALB Ingress Controller를 기동하기 위한 Policy를 생성한다.POLICY-EKS-IAM
{
  "Version": "2012-10-17",
  "Statement": [
    {
      "Effect": "Allow",
      "Action": [
        "acm:DescribeCertificate",
        "acm:ListCertificates",
        "acm:GetCertificate"
      ],
      "Resource": "*"
    },
    {
      "Effect": "Allow",
      "Action": [
        "ec2:AuthorizeSecurityGroupIngress",
        "ec2:CreateSecurityGroup",
        "ec2:CreateTags",
        "ec2:DeleteTags",
        "ec2:DeleteSecurityGroup",
        "ec2:DescribeAccountAttributes",
        "ec2:DescribeAddresses",
        "ec2:DescribeInstances",
        "ec2:DescribeInstanceStatus",
        "ec2:DescribeInternetGateways",
        "ec2:DescribeNetworkInterfaces",
        "ec2:DescribeSecurityGroups",
        "ec2:DescribeSubnets",
        "ec2:DescribeTags",
        "ec2:DescribeVpcs",
        "ec2:ModifyInstanceAttribute",
        "ec2:ModifyNetworkInterfaceAttribute",
        "ec2:RevokeSecurityGroupIngress"
      ],
      "Resource": "*"
    },
    {
      "Effect": "Allow",
      "Action": [
        "elasticloadbalancing:AddListenerCertificates",
        "elasticloadbalancing:AddTags",
        "elasticloadbalancing:CreateListener",
        "elasticloadbalancing:CreateLoadBalancer",
        "elasticloadbalancing:CreateRule",
        "elasticloadbalancing:CreateTargetGroup",
        "elasticloadbalancing:DeleteListener",
        "elasticloadbalancing:DeleteLoadBalancer",
        "elasticloadbalancing:DeleteRule",
        "elasticloadbalancing:DeleteTargetGroup",
        "elasticloadbalancing:DeregisterTargets",
        "elasticloadbalancing:DescribeListenerCertificates",
        "elasticloadbalancing:DescribeListeners",
        "elasticloadbalancing:DescribeLoadBalancers",
        "elasticloadbalancing:DescribeLoadBalancerAttributes",
        "elasticloadbalancing:DescribeRules",
        "elasticloadbalancing:DescribeSSLPolicies",
        "elasticloadbalancing:DescribeTags",
        "elasticloadbalancing:DescribeTargetGroups",
        "elasticloadbalancing:DescribeTargetGroupAttributes",
        "elasticloadbalancing:DescribeTargetHealth",
        "elasticloadbalancing:ModifyListener",
        "elasticloadbalancing:ModifyLoadBalancerAttributes",
        "elasticloadbalancing:ModifyRule",
        "elasticloadbalancing:ModifyTargetGroup",
        "elasticloadbalancing:ModifyTargetGroupAttributes",
        "elasticloadbalancing:RegisterTargets",
        "elasticloadbalancing:RemoveListenerCertificates",
        "elasticloadbalancing:RemoveTags",
        "elasticloadbalancing:SetIpAddressType",
        "elasticloadbalancing:SetSecurityGroups",
        "elasticloadbalancing:SetSubnets",
        "elasticloadbalancing:SetWebAcl"
      ],
      "Resource": "*"
    },
    {
      "Effect": "Allow",
      "Action": [
        "iam:CreateServiceLinkedRole",
        "iam:GetServerCertificate",
        "iam:ListServerCertificates"
      ],
      "Resource": "*"
    },
    {
      "Effect": "Allow",
      "Action": [
        "cognito-idp:DescribeUserPoolClient"
      ],
      "Resource": "*"
    },
    {
      "Effect": "Allow",
      "Action": [
        "waf-regional:GetWebACLForResource",
        "waf-regional:GetWebACL",
        "waf-regional:AssociateWebACL",
        "waf-regional:DisassociateWebACL"
      ],
      "Resource": "*"
    },
    {
      "Effect": "Allow",
      "Action": [
        "tag:GetResources",
        "tag:TagResources"
      ],
      "Resource": "*"
    },
    {
      "Effect": "Allow",
      "Action": [
        "waf:GetWebACL"
      ],
      "Resource": "*"
    },
    {
      "Effect": "Allow",
      "Action": [
        "wafv2:GetWebACL",
        "wafv2:GetWebACLForResource",
        "wafv2:AssociateWebACL",
        "wafv2:DisassociateWebACL"
      ],
      "Resource": "*"
    },
    {
      "Effect": "Allow",
      "Action": [
        "shield:DescribeProtection",
        "shield:GetSubscriptionState",
        "shield:DeleteProtection",
        "shield:CreateProtection",
        "shield:DescribeSubscription",
        "shield:ListProtections"
      ],
      "Resource": "*"
    }
  ]
}
3) 권한 부여를 위한 RBAC를 생성한다.
alb-ingress-controller-rbac.yaml
---
apiVersion: rbac.authorization.k8s.io/v1
kind: ClusterRole
metadata:
  labels:
    app.kubernetes.io/name: alb-ingress-controller
  name: alb-ingress-controller
rules:
  - apiGroups:
      - ""
      - extensions
    resources:
      - configmaps
      - endpoints
      - events
      - ingresses
      - ingresses/status
      - services
      - pods/status
    verbs:
      - create
      - get
      - list
      - update
      - watch
      - patch
  - apiGroups:
      - ""
      - extensions
    resources:
      - nodes
      - pods
      - secrets
      - services
      - namespaces
    verbs:
      - get
      - list
      - watch
---
apiVersion: rbac.authorization.k8s.io/v1
kind: ClusterRoleBinding
metadata:
  labels:
    app.kubernetes.io/name: alb-ingress-controller
  name: alb-ingress-controller
roleRef:
  apiGroup: rbac.authorization.k8s.io
  kind: ClusterRole
  name: alb-ingress-controller
subjects:
  - kind: ServiceAccount
    name: alb-ingress-controller
    namespace: kube-system
---
apiVersion: v1
kind: ServiceAccount
metadata:
  labels:
    app.kubernetes.io/name: alb-ingress-controller
  name: alb-ingress-controller
  namespace: kube-system
...
다음과 같이 반영한다.
[root@ip-192-168-114-198 ~]# kubectl apply -f alb-ingress-controller-rbac.yaml
clusterrole.rbac.authorization.k8s.io/alb-ingress-controller created
clusterrolebinding.rbac.authorization.k8s.io/alb-ingress-controller created
serviceaccount/alb-ingress-controller created
[root@ip-192-168-114-198 ~]#
4) IAM 연결
앞서 생성한 POLICY-EKS-IAM 정책을 ALB Ingress Contoller와 연결한다.
[root@ip-192-168-114-198 ~]# eksctl create iamserviceaccount --region $AWS_REGION --name alb-ingress-controller --namespace kube-system --cluster $CLUSTER_NAME --attach-policy-arn arn:aws:iam::104818303680:policy/POLICY-EKS-IAM --override-existing-serviceaccounts --approve
[  eksctl version 0.29.2
[  using region ap-northeast-2
[  2 iamserviceaccounts (kube-system/alb-ingress-controller, kube-system/aws-node) were included (based on the include/exclude rules)
[!]  metadata of serviceaccounts that exist in Kubernetes will be updated, as --override-existing-serviceaccounts was set
[  2 parallel tasks: { 2 sequential sub-tasks: { create IAM role for serviceaccount "kube-system/alb-ingress-controller", create serviceaccount "kube-system/alb-ingress-controller" }, 2 sequential sub-tasks: { create IAM role for serviceaccount "kube-system/aws-node", create serviceaccount "kube-system/aws-node" } }
[  building iamserviceaccount stack "eksctl-NRSON-EKS-CLUSTER-addon-iamserviceaccount-kube-system-aws-node"
[  building iamserviceaccount stack "eksctl-NRSON-EKS-CLUSTER-addon-iamserviceaccount-kube-system-alb-ingress-controller"
[  deploying stack "eksctl-NRSON-EKS-CLUSTER-addon-iamserviceaccount-kube-system-alb-ingress-controller"
[  deploying stack "eksctl-NRSON-EKS-CLUSTER-addon-iamserviceaccount-kube-system-aws-node"
[  serviceaccount "kube-system/aws-node" already exists
[  updated serviceaccount "kube-system/aws-node"
[  serviceaccount "kube-system/alb-ingress-controller" already exists
[  updated serviceaccount "kube-system/alb-ingress-controller"
[root@ip-192-168-114-198 ~]#
5) alb ingress controller 배포
alb-ingress-controller.yaml
# Application Load Balancer (ALB) Ingress Controller Deployment Manifest.
# This manifest details sensible defaults for deploying an ALB Ingress Controller.
# GitHub: https://github.com/kubernetes-sigs/aws-alb-ingress-controller
apiVersion: apps/v1
kind: Deployment
metadata:
  labels:
    app.kubernetes.io/name: alb-ingress-controller
  name: alb-ingress-controller
  # Namespace the ALB Ingress Controller should run in. Does not impact which
  # namespaces it's able to resolve ingress resource for. For limiting ingress
  # namespace scope, see --watch-namespace.
  namespace: kube-system
spec:
  selector:
    matchLabels:
      app.kubernetes.io/name: alb-ingress-controller
  template:
    metadata:
      labels:
        app.kubernetes.io/name: alb-ingress-controller
    spec:
      containers:
        - name: alb-ingress-controller
          args:
            # Limit the namespace where this ALB Ingress Controller deployment will
            # resolve ingress resources. If left commented, all namespaces are used.
            # - --watch-namespace=your-k8s-namespace

            # Setting the ingress-class flag below ensures that only ingress resources with the
            # annotation kubernetes.io/ingress.class: "alb" are respected by the controller. You may
            # choose any class you'd like for this controller to respect.
            - --ingress-class=alb

            # REQUIRED
            # Name of your cluster. Used when naming resources created
            # by the ALB Ingress Controller, providing distinction between
            # clusters.
            # - --cluster-name=devCluster

            # AWS VPC ID this ingress controller will use to create AWS resources.
            # If unspecified, it will be discovered from ec2metadata.
            # - --aws-vpc-id=vpc-xxxxxx

            # AWS region this ingress controller will operate in.
            # If unspecified, it will be discovered from ec2metadata.
            # List of regions: http://docs.aws.amazon.com/general/latest/gr/rande.html#vpc_region
            # - --aws-region=us-west-1

            # Enables logging on all outbound requests sent to the AWS API.
            # If logging is desired, set to true.
            # - --aws-api-debug

            # Maximum number of times to retry the aws calls.
            # defaults to 10.
            # - --aws-max-retries=10
          env:
            # AWS key id for authenticating with the AWS API.
            # This is only here for examples. It's recommended you instead use
            # a project like kube2iam for granting access.
            # - name: AWS_ACCESS_KEY_ID
            #   value: KEYVALUE

            # AWS key secret for authenticating with the AWS API.
            # This is only here for examples. It's recommended you instead use
            # a project like kube2iam for granting access.
            # - name: AWS_SECRET_ACCESS_KEY
            #   value: SECRETVALUE
          # Repository location of the ALB Ingress Controller.
          image: docker.io/amazon/aws-alb-ingress-controller:v1.1.8
      serviceAccountName: alb-ingress-controller
초기 배포시 아래와 같이 배포 문제가 발생할 수 있다.
[root@ip-192-168-114-198 ~]# kubectl apply -f alb-ingress-controller.yaml
deployment.apps/alb-ingress-controller created
[root@ip-192-168-114-198 ~]# kubectl get pod --all-namespaces
NAMESPACE     NAME                                      READY   STATUS             RESTARTS   AGE
kube-system   alb-ingress-controller-58c846f886-28s8d   0/1     CrashLoopBackOff   1          15s
kube-system   aws-node-lhck4                            1/1     Running            0          55m
kube-system   aws-node-v92n4                            1/1     Running            0          55m
kube-system   coredns-7dd7f84d9-ll7tq                   1/1     Running            0          68m
kube-system   coredns-7dd7f84d9-lnshb                   1/1     Running            0          68m
kube-system   kube-proxy-fqsx4                          1/1     Running            0          55m
kube-system   kube-proxy-xv642                          1/1     Running            0          55m
[root@ip-192-168-114-198 ~]#
이는 alb-ingress-controller를 배치할 region, vpc, cluster 등이 지정되어 있지 않기 때문으로 아래와 같이 수정해 준다.
[root@ip-192-168-114-198 ~]# kubectl edit deployment.apps/alb-ingress-controller -n kube-system
...
...
...
spec:
...
  template:
    ...
    spec:
      containers:
      - args:
        - --ingress-class=alb
        - --cluster-name=NRSON-EKS-CLUSTER
        - --aws-vpc-id=vpc-0a49e88ec5895ed25
        - --aws-region=ap-northeast-2
...
...
...
"/tmp/kubectl-edit-vj3us.yaml" 75L, 2951C written
deployment.apps/alb-ingress-controller edited
[root@ip-192-168-114-198 ~]#
위와 같이 현재 배포된 alb-ingress-controller에서 ingress-class를 찾아 그 동위 레벨에 cluster-name, aws-vpc-id, aws-region을 추가해 주고 저장한다.
그럼 아래와 같이 alb-ingress-controller가 배치된 것을 확인할 수 있다.
[root@ip-192-168-114-198 ~]# kubectl get pod --all-namespaces
NAMESPACE     NAME                                     READY   STATUS    RESTARTS   AGE
kube-system   alb-ingress-controller-8776f48c8-4vgrg   1/1     Running   0          14s
kube-system   aws-node-lhck4                           1/1     Running   0          60m
kube-system   aws-node-v92n4                           1/1     Running   0          61m
kube-system   coredns-7dd7f84d9-ll7tq                  1/1     Running   0          74m
kube-system   coredns-7dd7f84d9-lnshb                  1/1     Running   0          74m
kube-system   kube-proxy-fqsx4                         1/1     Running   0          60m
kube-system   kube-proxy-xv642                         1/1     Running   0          61m
[root@ip-192-168-114-198 ~]#
Application 배포 및 테스트
마지막으로 살펴볼 내용은 EKS & ALB Ingress Controller 기반 Application 배포 및 테스트 방법이다.
1) deployment
apiVersion: apps/v1
kind: Deployment
metadata:
  name: my-nginx
spec:
  selector:
    matchLabels:
      run: my-nginx
  replicas: 2
  template:
    metadata:
      labels:
        run: my-nginx
    spec:
      containers:
      - name: my-nginx
        image: nginx
        ports:
        - containerPort: 80
2) service
apiVersion: v1
kind: Service
metadata:
  name: my-nginx
  labels:
    run: my-nginx
spec:
  ports:
  - port: 80
    protocol: TCP
    #  type: NodePort
  selector:
    run: my-nginx
3) ingress
apiVersion: extensions/v1beta1
kind: Ingress
metadata:
  name: "ingress-app"
  annotations:
    kubernetes.io/ingress.class: alb
    alb.ingress.kubernetes.io/target-type: ip
    alb.ingress.kubernetes.io/scheme: internet-facing
    alb.ingress.kubernetes.io/subnets: subnet-aaa,subnet-bbb
spec:
  rules:
   - http:
      paths:
        - path: /*
          backend:
            serviceName: "my-nginx"
            servicePort: 80
나머지 다른 배포 방식은 Native Kubernetes와 동일하며, ingress의 경우 annotation이 추가된다.
kubernetes.io/ingress.class: alb - ingress type을 alb로 구성한다.
alb.ingress.kubernetes.io/target-type: ip - Service의 Type을 ClusterIP로 지정한다.
alb.ingress.kubernetes.io/schema: internet-facing
alb.ingress.kubernetes.io/listen-ports: '[{"HTTP": 80}, {"HTTPS": 443}]' - alb에서 expose하는 포트이다.
4) 배포
[root@ip-192-168-114-198 yaml]# ls
deployment-nginx.yaml  ingress-nginx.yaml  service-nginx.yaml
[root@ip-192-168-114-198 yaml]# kubectl apply -f deployment-nginx.yaml
deployment.apps/my-nginx created
[root@ip-192-168-114-198 yaml]# kubectl apply -f service-nginx.yaml
service/my-nginx created
[root@ip-192-168-114-198 yaml]# kubectl apply -f ingress-nginx.yaml
ingress.extensions/ingress-app created
[root@ip-192-168-114-198 yaml]#
5) 확인
- 로드밸런서 확인 (EC2 - 로드 밸런싱 - 로드밸런서)

위와 같이 ingress를 생성하면 ALB 로드밸런서가 자동으로 추가된다.
- 대상 그룹 확인 (EC2 - 로드 밸런싱 - 대상 그룹)
해당 ALB 로드밸런서를 통해 호출되는 Target Group은 아래와 같이 EKS의 Worker Node로 자동 추가된다.

대상 그룹의 tagets를 보면

위와 같이 해당 대상그룹이 등록되어 있으며 IP 기반으로 로드밸런싱을 수행한다. 여기서 IP address는 Pod의 IP 이다.
또한 상태가 healthy로 나와있는데, 이는 ingress controller의 readinessProbe 기능이다. 특정 context를 통해 해당 서버가 서비스를 할 수 있는 상태인지 여부를 체크하고 결과를 알려준다.
default로 '/'가 등록되어 있으며, 검증할 URI가 다를 경우 다음과 같이 변경할 수 있다.
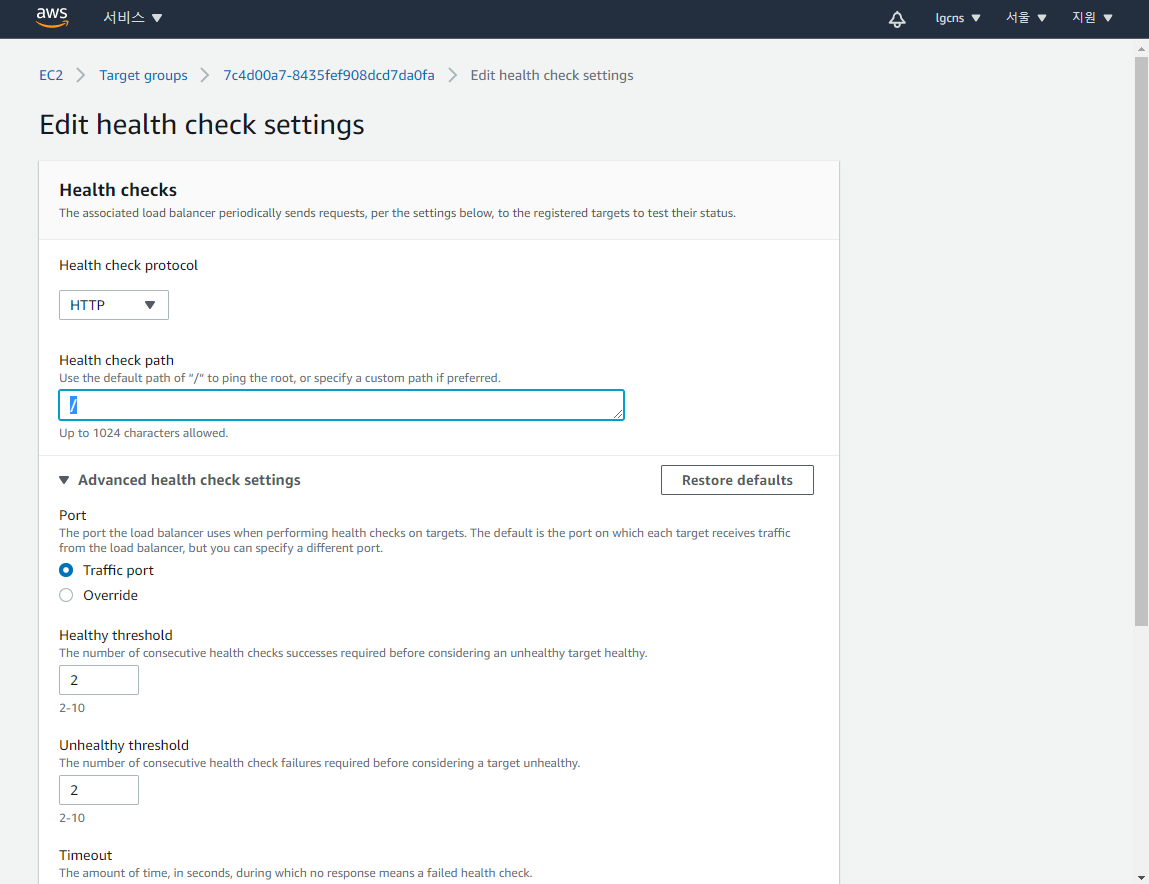
Health Check Path는 변경되지 않는 URL의 파일을 지정하여 호출하는 것이 좋다. 그밖에 연속으로 몇번 이상 성공한 후 성공 / 실패로 판단할 것인지 결정하는 threshold, timeout, interval, successcode 등을 정의할 수 있다.
kubectl로 ingress를 확인해 보면,
[root@ip-192-168-114-198 yaml]# kubectl get ingress
NAME          HOSTS   ADDRESS                                                                      PORTS   AGE
ingress-app   *       7c4d00a7-default-ingressap-cae2-552022937.ap-northeast-2.elb.amazonaws.com   80      46m
[root@ip-192-168-114-198 yaml]#
해당 ingress가 해당 alb ingress controller와 연동되어 있는 것을 확인할 수 있다.
# 참고
특이점은 ALB의 경우 일반 Native Kubernetes의 ingress와 달리 ingress마다 유입점을 결정할 수 있는 ALB 로드밸런서가 같이 생성된다는 점이다.
때문에 로드밸런서가 여러가 중복하여 기동되는 이는 유지보수를 떨어뜨리는 결과가 나타나기도 한다.
EKS는 이와 같은 문제점을 이미 인지하고, 해당 기능을 ALB-INGRESS-CONTROLLER 1.2 버전에서 해당 기능을 group.name이라는 Annotation으로 적용할 수 있도록 구성한다고 한다. 현재는 알파 버전으로 이후 베타 & 릴리즈 단계를 통해 정식 ALB INGRESS CONTROLLER의 기능으로 적용될 예정이다.
마지막으로 호출을 해보도록 하자.

위와 같이
http://7c4d00a7-default-ingressap-cae2-552022937.ap-northeast-2.elb.amazonaws.com/<context>/<file>
형태로 호출하여 확인할 수 있다.
NLB LoadBalanacer Type 적용
EKS에 LoadBalancer를 적용하는 방법은 크게 3가지 Type으로 이야기 한다.
앞서 적용한 ALB LoadBalancer & NLB LoadBalancer 그리고 Nginx Ingress Controller를 적용하는 방법이 있다.
각각을 API Gateway와 함께 배치하기 위한 아키텍처 고려사항으로
1) ALB LoadBalancer
Public Subnet을 사용하는 경우에만 접근이 가능하다. API Gateway는 VPCLink의 연결 유형을 제외한 나머지 연결유형을 선택할 경우, 해당 서비스가 Public으로 오픈되어야 한다. 즉, VPCLink는 NLB와의 연결을 지원하는 형태로 ALB는 Public Subnet에 존재해야만 연결이 가능하다.
2) NLB LoadBalancer
NLB의 경우 VPCLink 로 연결하는 Private Subnet 연결 방식 및 Public Subnet 두가지 타입을 모두 적용할 수 있다. API Gateway(Public Subnet) - VPCLink - NLB(Private Subnet) - EKS 형태로 구성하면 보다 보안이 강화된 아키텍처를 구상할 수 있다.
위 두가지 방식 외의 Nginx IngressController는 Native Kubernetes에서 많이 다루었기에 별도로 다시 다루지는 않도록 한다.
위와 같은 구성상의 특이점을 봤을때는 왜 NLB를 사용하면 되지 ALB를 사용하는 것인가 라고 의문점을 갖을 수 있지만, 이는 이와 같은 차이가 있기 때문이다.
NLB는 L4 네트워크 로드밸런서로 IP:Port를 기반으로 라우팅을 처리한다. ALB는 L7 애플리케이션 로드밸런서로 Context 기반 라우팅을 처리할 수 있다. 또한 비용, 성능 상의 차이를 기반으로 LoadBalancer의 타입을 결정해야 한다.
지금부터는 NLB를 EKS의 LoadBalancer Type으로 지정하는 방법에 대해 알아보자.
apiVersion: apps/v1
kind: Deployment
metadata:
  name: my-nginx
spec:
  selector:
    matchLabels:
      run: my-nginx
  replicas: 1
  template:
    metadata:
      labels:
        run: my-nginx
    spec:
      containers:
      - name: my-nginx
        image: nginx
        ports:
        - containerPort: 80
---
apiVersion: v1
kind: Service
metadata:
  name: my-nginx
  labels:
    run: my-nginx
  annotations:
    service.beta.kubernetes.io/aws-load-balancer-type: "nlb"
    service.beta.kubernetes.io/aws-load-balancer-internal: "true"
spec:
  ports:
  - port: 80
    protocol: TCP
    targetPort: 80
    nodePort: 30000
  type: LoadBalancer
    #  type: NodePort
  selector:
    run: my-nginx
앞서 우리는 my-nginx라는 서비스를 ingress에 노출하기 위해 Deployment, Service, Ingress를 각각 정의하였다. NLB Type의 로드밸런서를 사용할 경우에는 이와 다르게 Ingress가 존재하지 않는다.
위와 같이 LoadBalancer를 Service를 노출시키는 형태 중 LoadBalancer 타입으로 지정하고, 이를 nlb가 처리하도록 annotations을 등록해 주면, EKS는 AWS 로드밸런서에 NLB를 생성한다. 이때 Private Subnet을 사용할 경우 aws-load-balancer-internal을 true 등록해 주어야 생성이 가능하다. 해당 옵션이 없을 경우 NLB를 생성하지 못해 Service의 상태가 Pending 상태로 남아 있을 수 있다.
정상적으로 생성이 완료되면 다음과 같은 형태로 확인할 수 있다.
[root@ip-192-168-114-198 pv]# kubectl get pods
NAME                               READY   STATUS    RESTARTS   AGE
my-nginx-2-57d67cf9d9-kt2q4        1/1     Running   0          41h
[root@ip-192-168-114-198 pv]# kubectl get service
NAME		TYPE		CLUSTER-IP		EXTERNAL-IP							PORT		AGE
my-nginx 	LoadBalancer	192.168.xxx.xxx		abcdxxxxxxxxxxxxxx.ap-northeast-2.elb.amazonaws.com		80		41h
[root@ip-192-168-114-198 pv]#
이는 abcdxxxxxxx 엔드포인트를 갖는 AWS NLB와 연결되어 서비스가 직접 수행된다. Native Kubernetes를 직접 구축할 경우 Metal LB라는 LoadBalancer를 앞에 붙여 Service를 LB 타입으로 두고 연동해본 경험이 있는데 이와 같은 형태라고도 볼 수 있다. aws와 같은 public cloud는 자사의 로드밸런서를 사용하여 직접 Service LB 타입을 지원한다.
#참조
Not enough IP space available in subnet-xxxxxxxxxxxxxxxxx. ELB requires at least 8 free IP addresses in each subnet. 발생 시 대처 방안
[root@ip-192-168-114-198 pv]# kubectl describe service my-nginx
Name:                     my-nginx
Namespace:                my-apps
Labels:                   <none>
Annotations:              kubectl.kubernetes.io/last-applied-configuration:
                            {"apiVersion":"v1","kind":"Service","metadata":{"annotations":{"service.beta.kubernetes.io/aws-load-balancer-internal":"true","service.bet...
                          service.beta.kubernetes.io/aws-load-balancer-internal: true
                          service.beta.kubernetes.io/aws-load-balancer-type: nlb
Selector:                 name=my-nginx
Type:                     LoadBalancer
IP:                       192.168.XXX.XXX
Port:                     <unset>  80/TCP
TargetPort:               80/TCP
NodePort:                 <unset>  30091/TCP
Endpoints:                10.XXX.XXX.XXX:80,10.YYY.YYY.YYY:80
Session Affinity:         None
External Traffic Policy:  Cluster
Events:
  Type     Reason                  Age                 From                Message
  ----     ------                  ----                ----                -------
  Warning  SyncLoadBalancerFailed  5m24s               service-controller  Error syncing load balancer: failed to ensure load balancer: error creating load balancer: "InvalidSubnet: Not enough IP space available in subnet-xxxxxxxxxxxxxxxxx. ELB requires at least 8 free IP addresses in each subnet.\n\tstatus code: 400, request id: aaaaaaaa-bbbb-cccc-dddd-eeeeeeeeeeee"
  Warning  SyncLoadBalancerFailed  5m58s               service-controller  Error syncing load balancer: failed to ensure load balancer: error creating load balancer: "InvalidSubnet: Not enough IP space available in subnet-xxxxxxxxxxxxxxxxx. ELB requires at least 8 free IP addresses in each subnet.\n\tstatus code: 400, request id: ffffffff-bbbb-cccc-dddd-eeeeeeeeeeee"
  Warning  SyncLoadBalancerFailed  5m21s                service-controller  Error syncing load balancer: failed to ensure load balancer: error creating load balancer: "InvalidSubnet: Not enough IP space available in subnet-xxxxxxxxxxxxxxxxx. ELB requires at least 8 free IP addresses in each subnet.\n\tstatus code: 400, request id: gggggggg-bbbb-cccc-dddd-eeeeeeeeeeee"
  Warning  SyncLoadBalancerFailed  4m35s               service-controller  Error syncing load balancer: failed to ensure load balancer: error creating load balancer: "InvalidSubnet: Not enough IP space available in subnet-xxxxxxxxxxxxxxxxx. ELB requires at least 8 free IP addresses in each subnet.\n\tstatus code: 400, request id: hhhhhhhh-bbbb-cccc-dddd-eeeeeeeeeeee"
  Warning  SyncLoadBalancerFailed  3m55s                service-controller  Error syncing load balancer: failed to ensure load balancer: error creating load balancer: "InvalidSubnet: Not enough IP space available in subnet-xxxxxxxxxxxxxxxxx. ELB requires at least 8 free IP addresses in each subnet.\n\tstatus code: 400, request id: iiiiiiii-bbbb-cccc-dddd-eeeeeeeeeeee"
  Warning  SyncLoadBalancerFailed  1m59s               service-controller  Error syncing load balancer: failed to ensure load balancer: error creating load balancer: "InvalidSubnet: Not enough IP space available in subnet-xxxxxxxxxxxxxxxxx. ELB requires at least 8 free IP addresses in each subnet.\n\tstatus code: 400, request id: jjjjjjjj-bbbb-cccc-dddd-eeeeeeeeeeee"
  Warning  SyncLoadBalancerFailed  42s                 service-controller  Error syncing load balancer: failed to ensure load balancer: error creating load balancer: "InvalidSubnet: Not enough IP space available in subnet-xxxxxxxxxxxxxxxxx. ELB requires at least 8 free IP addresses in each subnet.\n\tstatus code: 400, request id: kkkkkkkk-bbbb-cccc-dddd-eeeeeeeeeeee"
  Normal   EnsuringLoadBalancer    5s (x8 over 5m24s)  service-controller  Ensuring load balancer
  Warning  SyncLoadBalancerFailed  5s                  service-controller  Error syncing load balancer: failed to ensure load balancer: error creating load balancer: "InvalidSubnet: Not enough IP space available in subnet-xxxxxxxxxxxxxxxxx. ELB requires at least 8 free IP addresses in each subnet.\n\tstatus code: 400, request id: llllllll-bbbb-cccc-dddd-eeeeeeeeeeee"
  [root@ip-192-168-114-198 pv]#
AWS ELB는 트래픽 수요를 충족하기 위해 확장 및 축소할 수 있다. 이때 ELB는 최소 8개의 Free IP Address를 확보해야 하며, 사용가능한 IP(CIDR)가 부족한 경우 위와 같은 문제가 발생할 수 있다.
이 경우 두가지 방법으로 대응할 수 있다.
- 사용하지 않는 ENI 삭제
- 새 서브넷 생성 및 VPC에 추가
사용하지 않는 ENI를 삭제하는 것으로 당연히 조치가 가능하지만, 현재 모두 사용 중으로 삭제할 수 있는 ENI가 없을 경우 다음과 같이 서브넷을 추가하고 VPC에 할당한 후 Service Annotation을 추가하여 별도의 Subnet에 ELB(ALB, NLB)를 적용할 수 있다.
[service.beta.kubernetes.io/aws-load-balancer-subnets]
apiVersion: apps/v1
kind: Deployment
metadata:
  name: my-nginx
spec:
  selector:
    matchLabels:
      run: my-nginx
  replicas: 1
  template:
    metadata:
      labels:
        run: my-nginx
    spec:
      containers:
      - name: my-nginx
        image: nginx
        ports:
        - containerPort: 80
---
apiVersion: v1
kind: Service
metadata:
  name: my-nginx
  labels:
    run: my-nginx
  annotations:
    service.beta.kubernetes.io/aws-load-balancer-type: "nlb"
    service.beta.kubernetes.io/aws-load-balancer-internal: "true"
    service.beta.kubernetes.io/aws-load-balancer-subnets: subnet-xxxxxxxx,subnet-yyyyyyyy
spec:
  ports:
  - port: 80
    protocol: TCP
    targetPort: 80
    nodePort: 30000
  type: LoadBalancer
    #  type: NodePort
  selector:
    run: my-nginx
신규로 추가한 subnet을 위와 같이 명시적으로 적용하여 해소할 수 있다.
EFS Persistent Volume 생성 및 연동
다음으로 EKS에 Persistent Volume을 연동해 보자. 여러 형태의 Persistent를 연동할 수 있지만, AWS에서 제공하는 볼륨 중 대표적으로 EFS를 연동하여 Persistent Volume으로 사용할 수 있다.
EFS는 공유 파일 스토리지로써 수천명의 클라이언트가 동시에 접근하여 처리할 수 있는 높은 처리속도를 제공한다. EBS의 ReadWriteOnce와 다르게 ReadWriteMany 액세스 모드를 제공하여 PV 공유 볼륨 형태로 적합하다.
1) EFS(Elastic File System) 파일 시스템 생성 (EFS > 파일 시스템 > 파일 시스템 생성 > 사용자 지정)
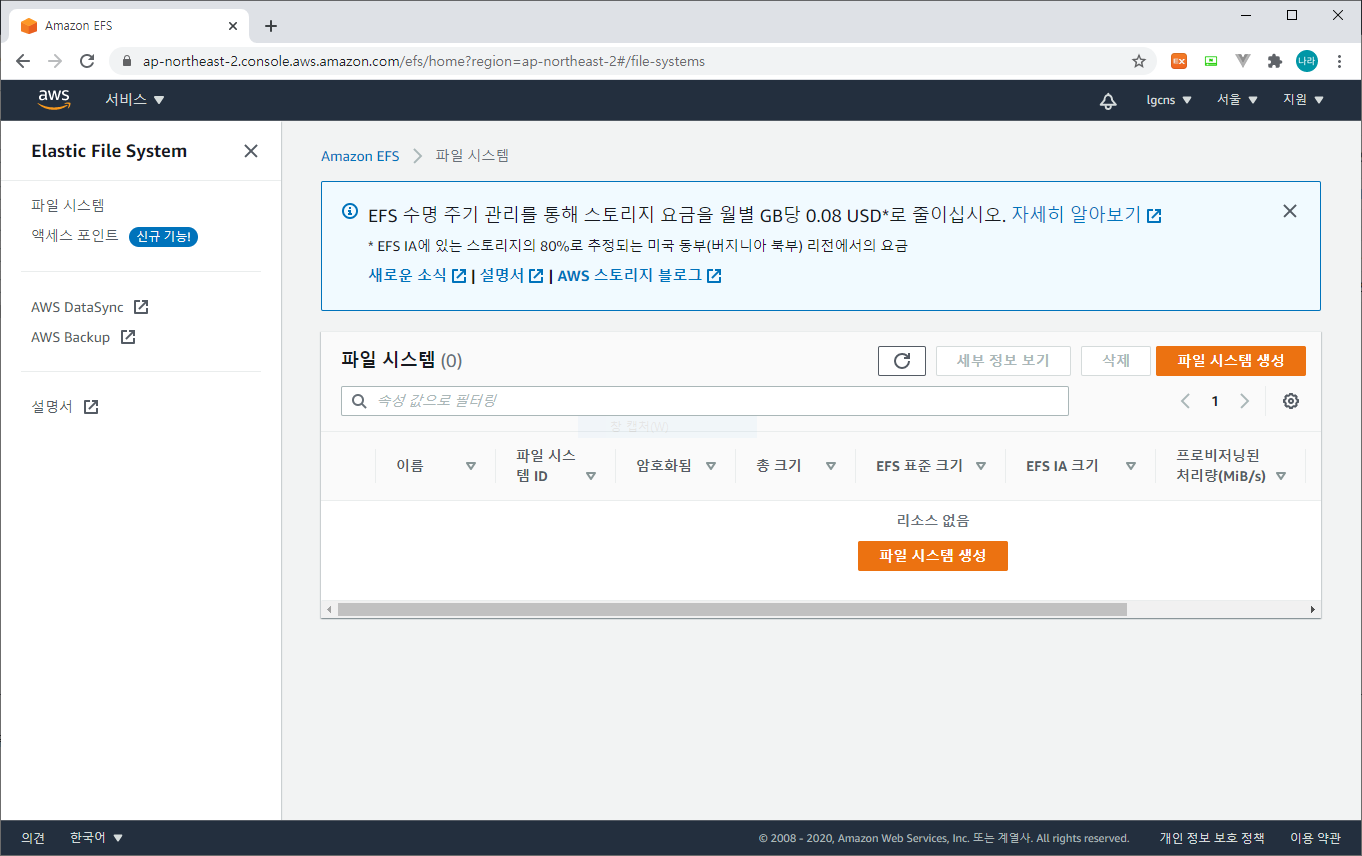
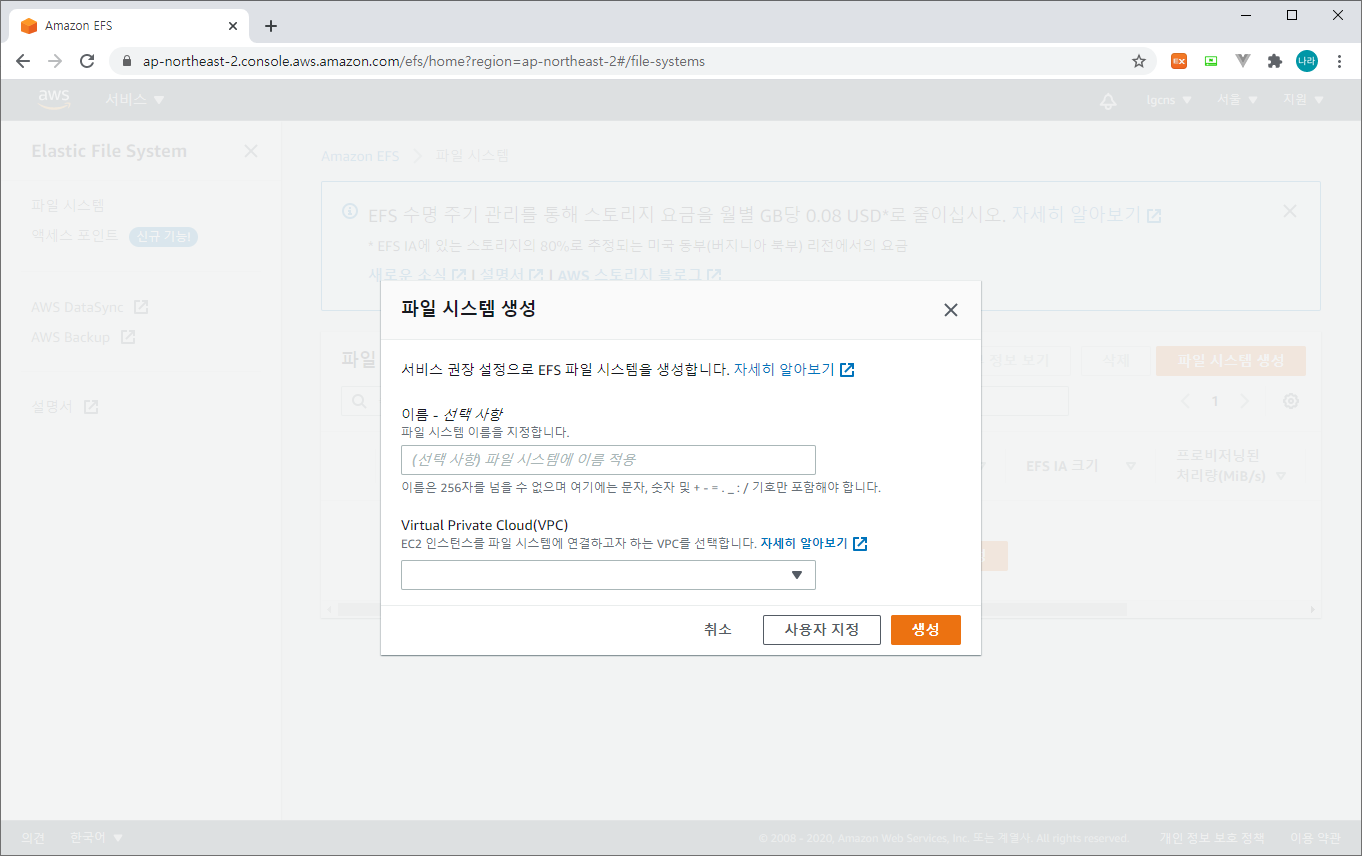
2) 파일 시스템 설정

이름 - 선택 사항 : 파일시스템 이름
자동 백업 : 파일 시스템 자동 백업 여부 (추가 비용 발생)
수명 주기 관리 : 데이터 관리 (마지막 엑세스 기준)
성능 모드 : IOPS 기반 성능 모드 설정 (범용 - 최대 I/O)
처리량 모드 : 파일 시스템 크기에 따라 또는 고정된 속도
3) 네트워크 액세스

Virtual Private Cloud(VPC) : EKS가 구성된 VPC와 동일한 VPC를 선택한다.
탑재 대상 : 가용 영역 / 서브넷ID / 보안 그룹을 지정한다.
4) 파일 시스템 정책 & 검토 및 생성
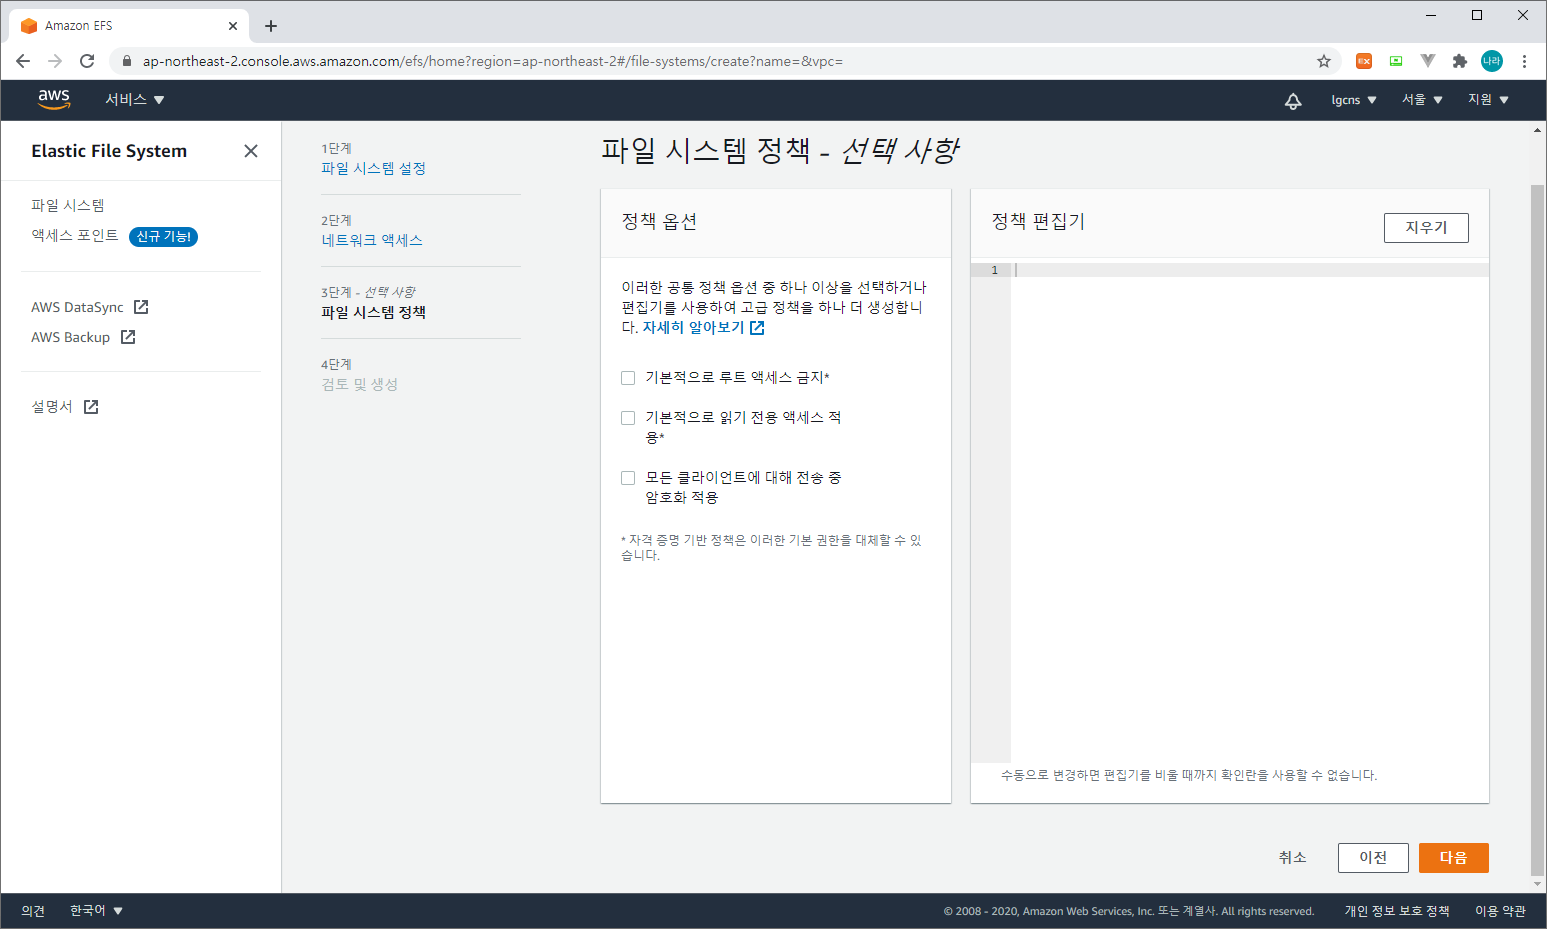

위와 같이 추가적인 정책 추가가 필요한 경우 추가하고 검토 및 생성을 진행한다.
5) 생성 확인

성공적으로 생성이 완료되면 위와 같이 확인할 수 있다.
6) 보안그룹 인바운드 규칙 수정
EFS가 사용하는 보안그룹에 EKS의 IPv4 CIDR을 허용할 수 있도록 구성한다.
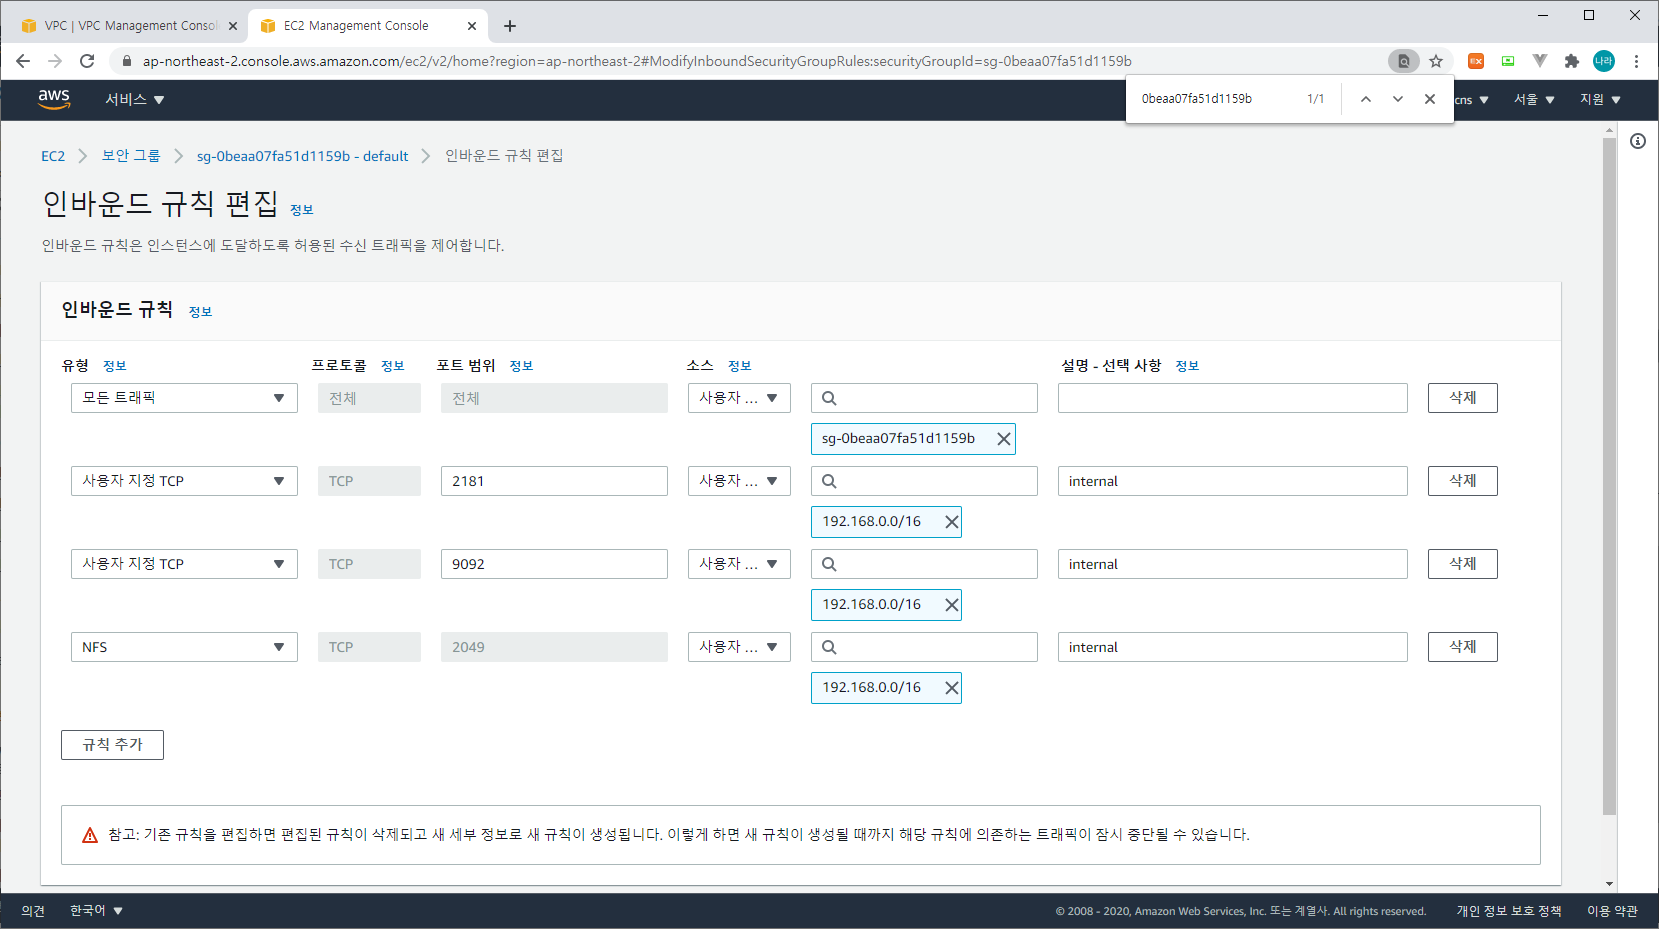
인바운드 규칙의 유형은 NFS를 선택하면 자동으로 2049 포트가 선택되며 소스 대상은 EKS가 배포된 VPC의 CIDR을 입력하고 규칙을 저장한다.
7) EFS Util 생성
Kubernetes Worker Node에서 EFS를 사용할 수 있도록 EFS Util을 구성해 주어야 한다. 앞서 eks cluster의 worker node에 ssh로 접근할 수 있도록 구성해 두어야만 접근이 가능하다. 또는 eks cluster를 구성할 때 cloudformation에 직접 정의하여 설치할 수도 있다.
[root@ip-192-168-114-198 ~]# ssh -i .ssh/id_rsa ec2-user@192.168.159.99
The authenticity of host '192.168.159.99 (192.168.159.99)' can't be established.
ECDSA key fingerprint is SHA256:htdaOSB230AYDhQFZ4qa1ogH0rfSSPhXvCc70vMu4Ro.
ECDSA key fingerprint is MD5:90:de:7d:76:8d:11:a7:57:c9:12:68:19:92:e3:40:6b.
Are you sure you want to continue connecting (yes/no)? yes
Warning: Permanently added '192.168.159.99' (ECDSA) to the list of known hosts.
Last login: Wed Oct  7 19:05:48 2020 from 205.251.233.50

       __|  __|_  )
       _|  (     /   Amazon Linux 2 AMI
      ___|\___|___|

https://aws.amazon.com/amazon-linux-2/
24 package(s) needed for security, out of 26 available
Run "sudo yum update" to apply all updates.
[ec2-user@ip-192-168-159-99 ~]$ sudo yum install -y amazon-efs-utils
Loaded plugins: priorities, update-motd
amzn2-core                                                                                                                                                                                                           | 3.7 kB  00:00:00
Resolving Dependencies
--> Running transaction check
---> Package amazon-efs-utils.noarch 0:1.28.2-1.amzn2 will be installed
--> Processing Dependency: stunnel >= 4.56 for package: amazon-efs-utils-1.28.2-1.amzn2.noarch
--> Running transaction check
---> Package stunnel.x86_64 0:4.56-6.amzn2.0.3 will be installed
--> Finished Dependency Resolution

Dependencies Resolved

============================================================================================================================================================================================================================================
 Package                                                      Arch                                               Version                                                       Repository                                              Size
============================================================================================================================================================================================================================================
Installing:
 amazon-efs-utils                                             noarch                                             1.28.2-1.amzn2                                                amzn2-core                                              36 k
Installing for dependencies:
 stunnel                                                      x86_64                                             4.56-6.amzn2.0.3                                              amzn2-core                                             149 k

Transaction Summary
============================================================================================================================================================================================================================================
Install  1 Package (+1 Dependent package)

Total download size: 185 k
Installed size: 436 k
Downloading packages:
(1/2): amazon-efs-utils-1.28.2-1.amzn2.noarch.rpm                                                                                                                                                                    |  36 kB  00:00:00
(2/2): stunnel-4.56-6.amzn2.0.3.x86_64.rpm                                                                                                                                                                           | 149 kB  00:00:00
--------------------------------------------------------------------------------------------------------------------------------------------------------------------------------------------------------------------------------------------
Total                                                                                                                                                                                                       1.6 MB/s | 185 kB  00:00:00
Running transaction check
Running transaction test
Transaction test succeeded
Running transaction
  Installing : stunnel-4.56-6.amzn2.0.3.x86_64                                                                                                                                                                                          1/2
  Installing : amazon-efs-utils-1.28.2-1.amzn2.noarch                                                                                                                                                                                   2/2
  Verifying  : stunnel-4.56-6.amzn2.0.3.x86_64                                                                                                                                                                                          1/2
  Verifying  : amazon-efs-utils-1.28.2-1.amzn2.noarch                                                                                                                                                                                   2/2

Installed:
  amazon-efs-utils.noarch 0:1.28.2-1.amzn2

Dependency Installed:
  stunnel.x86_64 0:4.56-6.amzn2.0.3

Complete!
[ec2-user@ip-192-168-159-99 ~]$ exit
logout
Connection to 192.168.159.99 closed.
[root@ip-192-168-114-198 ~]# ssh -i .ssh/id_rsa ec2-user@192.168.124.147
The authenticity of host '192.168.124.147 (192.168.124.147)' can't be established.
ECDSA key fingerprint is SHA256:Fm0j7VSj+0L0CS4NqzR0IsfrJ80+vKouzoNnh3OBwIQ.
ECDSA key fingerprint is MD5:50:21:00:30:15:0f:9d:16:77:65:8b:19:09:d2:45:d9.
Are you sure you want to continue connecting (yes/no)? yes
Warning: Permanently added '192.168.124.147' (ECDSA) to the list of known hosts.
Last login: Wed Oct  7 19:05:48 2020 from 205.251.233.50

       __|  __|_  )
       _|  (     /   Amazon Linux 2 AMI
      ___|\___|___|

https://aws.amazon.com/amazon-linux-2/
24 package(s) needed for security, out of 26 available
Run "sudo yum update" to apply all updates.
[ec2-user@ip-192-168-124-147 ~]$ sudo yum install -y amazon-efs-utils
Loaded plugins: priorities, update-motd
amzn2-core                                                                                                                                                                                                           | 3.7 kB  00:00:00
Resolving Dependencies
--> Running transaction check
---> Package amazon-efs-utils.noarch 0:1.28.2-1.amzn2 will be installed
--> Processing Dependency: stunnel >= 4.56 for package: amazon-efs-utils-1.28.2-1.amzn2.noarch
--> Running transaction check
---> Package stunnel.x86_64 0:4.56-6.amzn2.0.3 will be installed
--> Finished Dependency Resolution

Dependencies Resolved

============================================================================================================================================================================================================================================
 Package                                                      Arch                                               Version                                                       Repository                                              Size
============================================================================================================================================================================================================================================
Installing:
 amazon-efs-utils                                             noarch                                             1.28.2-1.amzn2                                                amzn2-core                                              36 k
Installing for dependencies:
 stunnel                                                      x86_64                                             4.56-6.amzn2.0.3                                              amzn2-core                                             149 k

Transaction Summary
============================================================================================================================================================================================================================================
Install  1 Package (+1 Dependent package)

Total download size: 185 k
Installed size: 436 k
Downloading packages:
(1/2): amazon-efs-utils-1.28.2-1.amzn2.noarch.rpm                                                                                                                                                                    |  36 kB  00:00:00
(2/2): stunnel-4.56-6.amzn2.0.3.x86_64.rpm                                                                                                                                                                           | 149 kB  00:00:00
--------------------------------------------------------------------------------------------------------------------------------------------------------------------------------------------------------------------------------------------
Total                                                                                                                                                                                                       1.5 MB/s | 185 kB  00:00:00
Running transaction check
Running transaction test
Transaction test succeeded
Running transaction
  Installing : stunnel-4.56-6.amzn2.0.3.x86_64                                                                                                                                                                                          1/2
  Installing : amazon-efs-utils-1.28.2-1.amzn2.noarch                                                                                                                                                                                   2/2
  Verifying  : stunnel-4.56-6.amzn2.0.3.x86_64                                                                                                                                                                                          1/2
  Verifying  : amazon-efs-utils-1.28.2-1.amzn2.noarch                                                                                                                                                                                   2/2

Installed:
  amazon-efs-utils.noarch 0:1.28.2-1.amzn2

Dependency Installed:
  stunnel.x86_64 0:4.56-6.amzn2.0.3

Complete!
[ec2-user@ip-192-168-124-147 ~]$
위와 같이 워커노드에 각각 접속하여 sudo yum install -y amazon-efs-utils 명령어로 efs util을 설치한다.
8) EFS Provisioner 생성
Provisioner를 생성하기 전 유의사항으로 앞서 생성한 EFS에서 사용하는 VPC의 DNS 호스트 이름과 DNS 확인이 활성화 되어 있는지 확인해야 한다.

EFS 파일 시스템에 접근하기 위한 URL을 활성화하기 위해 DNS 호스트 이름을 사용해야 하기 때문이다.
a. provisioner-deployment.yaml
apiVersion: v1
kind: ServiceAccount
metadata:
  name: efs-provisioner
---
kind: Deployment
apiVersion: apps/v1
metadata:
  namespace: default
  name: efs-provisioner
spec:
  selector:
    matchLabels:
      app: efs-provisioner
  replicas: 1
  strategy:
    type: Recreate
  template:
    metadata:
      labels:
        app: efs-provisioner
    spec:
      serviceAccount: efs-provisioner
      containers:
        - name: efs-provisioner
          image: quay.io/external_storage/efs-provisioner:v2.4.0
          env:
            - name: FILE_SYSTEM_ID
              value: "fs-783a2619"
            - name: AWS_REGION
              value: "ap-northeast-2"
            - name: PROVISIONER_NAME
              value: "efs-provisioner"
          volumeMounts:
            - name: pvcs
              mountPath: /pvcs
      volumes:
        - name: pvcs
          nfs:
            server: "fs-783a2619.efs.ap-northeast-2.amazonaws.com"
            path: /
- FILE_SYSTEM_ID : EFS FileSystem ID
- AWS_REGION : EFS REGION
- PROVISIONER_NAME
특히 volumes.nfs.server는 NFS 서버에 접근하기 위한 도메인으로 다음과 같은 형태로 구성되어 있다.
(FILE_SYSTEM_ID.efs.AWS_REGION.amazonaws.com)
해당 도메인이 접근 가능한지 아래와 같이 확인하고 DNS 등록이 안되어 있을 경우 상단의 VPC DNS 호스트 이름 활성화 여부를 다시 확인한다.
[root@ip-192-168-114-198 pv]# nslookup fs-783a2619.efs.ap-northeast-2.amazonaws.com
Server:         192.168.0.2
Address:        192.168.0.2#53

Non-authoritative answer:
Name:   fs-783a2619.efs.ap-northeast-2.amazonaws.com
Address: 192.168.108.180

[root@ip-192-168-114-198 pv]#
아래와 같이 kubectl apply로 반영한다.
[root@ip-192-168-114-198 pv]# kubectl apply -f provisioner-deployment.yaml
serviceaccount/efs-provisioner created
deployment.apps/efs-provisioner created
[root@ip-192-168-114-198 pv]#
b. provisioner-rbac.yaml
kind: ClusterRole
apiVersion: rbac.authorization.k8s.io/v1
metadata:
  name: efs-provisioner-runner
rules:
  - apiGroups: [""]
    resources: ["persistentvolumes"]
    verbs: ["get", "list", "watch", "create", "delete"]
  - apiGroups: [""]
    resources: ["persistentvolumeclaims"]
    verbs: ["get", "list", "watch", "update"]
  - apiGroups: ["storage.k8s.io"]
    resources: ["storageclasses"]
    verbs: ["get", "list", "watch"]
  - apiGroups: [""]
    resources: ["events"]
    verbs: ["create", "update", "patch"]
---
kind: ClusterRoleBinding
apiVersion: rbac.authorization.k8s.io/v1
metadata:
  name: run-efs-provisioner
subjects:
  - kind: ServiceAccount
    name: efs-provisioner
     # replace with namespace where provisioner is deployed
    namespace: default
roleRef:
  kind: ClusterRole
  name: efs-provisioner-runner
  apiGroup: rbac.authorization.k8s.io
---
kind: Role
apiVersion: rbac.authorization.k8s.io/v1
metadata:
  name: leader-locking-efs-provisioner
rules:
  - apiGroups: [""]
    resources: ["endpoints"]
    verbs: ["get", "list", "watch", "create", "update", "patch"]
---
kind: RoleBinding
apiVersion: rbac.authorization.k8s.io/v1
metadata:
  name: leader-locking-efs-provisioner
subjects:
  - kind: ServiceAccount
    name: efs-provisioner
    # replace with namespace where provisioner is deployed
    namespace: default
roleRef:
  kind: Role
  name: leader-locking-efs-provisioner
  apiGroup: rbac.authorization.k8s.io
RBAC는 크게 변경사항은 없으며 NAMESPACE를 지정할 경우 변경한다. 아래와 같이 kubectl apply로 반영한다.
[root@ip-192-168-114-198 pv]# kubectl apply -f provisioner-rbac.yaml
clusterrole.rbac.authorization.k8s.io/efs-provisioner-runner created
clusterrolebinding.rbac.authorization.k8s.io/run-efs-provisioner created
role.rbac.authorization.k8s.io/leader-locking-efs-provisioner created
rolebinding.rbac.authorization.k8s.io/leader-locking-efs-provisioner created
[root@ip-192-168-114-198 pv]#
c. provisioner-storageclass.yaml
kind: StorageClass
apiVersion: storage.k8s.io/v1
metadata:
  namespace: default
  name: eks-efs
provisioner: efs-provisioner
앞서 생성한 provisioner를 지정한 StorageClass를 생성한다. 아래와 같이 kubectl apply로 반영한다.
[root@ip-192-168-114-198 pv]# kubectl apply -f provisioner-storageclass.yaml
storageclass.storage.k8s.io/eks-efs created
[root@ip-192-168-114-198 pv]#
d. provisioner-pvc.yaml
pvc는 persistentVolume에 접속하기 위한 Claim을 생성한다. 앞서 생성한 StorageClass를 지정한다.
kind: PersistentVolumeClaim
apiVersion: v1
metadata:
  name: efs
  annotations:
    volume.beta.kubernetes.io/storage-class: "eks-efs"
spec:
  accessModes:
    - ReadWriteMany
  resources:
    requests:
      storage: 1Mi
EFS는 ReadWriteMany의 accessMode를 지원하여 여러 서비스에서 접근하여 볼륨을 공유할 수 있다. 아래와 같이 kubectl apply로 반영한다.
[root@ip-192-168-114-198 pv]# kubectl apply -f provisioner-pvc.yaml
persistentvolumeclaim/efs created
[root@ip-192-168-114-198 pv]#
e. EFS PROVISIONER 생성 확인
[root@ip-192-168-114-198 pv]# kubectl get pod efs-provisioner-79757b5966-zcq59 -o wide
NAME                               READY   STATUS    RESTARTS   AGE   IP               NODE                                                 NOMINATED NODE   READINESS GATES
efs-provisioner-79757b5966-zcq59   1/1     Running   0          17m   192.168.116.24   ip-192-168-124-147.ap-northeast-2.compute.internal   <none>           <none>
[root@ip-192-168-114-198 pv]# kubectl get deployment efs-provisioner -o wide
NAME              READY   UP-TO-DATE   AVAILABLE   AGE   CONTAINERS        IMAGES                                            SELECTOR
efs-provisioner   1/1     1            1           14m   efs-provisioner   quay.io/external_storage/efs-provisioner:v2.4.0   app=efs-provisioner
[root@ip-192-168-114-198 pv]# kubectl get pv pvc-e893bedb-2d87-476e-8d7a-6e58ec672e7b -o wide
NAME                                       CAPACITY   ACCESS MODES   RECLAIM POLICY   STATUS   CLAIM         STORAGECLASS   REASON   AGE     VOLUMEMODE
pvc-e893bedb-2d87-476e-8d7a-6e58ec672e7b   1Mi        RWX            Delete           Bound    default/efs   eks-efs                 2m55s   Filesystem
[root@ip-192-168-114-198 pv]# kubectl get pvc efs -o wide
NAME   STATUS   VOLUME                                     CAPACITY   ACCESS MODES   STORAGECLASS   AGE     VOLUMEMODE
efs    Bound    pvc-e893bedb-2d87-476e-8d7a-6e58ec672e7b   1Mi        RWX            eks-efs        3m16s   Filesystem
[root@ip-192-168-114-198 pv]# kubectl get storageclass eks-efs -o wide
NAME      PROVISIONER       RECLAIMPOLICY   VOLUMEBINDINGMODE   ALLOWVOLUMEEXPANSION   AGE
eks-efs   efs-provisioner   Delete          Immediate           false                  6m59s
[root@ip-192-168-114-198 pv]#
위와 같이 pod, deployment, pv, pvc, storageclass 정보를 확인한다.
9) Application 배포 및 Volume 확인
위와 같이 각 오브젝트 생성이 정상적으로 완료되면, Deployment에 Volume을 정의한다.
apiVersion: apps/v1
kind: Deployment
metadata:
  name: my-nginx
spec:
  selector:
    matchLabels:
      run: my-nginx
  replicas: 2
  template:
    metadata:
      labels:
        run: my-nginx
    spec:
      containers:
      - name: my-nginx
        image: nginx
        ports:
        - containerPort: 80
        volumeMounts:
          - name: efs-pvc
            mountPath: "/logs"
      volumes:
      - name: efs-pvc
        persistentVolumeClaim:
          claimName: efs
spec.template.spec.volumes.name : volume name
spec.template.spec.volumes.persistentVolumeClaim.claimName : pvc name mapping
spec.template.spec.containers.volumeMounts.name : volumes.name mapping
spec.template.spec.containers.volumeMounts.mountPath : local mount path
위와 같이 구성 후 PersistentVolume 상태를 확인해 보도록 하자.
위와 동일한 구조의 nginx를 두개의 서비스에 기동한다. (my-nginx & my-nginx-2)
[root@ip-192-168-114-198 pv]# kubectl get pods
NAME                               READY   STATUS    RESTARTS   AGE
efs-provisioner-79757b5966-zcq59   1/1     Running   0          144m
my-nginx-2-57d67cf9d9-jfld8        1/1     Running   0          23s
my-nginx-2-57d67cf9d9-kt2q4        1/1     Running   0          23s
my-nginx-7b56468975-lmvp8          1/1     Running   0          27s
my-nginx-7b56468975-z29xq          1/1     Running   0          27s
[root@ip-192-168-114-198 pv]# kubectl exec -it my-nginx-7b56468975-lmvp8 bash
root@my-nginx-7b56468975-lmvp8:/# df -h
Filesystem                                                                                  Size  Used Avail Use% Mounted on
overlay                                                                                      30G  2.5G   28G   9% /
tmpfs                                                                                        64M     0   64M   0% /dev
tmpfs                                                                                       3.8G     0  3.8G   0% /sys/fs/cgroup
fs-783a2619.efs.ap-northeast-2.amazonaws.com:/efs-pvc-e893bedb-2d87-476e-8d7a-6e58ec672e7b  8.0E     0  8.0E   0% /logs
/dev/nvme0n1p1                                                                               30G  2.5G   28G   9% /etc/hosts
shm                                                                                          64M     0   64M   0% /dev/shm
tmpfs                                                                                       3.8G   12K  3.8G   1% /run/secrets/kubernetes.io/serviceaccount
tmpfs                                                                                       3.8G     0  3.8G   0% /proc/acpi
tmpfs                                                                                       3.8G     0  3.8G   0% /sys/firmware
root@my-nginx-7b56468975-lmvp8:/# cd /logs/
root@my-nginx-7b56468975-lmvp8:/logs# ls -la
total 4
drwxrws--x 2 root 2000 6144 Nov  6 09:02 .
drwxr-xr-x 1 root root   51 Nov  6 11:13 ..
root@my-nginx-7b56468975-lmvp8:/logs# echo "share" > /logs/share.txt
root@my-nginx-7b56468975-lmvp8:/logs# cat /logs/share.txt
share
root@my-nginx-7b56468975-lmvp8:/logs# exit
exit
[root@ip-192-168-114-198 pv]# kubectl exec -it my-nginx-2-57d67cf9d9-jfld8 bash
root@my-nginx-2-57d67cf9d9-jfld8:/# cat /logs/share.txt
share
root@my-nginx-2-57d67cf9d9-jfld8:/# exit
exit
[root@ip-192-168-114-198 pv]#
위와 같이 /logs 디렉토리가 fs-783a2619.efs.ap-northeast-2.amazonaws.com:/efs-pvc-e893bedb-2d87-476e-8d7a-6e58ec672e7b 파일시스템에 연결되어 있는 것을 확인할 수 있으며, my-nginx 서비스에서 생성한 share.txt라는 파일이 my-nginx-2 서비스에서도 동일하게 확인할 수 있는 것을 볼 수 있다.
대체로 이러한 구조는 업로드 파일을 공유하거나, 로그와 같은 데이터 수집에 필요한 정보를 저장하는 역할로 활용될 수 있다.
오류 처리
EKS 구축 시 발생 가능한 오류는 다음과 같다.
1) arn:aws:iam::104818303680:user/EKS-Admin is not authorized to perform: iam:PassRole on resource
...
...
[  unexpected status "ROLLBACK_IN_PROGRESS" while waiting for CloudFormation stack "eksctl-EKS-AN2-MSA-cluster"
[  fetching stack events in attempt to troubleshoot the root cause of the failure
[  AWS::EKS::Cluster/ControlPlane: CREATE_FAILED 벬User: arn:aws:iam::104818303680:user/EKS-Admin is not authorized to perform: iam:PassRole on resource: arn:aws:iam::104818303680:role/eks-cluster-role (Service: AmazonEKS; Status Code: 403; Error Code: AccessDeniedException; Request ID: 2316b5bb-186b-418d-9c3b-df4dc4edc033; Proxy: null)"
[!]  1 error(s) occurred and cluster hasn't been created properly, you may wish to check CloudFormation console
[  to cleanup resources, run 'eksctl delete cluster --region=ap-northeast-2 --name=EKS-AN2-MSA'
[  waiting for CloudFormation stack "eksctl-EKS-AN2-MSA-cluster": ResourceNotReady: failed waiting for successful resource state
Error: failed to create cluster "EKS-AN2-MSA"
위와 같은 오류 발생 시 사용자에게 부여 된 Policy 중 role에 부여 된 iam:PassRole 여부를 확인한다. iam:PassRole는 사용자가 승인된 역할만 전달하도록 제한하는 IAM이다.
        {
            "Effect": "Allow",
            "Action": [
                "iam:GetRole",
                "iam:ListAttachedRolePolicies",
                "iam:PassRole"
            ],
            "Resource": [
                "arn:aws:iam::104818303680:role/*"
            ]
        },
위와 같이 arn:aws:iam::AWS_ID:role/*를 resource로 하는 Action에 iam:PassRole이 추가되어야 한다.
2) Caller does not have permission to perform 'iam:listAttachedRolePolicies'
...
...
[  unexpected status "ROLLBACK_IN_PROGRESS" while waiting for CloudFormation stack "eksctl-EKS-AN2-MSA-cluster"
[  fetching stack events in attempt to troubleshoot the root cause of the failure
[  AWS::EKS::Cluster/ControlPlane: CREATE_FAILED 벬Caller does not have permission to perform `iam:listAttachedRolePolicies` (Service: AmazonEKS; Status Code: 400; Error Code: InvalidParameterException; Request ID: 74f550a8-9e52-44b5-b683-32f7fcb2b4ab; Proxy: null)"
[!]  1 error(s) occurred and cluster hasn't been created properly, you may wish to check CloudFormation console
[  to cleanup resources, run 'eksctl delete cluster --region=ap-northeast-2 --name=EKS-AN2-MSA'
[  waiting for CloudFormation stack "eksctl-EKS-AN2-MSA-cluster": ResourceNotReady: failed waiting for successful resource state
Error: failed to create cluster "EKS-AN2-MSA"
위와 같은 오류 발생 시 동일하게 사용자에게 부여 된 Policy 중 role에 부여 된 iam:listAttachedRolePolicies 여부를 확인한다. iam:listAttachedRolePolicies는 지정된 iam 역할에 연결된 모든 AWS 관리형 정책을 나열하는 IAM이다.
        {
            "Effect": "Allow",
            "Action": [
                "iam:GetRole",
                "iam:ListAttachedRolePolicies",
                "iam:PassRole"
            ],
            "Resource": [
                "arn:aws:iam::104818303680:role/*"
            ]
        },
위와 같이 arn:aws:iam::AWS_ID:role/*를 resource로 하는 Action에 iam:listAttachedRolePolicies이 추가되어야 한다.
3) Code: NodeCreationFailure,Message: Instances failed to join the kubernetes cluster,ResourceIds
...
...
[  unexpected status "ROLLBACK_IN_PROGRESS" while waiting for CloudFormation stack "eksctl-EKS-AN2-MSA-nodegroup-EKS-NODE-AN2-MSA"
[  fetching stack events in attempt to troubleshoot the root cause of the failure
[  AWS::EKS::Nodegroup/ManagedNodeGroup: CREATE_FAILED 벬Nodegroup EKS-NODE-AN2-MSA failed to stabilize: [{Code: NodeCreationFailure,Message: Instances failed to join the kubernetes cluster,ResourceIds: [i-064470221a18cb556, i-0911d0c6b4f1f0725]}]"
[!]  1 error(s) occurred and cluster hasn't been created properly, you may wish to check CloudFormation console
[  to cleanup resources, run 'eksctl delete cluster --region=ap-northeast-2 --name=EKS-AN2-MSA'
[  waiting for CloudFormation stack "eksctl-EKS-AN2-MSA-nodegroup-EKS-NODE-AN2-MSA": ResourceNotReady: failed waiting for successful resource state
Error: failed to create cluster "EKS-AN2-MSA"
위와 같은 오류는 관리 노드 그룹의 오류로 부터 발생한다. EKS Worker Node Group을 생성하고자 하였으나 어떠한 이유로 인해 NodeCreationFailure가 발생하였다. 이는 대체로 IAM 역할 권한 부족 또는 노드에 대한 아웃바운드 인터넷 엑세스가 부족할 경우 발생한다.
EKS 보안그룹
EKS는 다음과 같은 보안그룹 권고사항을 요구한다.
a. 클러스터 보안 그룹
(aws eks describe-cluster --name <cluster_name> --query cluster.resourcesVpcConfig.clusterSecurityGroupId)
| Protocol | Ports | Source | Destination | |
| Recommended inbound traffic | All | All | Self | |
| Recommended outbound traffic | All | All | 0.0.0.0/0 |
b. 컨트롤 플레인
(aws eks describe-cluster --name <cluster_name> --query cluster.resourcesVpcConfig.securityGroupIds)
| Protocol | Ports | Source | Destination | |
| Recommended inbound traffic | TCP | 443 | All Node Security Group & BASTION Server | |
| Recommended outbound traffic | TCP | 1025 ~ 65535 | All Node Security Group |
기본 생성되는 컨트롤 플레인 보안 그룹에는 인바운드 HTTPS 443이 포함되어 있지 않아 수동으로 추가해 주어야 한다.
또한 cluster endpoint 가 private일 경우 bastion server에 kubectl이 구성되어 있어야 한다.
c. Worker 노드 보안 그룹
| Protocol | Ports | Source | Destination | |
| Recommended inbound traffic | All | All | All Node Security Group | |
| TCP | 443, 1025 ~ 65535 | Control Plane Security Group | ||
| Recommended outbound traffic | All | All | 0.0.0.0/0 |
상단에 명시한 vpc sample을 통해 자동 생성할 경우 대부분 권고 값으로 자동 생성되지만, 컨트롤 플레인의 Inbound Traffic에 443 포트가 오픈되지 않은 상태로 생성된다. 이로 인해 Bastion Server에서 kubectl을 실행할 수 있는 권한이 없어 설치가 완료되지 않을 수 있다. 따라서 Control Plane의 보안 그룹이 생성되면, 직접 Bastion Server의 보안 그룹이 접근할 수 있도록 인바운드 트래픽을 수정하도록 하자.
EKS Cluster 삭제
EKS Cluster를 전제적으로 재 구성해야 하는 경우 아래와 같이 삭제할 수 있다.
(eksctl delete cluster --region=ap-northeast-2 --name=EKS-AN2-MSA)
[root@ip-10-121-3-247 ~]# eksctl delete cluster --region=ap-northeast-2 --name=EKS-AN2-MSA
[  eksctl version 0.29.2
[  using region ap-northeast-2
[  deleting EKS cluster "EKS-AN2-MSA"
[  deleted 0 Fargate profile(s)
[  kubeconfig has been updated
[  cleaning up AWS load balancers created by Kubernetes objects of Kind Service or Ingress
[  2 sequential tasks: { delete nodegroup "EKS-NODE-AN2-MSA", delete cluster control plane "EKS-AN2-MSA" [async] }
[  will delete stack "eksctl-EKS-AN2-MSA-nodegroup-EKS-NODE-AN2-MSA"
[  waiting for stack "eksctl-EKS-AN2-MSA-nodegroup-EKS-NODE-AN2-MSA" to get deleted
[  will delete stack "eksctl-EKS-AN2-MSA-cluster"
[  all cluster resources were deleted
[root@ip-10-121-3-247 ~]#
삭제 후 eks console에서 삭제 여부를 확인한다.
이후 CloudFormation으로 생성한 ContolPlane & NodeGroup & VPC 관련 스택을 삭제해야 한다.
IAM에 생성된 사용자, 그룹, 역할, 정책은 필요에 의해 재활용 또는 삭제하도록 한다.
EKS kubeconfig update
때로 aws configure를 갱신하거나, kubeconfig를 삭제하거나, 변경이 되었을 경우 다시 aws 상에서 업데이트 받는 방법이다.
aws eks update-kubeconfig --name <CLUSTER_NAME> --region <REGION_NAME>
'③ 클라우드 > ⓐ AWS' 카테고리의 다른 글
| AWS App Mesh API 통합 관리 10분 완성 (0) | 2020.10.17 |
|---|---|
| Amazon API Gateway API 배포 / 인증 10분 완성 (1) | 2020.10.17 |
| Micro Service와 Serverless (0) | 2019.07.09 |
| Amazon CloudWatch, Amazon CloudTrail (0) | 2019.07.08 |
| AWS IAM (Identity and Access Management) (0) | 2019.07.07 |
- Total
- Today
- Yesterday
- JBoss
- git
- nodejs
- openstack token issue
- openstack tenant
- OpenStack
- webtob
- JEUS6
- Docker
- wildfly
- kubernetes
- MSA
- 마이크로서비스 아키텍처
- 마이크로서비스
- API Gateway
- jeus
- SA
- Architecture
- Da
- k8s
- 오픈스택
- 쿠버네티스
- apache
- aa
- SWA
- node.js
- aws
- TA
- 아키텍처
- JEUS7
| 일 | 월 | 화 | 수 | 목 | 금 | 토 |
|---|---|---|---|---|---|---|
| 1 | 2 | 3 | 4 | 5 | 6 | 7 |
| 8 | 9 | 10 | 11 | 12 | 13 | 14 |
| 15 | 16 | 17 | 18 | 19 | 20 | 21 |
| 22 | 23 | 24 | 25 | 26 | 27 | 28 |
