티스토리 뷰
IT는 어마어마하게 다양한 솔루션과 개발방식 그리고 이를 서포트 하기 위한 도구들로 이루어져 있다.
그중 최근 화두가 되고 있는(다소 늦은 감이 있지만,,) ALM의 다양한 요소를 살펴보고 직접 이를 구축해 보는 시간을 갖도록 하자.
그 첫번째 시간으로 SVN(Subversion)을 통한 소스 형상관리 방법에 대해 알아보자.
SVN Install
서브버전(Subversion)은 오픈소스 소프트웨어이다. 명령행 인터페이스에서 사용하는 명령어를 따서 “SVN”이라고 줄여서 부르기도 한다. 제한이 있던 CVS를 대체하기 위해 2000년부터 콜랩넷에서 개발되었다.
현재는 아파치 최상위 프로젝트로서 전 세계 개발자 커뮤니티와 함께 개발되고 있다.
서브 버전은 서버-클라이언트 모델을 따른다. 서버는 작업하는 컴퓨터 내에 둘 수도 있고, 전산망에 연결된 별도의 컴퓨터에 두고 사용할 수도 있다. 서브버전 서버와 클라이언트는 http, https, svn, svn+ssh의 규약으로 통신한다.
설치는 직접 install binary를 다운로드 받아 업로드 후 설치 하는 방법과 rpm, yum 등의 dependency check가 직접 가능한 package 설치 binary를 사용할 수 도 있다.
이중 아래 내용은 yum을 활용하여 설치하는 과정이다.
[root@ciserver ~]# yum install -y subversion
Loaded plugins: fastestmirror
Determining fastest mirrors
epel/x86_64/metalink | 6.8 kB 00:00:00
* base: mirror.kakao.com
* epel: ftp.jaist.ac.jp
* extras: mirror.kakao.com
* updates: mirror.kakao.com
base | 3.6 kB 00:00:00
epel | 4.7 kB 00:00:00
extras | 2.9 kB 00:00:00
gitlab_gitlab-ce/x86_64/signature | 862 B 00:00:00
gitlab_gitlab-ce/x86_64/signature | 1.0 kB 00:00:00 !!!
gitlab_gitlab-ce-source/signature | 862 B 00:00:00
gitlab_gitlab-ce-source/signature | 951 B 00:00:00 !!!
gitlab_gitlab-ee/x86_64/signature | 862 B 00:00:00
gitlab_gitlab-ee/x86_64/signature | 1.0 kB 00:00:00 !!!
gitlab_gitlab-ee-source/signature | 862 B 00:00:00
gitlab_gitlab-ee-source/signature | 951 B 00:00:00 !!!
mysql-connectors-community | 2.5 kB 00:00:00
mysql-tools-community | 2.5 kB 00:00:00
mysql56-community | 2.5 kB 00:00:00
updates | 2.9 kB 00:00:00
(1/5): epel/x86_64/group_gz | 95 kB 00:00:00
(2/5): epel/x86_64/updateinfo | 1.0 MB 00:00:00
(3/5): extras/7/x86_64/primary_db | 206 kB 00:00:00
(4/5): epel/x86_64/primary_db | 6.9 MB 00:00:00
(5/5): updates/7/x86_64/primary_db | 4.5 MB 00:00:03
(1/2): gitlab_gitlab-ee/x86_64/primary | 2.6 MB 00:00:03
(2/2): gitlab_gitlab-ce/x86_64/primary | 2.4 MB 00:00:04
gitlab_gitlab-ce 638/638
gitlab_gitlab-ee 622/622
Resolving Dependencies
--> Running transaction check
---> Package subversion.x86_64 0:1.7.14-14.el7 will be installed
--> Processing Dependency: subversion-libs(x86-64) = 1.7.14-14.el7 for package: subversion-1.7.14-14.el7.x86_64
--> Processing Dependency: libsvn_wc-1.so.0()(64bit) for package: subversion-1.7.14-14.el7.x86_64
--> Processing Dependency: libsvn_subr-1.so.0()(64bit) for package: subversion-1.7.14-14.el7.x86_64
--> Processing Dependency: libsvn_repos-1.so.0()(64bit) for package: subversion-1.7.14-14.el7.x86_64
--> Processing Dependency: libsvn_ra_svn-1.so.0()(64bit) for package: subversion-1.7.14-14.el7.x86_64
--> Processing Dependency: libsvn_ra_neon-1.so.0()(64bit) for package: subversion-1.7.14-14.el7.x86_64
--> Processing Dependency: libsvn_ra_local-1.so.0()(64bit) for package: subversion-1.7.14-14.el7.x86_64
--> Processing Dependency: libsvn_ra-1.so.0()(64bit) for package: subversion-1.7.14-14.el7.x86_64
--> Processing Dependency: libsvn_fs_util-1.so.0()(64bit) for package: subversion-1.7.14-14.el7.x86_64
--> Processing Dependency: libsvn_fs_fs-1.so.0()(64bit) for package: subversion-1.7.14-14.el7.x86_64
--> Processing Dependency: libsvn_fs_base-1.so.0()(64bit) for package: subversion-1.7.14-14.el7.x86_64
--> Processing Dependency: libsvn_fs-1.so.0()(64bit) for package: subversion-1.7.14-14.el7.x86_64
--> Processing Dependency: libsvn_diff-1.so.0()(64bit) for package: subversion-1.7.14-14.el7.x86_64
--> Processing Dependency: libsvn_delta-1.so.0()(64bit) for package: subversion-1.7.14-14.el7.x86_64
--> Processing Dependency: libsvn_client-1.so.0()(64bit) for package: subversion-1.7.14-14.el7.x86_64
--> Processing Dependency: libneon.so.27()(64bit) for package: subversion-1.7.14-14.el7.x86_64
--> Processing Dependency: libaprutil-1.so.0()(64bit) for package: subversion-1.7.14-14.el7.x86_64
--> Processing Dependency: libapr-1.so.0()(64bit) for package: subversion-1.7.14-14.el7.x86_64
--> Running transaction check
---> Package apr.x86_64 0:1.4.8-5.el7 will be installed
---> Package apr-util.x86_64 0:1.5.2-6.el7 will be installed
---> Package neon.x86_64 0:0.30.0-4.el7 will be installed
--> Processing Dependency: libgnutls.so.28(GNUTLS_3_0_0)(64bit) for package: neon-0.30.0-4.el7.x86_64
--> Processing Dependency: libgnutls.so.28(GNUTLS_2_12)(64bit) for package: neon-0.30.0-4.el7.x86_64
--> Processing Dependency: libgnutls.so.28(GNUTLS_1_4)(64bit) for package: neon-0.30.0-4.el7.x86_64
--> Processing Dependency: libproxy.so.1()(64bit) for package: neon-0.30.0-4.el7.x86_64
--> Processing Dependency: libpakchois.so.0()(64bit) for package: neon-0.30.0-4.el7.x86_64
--> Processing Dependency: libgnutls.so.28()(64bit) for package: neon-0.30.0-4.el7.x86_64
---> Package subversion-libs.x86_64 0:1.7.14-14.el7 will be installed
--> Running transaction check
---> Package gnutls.x86_64 0:3.3.29-9.el7_6 will be installed
--> Processing Dependency: trousers >= 0.3.11.2 for package: gnutls-3.3.29-9.el7_6.x86_64
--> Processing Dependency: libnettle.so.4()(64bit) for package: gnutls-3.3.29-9.el7_6.x86_64
--> Processing Dependency: libhogweed.so.2()(64bit) for package: gnutls-3.3.29-9.el7_6.x86_64
---> Package libproxy.x86_64 0:0.4.11-11.el7 will be installed
--> Processing Dependency: libmodman.so.1()(64bit) for package: libproxy-0.4.11-11.el7.x86_64
---> Package pakchois.x86_64 0:0.4-10.el7 will be installed
--> Running transaction check
---> Package libmodman.x86_64 0:2.0.1-8.el7 will be installed
---> Package nettle.x86_64 0:2.7.1-8.el7 will be installed
---> Package trousers.x86_64 0:0.3.14-2.el7 will be installed
--> Finished Dependency Resolution
Dependencies Resolved
============================================================================================================================================================================================================================================
Package Arch Version Repository Size
============================================================================================================================================================================================================================================
Installing:
subversion x86_64 1.7.14-14.el7 base 1.0 M
Installing for dependencies:
apr x86_64 1.4.8-5.el7 base 103 k
apr-util x86_64 1.5.2-6.el7 base 92 k
gnutls x86_64 3.3.29-9.el7_6 base 680 k
libmodman x86_64 2.0.1-8.el7 base 28 k
libproxy x86_64 0.4.11-11.el7 base 64 k
neon x86_64 0.30.0-4.el7 base 166 k
nettle x86_64 2.7.1-8.el7 base 327 k
pakchois x86_64 0.4-10.el7 base 14 k
subversion-libs x86_64 1.7.14-14.el7 base 922 k
trousers x86_64 0.3.14-2.el7 base 289 k
Transaction Summary
============================================================================================================================================================================================================================================
Install 1 Package (+10 Dependent packages)
Total download size: 3.6 M
Installed size: 12 M
Downloading packages:
(1/11): apr-util-1.5.2-6.el7.x86_64.rpm | 92 kB 00:00:00
(2/11): apr-1.4.8-5.el7.x86_64.rpm | 103 kB 00:00:00
(3/11): libmodman-2.0.1-8.el7.x86_64.rpm | 28 kB 00:00:00
(4/11): libproxy-0.4.11-11.el7.x86_64.rpm | 64 kB 00:00:00
(5/11): neon-0.30.0-4.el7.x86_64.rpm | 166 kB 00:00:00
(6/11): gnutls-3.3.29-9.el7_6.x86_64.rpm | 680 kB 00:00:00
(7/11): pakchois-0.4-10.el7.x86_64.rpm | 14 kB 00:00:00
(8/11): nettle-2.7.1-8.el7.x86_64.rpm | 327 kB 00:00:00
(9/11): subversion-1.7.14-14.el7.x86_64.rpm | 1.0 MB 00:00:00
(10/11): trousers-0.3.14-2.el7.x86_64.rpm | 289 kB 00:00:00
(11/11): subversion-libs-1.7.14-14.el7.x86_64.rpm | 922 kB 00:00:00
--------------------------------------------------------------------------------------------------------------------------------------------------------------------------------------------------------------------------------------------
Total 7.7 MB/s | 3.6 MB 00:00:00
Running transaction check
Running transaction test
Transaction test succeeded
Running transaction
Installing : apr-1.4.8-5.el7.x86_64 1/11
Installing : apr-util-1.5.2-6.el7.x86_64 2/11
Installing : pakchois-0.4-10.el7.x86_64 3/11
Installing : nettle-2.7.1-8.el7.x86_64 4/11
Installing : libmodman-2.0.1-8.el7.x86_64 5/11
Installing : libproxy-0.4.11-11.el7.x86_64 6/11
Installing : trousers-0.3.14-2.el7.x86_64 7/11
Installing : gnutls-3.3.29-9.el7_6.x86_64 8/11
Installing : neon-0.30.0-4.el7.x86_64 9/11
Installing : subversion-libs-1.7.14-14.el7.x86_64 10/11
Installing : subversion-1.7.14-14.el7.x86_64 11/11
Verifying : trousers-0.3.14-2.el7.x86_64 1/11
Verifying : libmodman-2.0.1-8.el7.x86_64 2/11
Verifying : subversion-1.7.14-14.el7.x86_64 3/11
Verifying : subversion-libs-1.7.14-14.el7.x86_64 4/11
Verifying : apr-util-1.5.2-6.el7.x86_64 5/11
Verifying : apr-1.4.8-5.el7.x86_64 6/11
Verifying : nettle-2.7.1-8.el7.x86_64 7/11
Verifying : neon-0.30.0-4.el7.x86_64 8/11
Verifying : pakchois-0.4-10.el7.x86_64 9/11
Verifying : gnutls-3.3.29-9.el7_6.x86_64 10/11
Verifying : libproxy-0.4.11-11.el7.x86_64 11/11
Installed:
subversion.x86_64 0:1.7.14-14.el7
Dependency Installed:
apr.x86_64 0:1.4.8-5.el7 apr-util.x86_64 0:1.5.2-6.el7 gnutls.x86_64 0:3.3.29-9.el7_6 libmodman.x86_64 0:2.0.1-8.el7 libproxy.x86_64 0:0.4.11-11.el7 neon.x86_64 0:0.30.0-4.el7 nettle.x86_64 0:2.7.1-8.el7
pakchois.x86_64 0:0.4-10.el7 subversion-libs.x86_64 0:1.7.14-14.el7 trousers.x86_64 0:0.3.14-2.el7
Complete!
[root@ciserver ~]#SVN Repository Create & Configuration
먼저 기동전 Repository를 저장한 공간을 생성한다.
[root@ciserver ~]# mkdir svn_repo
[root@ciserver ~]# cd svn_repo
[root@ciserver svn_repo]# svnadmin create --fs-type fsfs /root/svn_repo
[root@ciserver svn_repo]# ls -la
total 12
drwxr-xr-x.  6 root root   86 Sep 12 00:20 .
drwxrwxrwx. 25 root root 4096 Sep 12 00:11 ..
-rw-r--r--.  1 root root  229 Sep 12 00:20 README.txt
drwxr-xr-x.  2 root root   54 Sep 12 00:20 conf
drwxr-sr-x.  6 root root  233 Sep 12 00:20 db
-r--r--r--.  1 root root    2 Sep 12 00:20 format
drwxr-xr-x.  2 root root  231 Sep 12 00:20 hooks
drwxr-xr-x.  2 root root   41 Sep 12 00:20 locks
[root@ciserver svn_repo]#
위와 같이 svn repository를 create 한다. 생성하면 위와 같이 svn repository를 구성하는 설정파일이 생성된다.
설정은 conf 파일에서 관리할 수 있다.
[root@ciserver conf]# pwd
/root/svn_repo/conf
[root@ciserver conf]# ls -la
total 12
drwxr-xr-x. 2 root root   54 Sep 12 00:20 .
drwxr-xr-x. 6 root root   86 Sep 12 00:20 ..
-rw-r--r--. 1 root root 1080 Sep 12 00:20 authz
-rw-r--r--. 1 root root  309 Sep 12 00:20 passwd
-rw-r--r--. 1 root root 3090 Sep 12 00:20 svnserve.conf
[root@ciserver conf]#
먼저 passwd 파일이다. passwd 파일은 사용자의 아이디와 비밀번호를 관리하는 파일이다.
[root@ciserver conf]# cat passwd
### This file is an example password file for svnserve.
### Its format is similar to that of svnserve.conf. As shown in the
### example below it contains one section labelled [users].
### The name and password for each user follow, one account per line.

[users]
# harry = harryssecret
# sally = sallyssecret
admin = admin
son.nara = son.nara
[root@ciserver conf]#
위와 같이 사용자를 추가하고 관리할 수 있다.
다음으로 생성한 사용자에게 권한을 부여하는 authz 파일이다.
[root@ciserver conf]# cat authz
### This file is an example authorization file for svnserve.
### Its format is identical to that of mod_authz_svn authorization
### files.
### As shown below each section defines authorizations for the path and
### (optional) repository specified by the section name.
### The authorizations follow. An authorization line can refer to:
###  - a single user,
###  - a group of users defined in a special [groups] section,
###  - an alias defined in a special [aliases] section,
###  - all authenticated users, using the '$authenticated' token,
###  - only anonymous users, using the '$anonymous' token,
###  - anyone, using the '*' wildcard.
###
### A match can be inverted by prefixing the rule with '~'. Rules can
### grant read ('r') access, read-write ('rw') access, or no access
### ('').

[aliases]
# joe = /C=XZ/ST=Dessert/L=Snake City/O=Snake Oil, Ltd./OU=Research Institute/CN=Joe Average

[groups]
# harry_and_sally = harry,sally
# harry_sally_and_joe = harry,sally,&joe

# [/foo/bar]
# harry = rw
# &joe = r
# * =

# [repository:/baz/fuz]
# @harry_and_sally = rw
# * = r
allaccess = admin,son.nara

[/]
@allaccess = rw
* = r
[root@ciserver conf]#
allaccess 그룹을 생성하여, admin과 son.nara을 해당 그룹에 포함시키며, 권한으로 rw를 모든 context에 부여한다.
또한 그외 나머지 사용자에게 r 권한을 부여하는 설정이다.
마지막으로 svnserve.conf는 svn을 구성하는 설정파일이다.
[root@ciserver conf]# cat svnserve.conf
### This file controls the configuration of the svnserve daemon, if you
### use it to allow access to this repository.  (If you only allow
### access through http: and/or file: URLs, then this file is
### irrelevant.)

### Visit http://subversion.apache.org/ for more information.

[general]
### The anon-access and auth-access options control access to the
### repository for unauthenticated (a.k.a. anonymous) users and
### authenticated users, respectively.
### Valid values are "write", "read", and "none".
### Setting the value to "none" prohibits both reading and writing;
### "read" allows read-only access, and "write" allows complete
### read/write access to the repository.
### The sample settings below are the defaults and specify that anonymous
### users have read-only access to the repository, while authenticated
### users have read and write access to the repository.
anon-access = read
auth-access = write
### The password-db option controls the location of the password
### database file.  Unless you specify a path starting with a /,
### the file's location is relative to the directory containing
### this configuration file.
### If SASL is enabled (see below), this file will NOT be used.
### Uncomment the line below to use the default password file.
password-db = passwd
### The authz-db option controls the location of the authorization
### rules for path-based access control.  Unless you specify a path
### starting with a /, the file's location is relative to the the
### directory containing this file.  If you don't specify an
### authz-db, no path-based access control is done.
### Uncomment the line below to use the default authorization file.
authz-db = authz
### This option specifies the authentication realm of the repository.
### If two repositories have the same authentication realm, they should
### have the same password database, and vice versa.  The default realm
### is repository's uuid.
# realm = My First Repository
### The force-username-case option causes svnserve to case-normalize
### usernames before comparing them against the authorization rules in the
### authz-db file configured above.  Valid values are "upper" (to upper-
### case the usernames), "lower" (to lowercase the usernames), and
### "none" (to compare usernames as-is without case conversion, which
### is the default behavior).
# force-username-case = none

[sasl]
### This option specifies whether you want to use the Cyrus SASL
### library for authentication. Default is false.
### This section will be ignored if svnserve is not built with Cyrus
### SASL support; to check, run 'svnserve --version' and look for a line
### reading 'Cyrus SASL authentication is available.'
# use-sasl = true
### These options specify the desired strength of the security layer
### that you want SASL to provide. 0 means no encryption, 1 means
### integrity-checking only, values larger than 1 are correlated
### to the effective key length for encryption (e.g. 128 means 128-bit
### encryption). The values below are the defaults.
# min-encryption = 0
# max-encryption = 256
[root@ciserver conf]#
위와 같이 필요한 구성정보를 주석 해제한다.
SVN Start
svn은 다음과 같이 기동할 수 있다. 기동 시 멀티 리포지토리를 사용하기 위해 listen port를 지정하여 기동하는 것을 권고한다.
[root@ciserver conf]# svnserve -d -r /root/svn_repo --listen-port 3690
[root@ciserver conf]# netstat -anp | grep 3690
tcp        0      0 0.0.0.0:3690            0.0.0.0:*               LISTEN      3387/svnserve
[root@ciserver conf]#
Eclipse SVN 설치
a. Eclipse 설치는 압축을 푸는 것 만으로 설치 완료
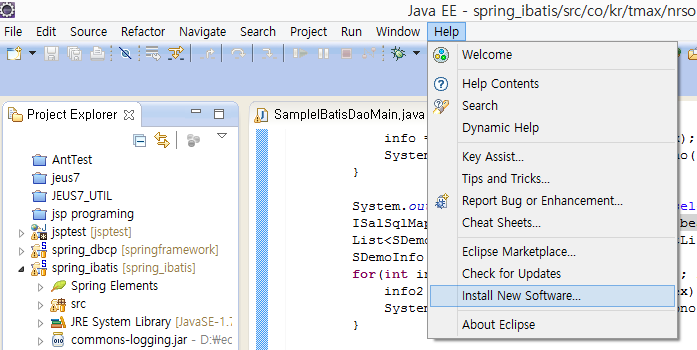
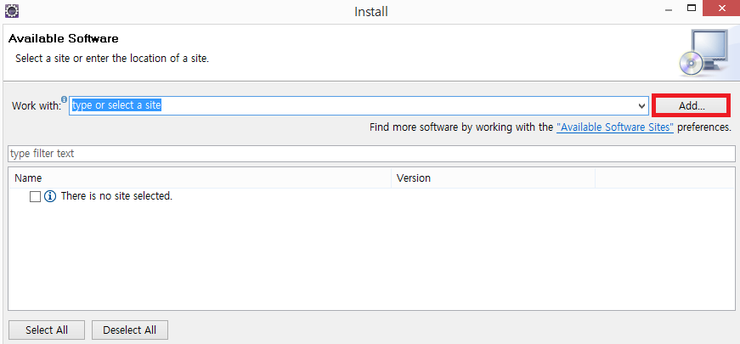
b. Eclipse svn 설치 순서
[Help -> Install New Software 선택]
[Add Button Click!]
[svn repository add]
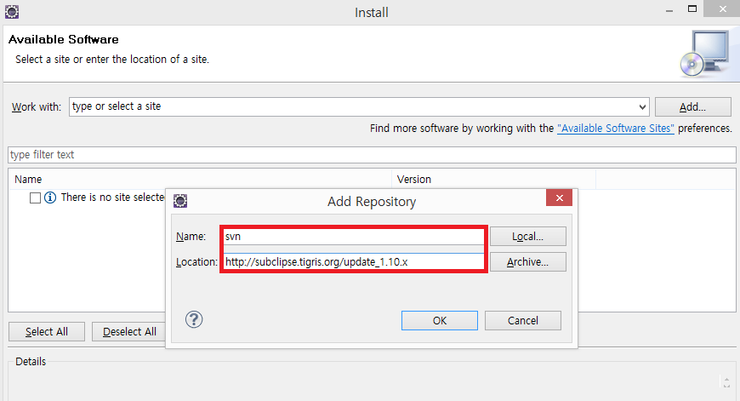
Name : svn
Location : http://subclipse.tigris.org/update_1.10.x
위 사항 입력 후 OK Click!
[Subclipse, SVNKit 선택 및 install]
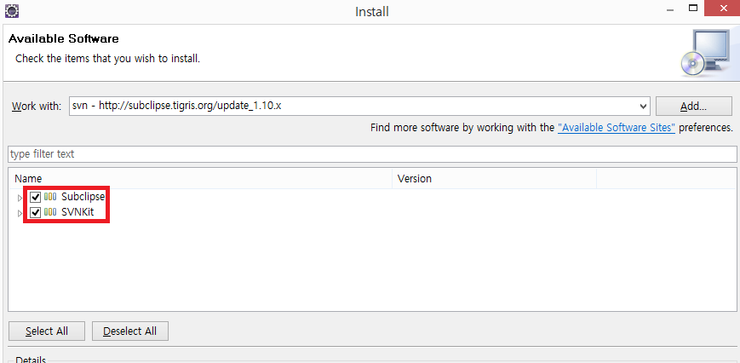
Next 및 이후 과정을 수행 하시면 버전에 따라 몇 번 Eclipse가 재-구동 될 수 있으며, 설치 완료
또는 Eclipse Marketplace를 사용하여 설치할 수 있다.
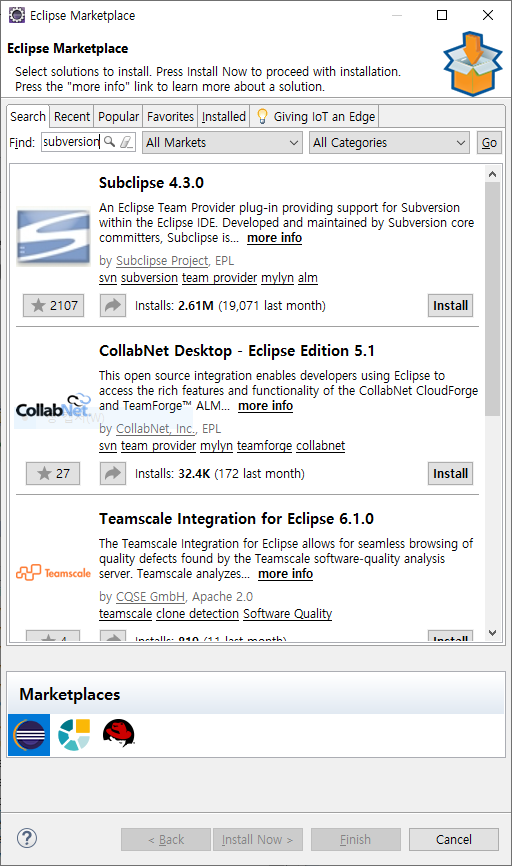
Subclipse를 install하고 Eclipse를 Restart하면 SVN을 사용할 수 있다.
Eclipse SVN 연동
[svn Repository 접속]

빨간 색 표시 부분을 클릭하여
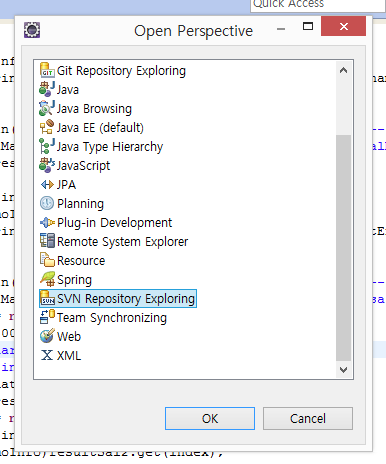
[SVN Repository Exploring 선택 후 svn repository add]

메뉴 중 svn이 표시되어 있는 데이터베이스 이미지 메뉴를 선택한다.
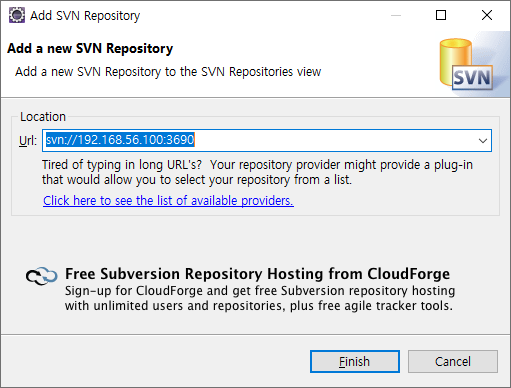

다음으로 Eclipse Project에서 연동하는 방법이다.

프로젝트 우클릭 > Team > Share Project를 선택하면 다음과 같은 화면으로 이동한다.
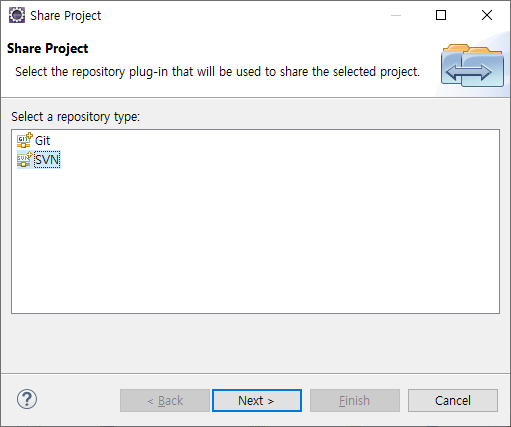
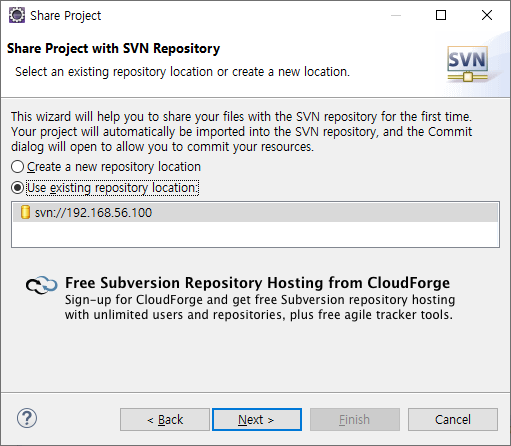
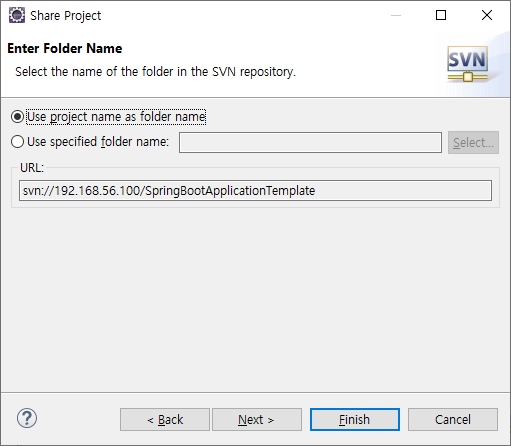

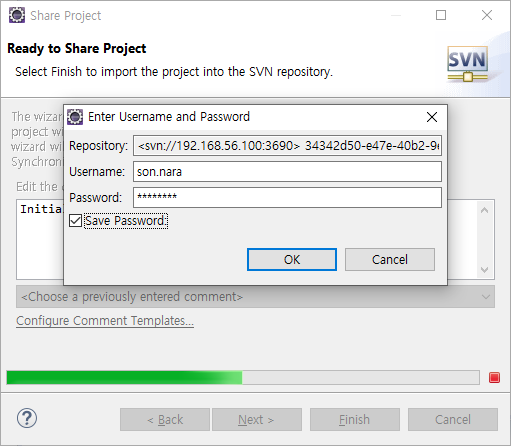
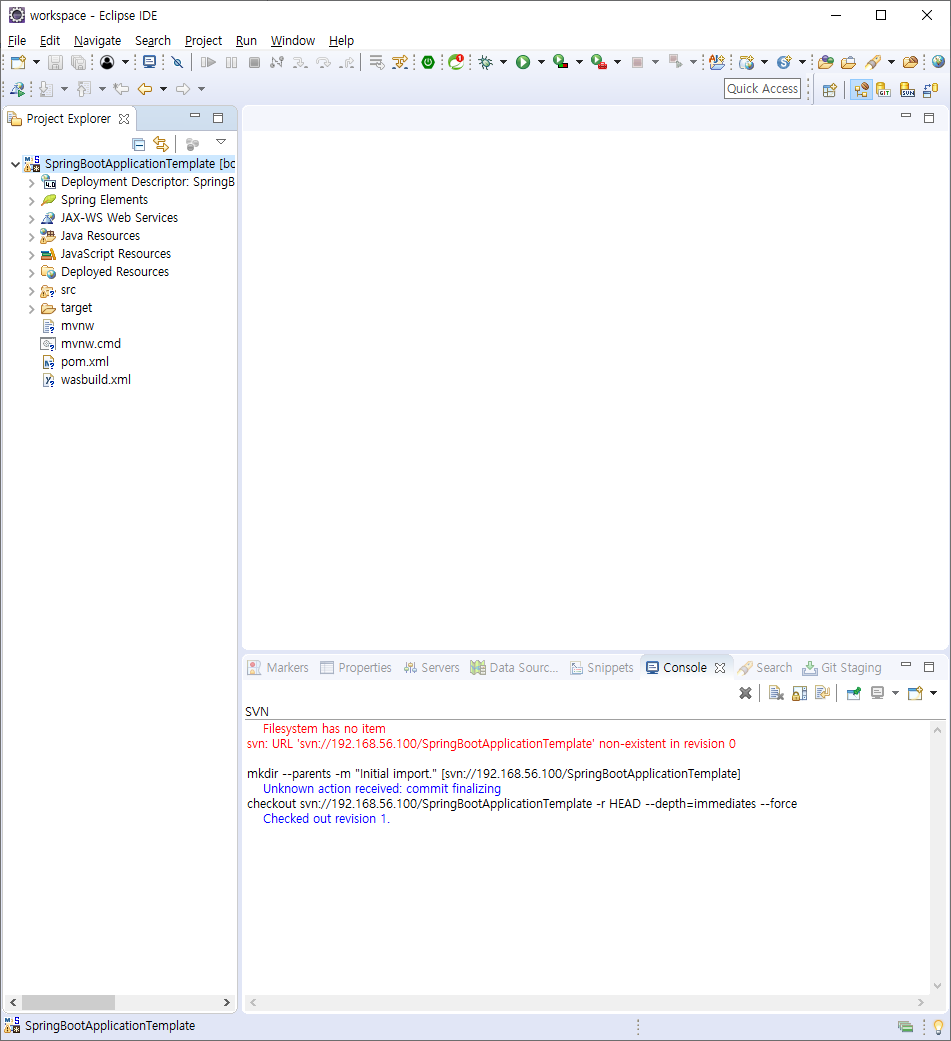
위와 같이 연동이 완료되면 SVN을 통해 코드를 관리할 수 있게 된다.
# 요약!
1) Eclipse download 및 압축 해제
2) svn yum 설치
3) svn 기동 종료
4) eclipse plugin 설치
5) svn / eclipse 연동 (repositories 생성)
다음시간에는 SVN 활용방법을 알아보겠습니다.
# 댓글과 추천은 글쓴이에게 힘이됩니다.!
'⑤ 개발, 데이터베이스 > ⓙ JAVA' 카테고리의 다른 글
| [ALM] 1) SVN을 통한 형상관리 (svn 활용) (0) | 2019.07.04 |
|---|---|
| [Java] Map / Arrays / BP (0) | 2018.03.25 |
- Total
- Today
- Yesterday
- wildfly
- API Gateway
- openstack token issue
- nodejs
- 오픈스택
- k8s
- Docker
- aa
- JBoss
- node.js
- 아키텍처
- aws
- TA
- JEUS6
- JEUS7
- git
- Architecture
- 마이크로서비스
- jeus
- kubernetes
- 마이크로서비스 아키텍처
- SA
- apache
- SWA
- 쿠버네티스
- openstack tenant
- webtob
- OpenStack
- Da
- MSA
| 일 | 월 | 화 | 수 | 목 | 금 | 토 |
|---|---|---|---|---|---|---|
| 1 | 2 | 3 | ||||
| 4 | 5 | 6 | 7 | 8 | 9 | 10 |
| 11 | 12 | 13 | 14 | 15 | 16 | 17 |
| 18 | 19 | 20 | 21 | 22 | 23 | 24 |
| 25 | 26 | 27 | 28 | 29 | 30 | 31 |
