
티스토리 뷰
개요
Pod는 Kubernetes에 어플리케이션을 배치하기 위한 최소 오브젝트 단위이다. 하나 이상의 컨테이너를 가질 수 있고, 짧은 라이프사이클을 통해 생성되고 삭제된다.
마이크로서비스와 같은 분산 환경에서 수 많은 Pod 들의 상태를 관리하는 것은 굉장히 어려운 일이다. 컨테이너로 세분화 된 어플리케이션은 잦은 상태 변화(Pod의 동작에 이상이 발생하거나, 상태가 변화할 경우)가 발생되며, 이에 따른 변화 요소를 수동으로 찾아가기 어렵기 때문에, 시스템이 스스로 감지하고 해결해야 하며, 이 모든 작업은 자동으로 수행될 수 있도록 구축해야 한다. 또한, 분산 시스템의 경우 실패 처리가 핵심이다. Container Management Platform은 시스템 상태를 감시하고 수행이 중지된 서비스를 다시 시작할 수 있어야하며, 때로는 애플리케이션을 강제로 종료하는 기능을 제공해야 한다.
지금부터 Kubernetes에서 지원하는 Pod의 생성 및 종료 시점의 관리 방안에 대해 알아보도록 하자.
Pod 생성 관리 (Health Check)
Kubernetes는 Pod가 시작될 때 Health Check 기능을 적용하여 보다 안전한 배포 프로세스를 구축할 수 있다. Health Check는 Readiness Probe, Liveness Probe, Startup Probe를 지원하며, 언제 어떤 Probe를 사용하는지, 구성은 어떻게 하는지 알아보자.
Probe Handler
먼저 Probe는 HTTP, Execution 및 TCP 세 가지 유형으로 적용할 수 있다. 각각 Container를 구성하는 어플리케이션의 성향에 따라 적용할 수 있다.
- HTTPGetAction : Kubernetes는 지정한 URL을 호출하여 200 또는 300범위에서 HTTP 응답을 받으면 application을 정상으로 표시한다. 그렇지 않으면 비정상으로 표시된다.
- ExecAction : Kubernetes는 컨테이너 내부에서 Command를 실행한다. Command가 종료 코드 0 즉 성공을 반환하면 컨테이너가 정상으로 표시되며, 그렇지 않을 경우 비정상으로 표시된다.
- TCPSocketAction : Kubernetes가 지정된 포트에 TCP 연결을 시도한다. 연결에 성공할 경우 컨테이너는 정상적인 것으로 표시되며, 그렇지 않을 경우 비정상으로 표시된다. gRPC 또는 FTP 서비스에 적용이 용이하다.
또한, 각 Probe를 적용할 때 initialDelaySeconds 적용에 유의해야 한다. 특히 Liveness Probe가 실패할 경우 Container는 재 시작된다. 따라서 application이 서비스 준비가 완료될때까지 Probe Check기 시작되지 않도록 해야하며, 이는 initialDelaySeconds를 통해 해결할 수 있다. initialDelaySeconds를 사용하여 Container의 평균 기동 시간 동안 버퍼를 두고 Probe가 동작하도록 설정하는 것을 권고한다. 이는 startupProbe를 적용하여 대체할 수 있다.
Probe Configure
Probe를 구성하는 주요 설정에 대해 알아보자.
- initialDelaySeconds : Probe가 시작되기 전 대기 시간으로 default는 0초이다.
- periodSeconds : Probe를 수행하는 빈도(초)로 기본값은 10초이다.
- timeoutSeconds : Probe 타임아웃 시간(초)으로 기본값은 1초이다.
- successThreshold : Probe가 실패한 후 성공으로 변경되기 위한 연속 성공횟수이다. 기본값은 1이다.
- failureThreshold : Probe가 실패하면 Kubernetes는 failureThreshold 횟수 만큼 Container 재시작을 시도한다.
- terminationGracePeriodSeconds : Probe가 failure 상태가 될 경우 컨테이너를 종료하는데 까지 걸리는 시간이다.
Liveness Probe
Liveness Probe를 통해 컨테이너를 언제 재시작해야 하는지 판단할수 있다. 예를 들어 container가 알 수 없는 원인으로 비정상 동작을 하거나, 교착상태에 빠졌을 경우 Liveness Probe를 통해 해당 Container를 재시작하고 일정 횟수 이상 실패할 경우 새로운 Pod로 교체한다.

Liveness Probe가 정의되어 있지 않을 경우 기본 Success로 판단하게 되는데 application이 특정 이유로 인해 비정상 동작하더라도 프로세스는 계속 실행되고 있기 때문에 기본적으로 Kubernetes는 모든 것이 정상이라고 판단하고 트래픽을 지속적으로 유입하게 된다. Liveness Probe를 사용하여 Kubernetes는 application이 더 이상 요청을 처리하지 않음을 감지하고 문제가 되는 pod를 다시 시작하여 이와 같은 문제를 해소할 수 있다.
1) ExecAction
다음은 livenessprobe execution를 테스트하기 위한 yaml 파일이다.
apiVersion: v1
kind: Pod
metadata:
  labels:
    test: liveness
  name: liveness-exec
spec:
  containers:
  - name: liveness
    image: k8s.gcr.io/busybox
    args:
    - /bin/sh
    - -c
    - touch /tmp/healthy; sleep 30; rm -rf /tmp/healthy; sleep 600
    livenessProbe:
      exec:
        command:
        - cat
        - /tmp/healthy
      initialDelaySeconds: 5
      periodSeconds: 5
livenessProbe를 정의하기 위해서는 livenessProbe.exec.command의 내용을 Container의 정상 여부를 검증할 수 있는 명령어로 정의해야 한다. 이는 각 어플리케이션 별로 상이하기 때문에 위 예시는 참고용으로 활용하면 될 듯하다.
위 livenessProbe에는 /tmp/healthy 파일을 확인하는 cat command를 정의하고 파일이 있을 경우 success하는 시나리오이다. "/bin/sh -c "touch /tmp/healthy; sleep 30; rm -rf /tmp/healthy; sleep 600"와 같이 container 수명이 30초인 liveness container는 파일생성 > sleep 30초 > 파일삭제 > sleep 600초 순으로 동작한다.
위 예시는 PID 1로 기동되는 container를 강제로 다운 시켜 livenessProbe를 failure로 출력하도록 구성하였지만, 대체로 PID 1로 기동되는 cmd / entrypoint의 process에 대한 ping / ps 검증, http url response 검증 등이 대표적인 적용방안이 될 것이다.
[root@ip-192-168-78-195 app]# kubectl describe pod liveness-exec
Events:
Type Reason Age From Message
---- ------ ---- ---- -------
Normal Scheduled 37s default-scheduler Successfully assigned default/liveness-exec to ip-192-168-186-60.ap-northeast-2.compute.internal
Normal Pulling 36s kubelet, ip-192-168-186-60.ap-northeast-2.compute.internal Pulling image "k8s.gcr.io/busybox"
Normal Pulled 35s kubelet, ip-192-168-186-60.ap-northeast-2.compute.internal Successfully pulled image "k8s.gcr.io/busybox" in 1.411412542s
Normal Created 35s kubelet, ip-192-168-186-60.ap-northeast-2.compute.internal Created container liveness
Normal Started 35s kubelet, ip-192-168-186-60.ap-northeast-2.compute.internal Started container liveness
Warning Unhealthy 2s kubelet, ip-192-168-186-60.ap-northeast-2.compute.internal Liveness probe failed: cat: can't open '/tmp/healthy': No such file or directory
[root@ip-192-168-78-195 app]# kubectl describe pod liveness-exec
Events:
Type Reason Age From Message
---- ------ ---- ---- -------
Normal Scheduled 79s default-scheduler Successfully assigned default/liveness-exec to ip-192-168-186-60.ap-northeast-2.compute.internal
Normal Pulled 77s kubelet, ip-192-168-186-60.ap-northeast-2.compute.internal Successfully pulled image "k8s.gcr.io/busybox" in 1.411412542s
Warning Unhealthy 34s (x3 over 44s) kubelet, ip-192-168-186-60.ap-northeast-2.compute.internal Liveness probe failed: cat: can't open '/tmp/healthy': No such file or directory
Normal Killing 34s kubelet, ip-192-168-186-60.ap-northeast-2.compute.internal Container liveness failed liveness probe, will be restarted
Normal Pulling 4s (x2 over 78s) kubelet, ip-192-168-186-60.ap-northeast-2.compute.internal Pulling image "k8s.gcr.io/busybox"
Normal Pulled 3s kubelet, ip-192-168-186-60.ap-northeast-2.compute.internal Successfully pulled image "k8s.gcr.io/busybox" in 1.472326648s
Normal Created 2s (x2 over 77s) kubelet, ip-192-168-186-60.ap-northeast-2.compute.internal Created container liveness
Normal Started 2s (x2 over 77s) kubelet, ip-192-168-186-60.ap-northeast-2.compute.internal Started container liveness
[root@ip-192-168-78-195 app]#
위와 같이 initialDelaySeconds 초 만큼 대기 후 periodSeconds 마다 kubelet은 livenessProbe를 실행하며, 약 35초 경과 후 livenessProbe 실패가 발생한다. "initialDelaySeconds 5초 + periodSeconds 5n초"는 container 수명인 30초가 초과되는 시점에 파일이 삭제되므로 35초 시점에 실패가 발생하게되는 것이다.
이후 terminationGracePeriodSeconds (default 30초)만큼 대기 후 Pod를 재시작한다. 즉, Pod가 리스타트되는 시간은 총 75초 소요된다. (initialDelaySeconds + periodSeconds * n + terminationGracePeriodSeconds)
물론 restart가 3회 이상 수행될 경우 failureThreshold에 의해 Pod의 상태를 CrashLoopBackOff로 변경한다.
[root@ip-192-168-78-195 app]# kubectl get pods -w
NAME READY STATUS RESTARTS AGE
liveness-exec 1/1 Running 0 2s
liveness-exec 1/1 Running 1 77s
liveness-exec 1/1 Running 2 2m32s
2) HTTPGetAction
다음은 livenessprobe http를 테스트하기 위한 yaml 파일이다.
apiVersion: v1
kind: Pod
metadata:
  labels:
    test: liveness
  name: liveness-http
spec:
  containers:
  - name: liveness
    image: k8s.gcr.io/liveness
    args:
    - /server
    livenessProbe:
      httpGet:
        path: /healthz
        port: 8080
        httpHeaders:
        - name: Custom-Header
          value: Awesome
      initialDelaySeconds: 3
      periodSeconds: 3
liveness-http 컨테이너는 초기 10초 간 /healthz에 대한 요청을 200으로 return하고, 이후 500으로 return하는 컨테이너이다. 초기 initialDelaySeconds 3초 후 periodSeconds 3초 마다 한번씩 probe를 실행하여 체크한다.
[root@ip-192-168-78-195 app]# kubectl describe pod liveness-http
Events:
Type Reason Age From Message
---- ------ ---- ---- -------
Normal Scheduled 15s default-scheduler Successfully assigned default/liveness-http to ip-192-168-186-60.ap-northeast-2.compute.internal
Normal Pulling 15s kubelet, ip-192-168-186-60.ap-northeast-2.compute.internal Pulling image "k8s.gcr.io/liveness"
Normal Pulled 12s kubelet, ip-192-168-186-60.ap-northeast-2.compute.internal Successfully pulled image "k8s.gcr.io/liveness" in 2.120377802s
Normal Created 12s kubelet, ip-192-168-186-60.ap-northeast-2.compute.internal Created container liveness
Normal Started 12s kubelet, ip-192-168-186-60.ap-northeast-2.compute.internal Started container liveness
Warning Unhealthy 0s kubelet, ip-192-168-186-60.ap-northeast-2.compute.internal Liveness probe failed: HTTP probe failed with statuscode: 500
[root@ip-192-168-78-195 app]#
즉 위와 같이 livenessProbe 실패는 초기 기동 완료 후 12초 경과 시점이 될 것이다.
3) TCPSocketAction
다음은 livenessprobe tcp를 테스트하기 위한 yaml 파일이다.
apiVersion: v1
kind: Pod
metadata:
  name: goproxy
  labels:
    app: goproxy
spec:
  containers:
  - name: goproxy
    image: k8s.gcr.io/goproxy:0.1
    ports:
    - containerPort: 8080
    readinessProbe:
      tcpSocket:
        port: 8080
      initialDelaySeconds: 5
      periodSeconds: 10
    livenessProbe:
      tcpSocket:
        port: 8080
      initialDelaySeconds: 15
      periodSeconds: 20
최초 15초 경과 후 20초에 한번씩 8080 port로 tcp 연결이 가능한지를 검증한다. 컨테이너 포트로의 연결을 실패할 경우 컨테이너를 재시작 한다.
Readiness Probe
Readiness Probe는 Pod 내에 배포한 application이 트래픽을 처리할 준비가 되었을 때 Kubernetes에게 알리도록 설계되어 있다. Kubernetes는 서비스가 포드로 트래픽을 보내도록 허용하기 전에 Readiness Probe가 정상적으로 준비되었는지 확인한다. Readiness Probe가 실패하면 성공하기 전까지 Pod로의 트래픽 전송을 중지하고 서비스 라우팅 대상에서 제외된다.
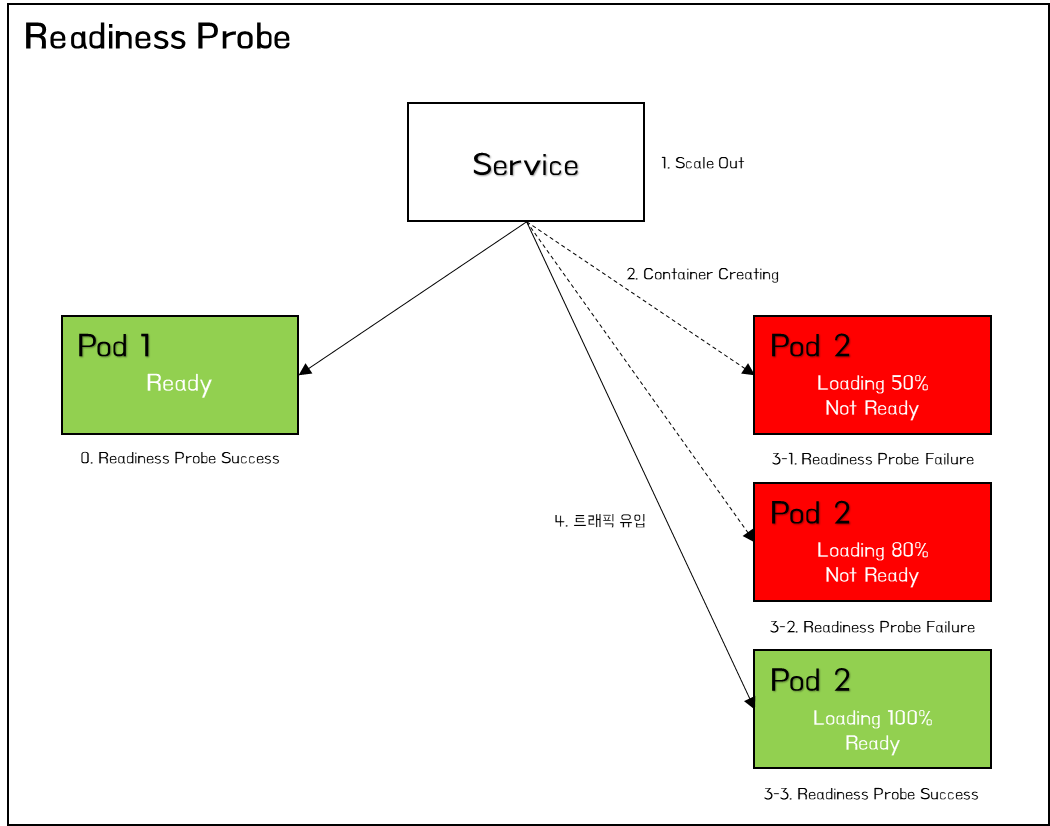
Kubernetes는 Listen 되는 Port와 application이 기동되는데까지의 시간차이로 인한 일시적인 504 Bad Gateway와 같은 5xx 에러를 발생 시킬 수 있다. 또한, Pod가 확장되어 늘어날 경우 서비스 준비가 완료되기 전까지 트래픽을 수신하지 않아야 하지만 Kubernetes Service는 Container 내부의 프로세스가 시작되자 마자 트래픽을 전송한다. 이와 같은 경우 Readiness Probe를 적용하여 application이 완전히 시작되었는지를 확인한 후 트래픽을 수신함으로써 위와 같은 문제를 예방할 수 있다.
Readiness Probe는 Liveness Probe와 동일하게 구성하고 동작한다. 다만, 차이점은 Liveness Probe는 컨테이너를 재기동한다는 점과 Readiness Probe는 트래픽을 차단한다는 점이다. 이를 이용하여 두 Probe를 함께 적용하는 것이 효과적이다.
Startup Probe
Startup Probe는 컨테이너 내의 application이 시작되었는지 확인한다. Startup Probe는 온전히 어플리케이션 기동에 집중한 Probe로 성공할때 까지 Liveness/Readiness Probe는 활성화 되지 않는다.(즉, 어플리케이션 기동에 다른 Probe가 방해되지 않도록 제어한다) 대체로, 초기 기동 시간이 오래 걸리는 작업인 Legacy 연동, Database 연동, 배치 처리, 초기 데이터 적재 등의 작업이 포함될 경우 StartupProbe를 적용하고, 기동이 완료된 이후부터 LivenessProbe/ReadinessProbe를 적용하여 관리한다.
# 참조
LivenessProbe의 failureThreshold * periodSeconds를 통해 Container 관리가 가능하지만, 기동 시점에 한번 오래 동작하는 event로 인해 해당 시간과 빈도를 늘려두는 것은 이후 운영 시점의 민첩성에 문제가 될 수 있다. 따라서 StartupProbe를 적용하고 이후 운영단계에서는 LivenessProbe를 적용하는 것이 효과적이다.
다음은 startupprobe를 테스트하기 위한 yaml 파일이다.
apiVersion: v1
kind: Pod
metadata:
  labels:
    test: liveness
  name: liveness-http
spec:
  containers:
  - name: liveness
    image: k8s.gcr.io/liveness
    args:
    - /server
    ports:
    - name: liveness-port
      containerPort: 8080
      hostPort: 8080
    livenessProbe:
      httpGet:
        path: /healthz
        port: liveness-port
      failureThreshold: 1
      periodSeconds: 10
    startupProbe:
      httpGet:
        path: /healthz
        port: liveness-port
      failureThreshold: 30
      periodSeconds: 10
startupProbe는 Pod 초기 시작 시간을 delay 하기를 원할 경우 적용한다. initialDelaySeconds와 비슷하게 동작하며, Probe로 인한 교착상태를 방지하기 위해 적용한다.
[root@ip-192-168-78-195 ~]# kubectl get pods -w
NAME READY STATUS RESTARTS AGE
liveness-http 0/1 Running 0 3s
liveness-http 0/1 Running 0 10s
liveness-http 1/1 Running 0 11s
liveness-http 0/1 Running 1 22s
liveness-http 0/1 Running 1 30s
liveness-http 1/1 Running 1 31s
liveness-http 0/1 Running 2 42s
liveness-http 0/1 Running 2 50s
liveness-http 1/1 Running 2 51s
liveness-http 0/1 Running 3 62s
liveness-http 0/1 Running 3 70s
liveness-http 1/1 Running 3 70s
liveness-http 0/1 Running 4 82s
liveness-http 0/1 Running 4 90s
liveness-http 1/1 Running 4 90s
위와 같이 초기 Pod 기동 시간이 startupProbe가 체크되는 10초 이후 이며, livenessProbe 10초 (다운) + startupProbe(기동딜레이) 10초 총 20초에 한번씩 Pod가 재기동 되고 있는 것을 확인할 수 있다.
Pod 종료 관리 (Graceful Shutdown)
Kubernetes는 여러 노드에 걸쳐 Pod를 실행하기 위해 복사본을 만들고, 애플리케이션을 업데이트하고, 동시에 여러 버전의 애플리케이션을 실행할 수 있다. 이는 Kubernetes가 정상적으로 컨테이너를 종료할 수 있도록 지원한다. RollingUpdate로 배포하는 경우 Kubernetes는 새 Pod를 실행하는 동안 이전 포드를 Gracefully하게 종료한다.
이때, Pod의 배포 시간과 다운타임 최소화를 통해 사용자에게 미치는 영향을 최소화하고 복구 시간을 최대한 빠르게 하기 위해 애플리케이션 종료를 안전하게 처리해야 한다.
지금부터 Kubernetes에서 Pod를 종료하는 단계에 대해 알아보자.
- Pod Terminating : Pod가 "Terminating" 상태로 설정되고 모든 서비스의 endpoint에서 제거된다. 이 시점에서 Pod는 새 트래픽 수신을 중지하지만 Pod 내에서 실행 중인 요청은 정상적으로 처리된다.
- PreStop Hook : preStop Hook이 실행된다. preStop Hook은 SIGTERM을 수신할 때 애플리케이션이 정상적으로 종료되지 않으면 이 Hook을 사용하여 정상적인 종료를 트리거할 수 있다. 대부분의 프로그램은 SIGTERM을 수신할 때 정상적으로 종료되지만 제어할 수 없는 시스템을 관리하는 경우 preStop 후크는 애플리케이션을 수정하지 않고 정상적인 종료를 트리거하는 좋은 방법이다.
- SIGTERM signal : Kubernetes는 Pod 내 컨테이너에 SIGTERM 신호를 보낸다. 이 신호는 컨테이너가 곧 종료될 것임을 알린다. 여기에는 오래 지속되는 연결(예: 데이터베이스 연결 또는 WebSocket 스트림)중지, Snapshot 저장 등이 포함될 수 있다.
- Grace Period : Kubernetes는 grace period 시간(terminationGracePeriodSeconds) 만큼 대기한다. Kubernetes는 preStop 후크가 완료될 때까지 기다리지 않고, 종료가 완료되기 전에 app이 종료되면 Kubernetes는 즉시 다음 단계로 이동한다.
- SIGKILL signal : SIGKILL 신호가 포드로 전송되고 포드가 제거된다. Grace Period 후에도 컨테이너가 계속 실행 중이면 SIGKILL 신호가 전송되어 강제로 제거된다. 이 시점에서 모든 Kubernetes 개체도 정리된다.
유의할 점은 preStop hook, grace Period 및 SIGTERM signal이 모두 병렬로 발생한다는 점이다.
preStop과 postStart Hook Handler yaml은 아래와 같이 활용할 수 있다.
apiVersion: v1
kind: Pod
metadata:
  name: lifecycle-demo
spec:
  containers:
  - name: lifecycle-demo-container
    image: nginx
    lifecycle:
      postStart:
        exec:
          command: ["/bin/sh", "-c", "echo Hello from the postStart handler > /usr/share/message"]
      preStop:
        exec:
          command: ["/bin/sh","-c","nginx -s quit; while killall -0 nginx; do sleep 1; done"]
위와 같이 postStart는 Container 기동 이후 /usr/share/message 파일에 Hello from the postStart handler를 작성한다. preStop은 Container가 종료되기 직전 nginx -s quit으로 현재 연결되어 있는 사용자의 요청이 완료되도록 대기하고, 요청이 완료되면 nginx를 종료한다. 이후 killall -0으로 nginx 프로세스가 종료되었는지 확인한다.
- PostStart : 이 Hook은 컨테이너가 생성된 직후에 실행된다. 그러나, Hook이 컨테이너 엔트리포인트에 앞서서 실행된다는 보장은 없다. 파라미터는 핸들러에 전달되지 않는다.
- PreStop : 이 Hook은 API 요청이나 liveness probe 실패, 자원 경합 등의 관리 이벤트로 인해 컨테이너가 종료되기 직전에 호출된다. 컨테이너가 이미 terminated 또는 completed 상태인 경우에는 PreStop Hook 요청이 실패하며, Hook은 컨테이너를 중지하기 위한 TERM 신호가 보내지기 이전에 완료되어야 한다. 어떠한 파라미터도 핸들러에게 전달되지 않는다.
결론
Kubernetes는 이미 훌륭한 완전 관리형 Container Management Platform이지만, 여전히 다양한 상황에서 고려되어야 할 부분들이 존재한다. 특히 어플리케이션을 배포하는 Pod의 기동/종료를 관리하는 것은 무엇보다 중요한 고려사항일 것이다.
Kubernetes는 다양한 이유로 포드가 종료될 수 있으며 애플리케이션이 이러한 종료를 정상적으로 처리하도록 하는 것은 안정적인 시스템을 만들고 우수한 사용자 경험을 제공하는 핵심요소이다.
'③ 클라우드 > ⓚ Kubernetes' 카테고리의 다른 글
| Polaris - Kubernetes 워크로드 모범 사례 적용 검증 (0) | 2022.03.13 |
|---|---|
| Kubernetes 활용성을 높이는 플러그인 & krew 패키지 매니저 (0) | 2022.03.03 |
| Kubernetes Context (Multi Cluster 접근관리) (0) | 2022.02.26 |
| Kubeflow를 활용하여 머신러닝 분석환경 구축하기 (0) | 2021.01.19 |
| Kubernetes 환경변수 구성하기 (ConfigMap, Secret) (2) | 2021.01.03 |
- Total
- Today
- Yesterday
- 쿠버네티스
- 마이크로서비스 아키텍처
- wildfly
- apache
- JEUS6
- OpenStack
- Docker
- 아키텍처
- API Gateway
- JBoss
- SA
- 마이크로서비스
- MSA
- k8s
- git
- nodejs
- SWA
- Architecture
- jeus
- webtob
- TA
- aa
- 오픈스택
- node.js
- JEUS7
- kubernetes
- openstack tenant
- Da
- aws
- openstack token issue
| 일 | 월 | 화 | 수 | 목 | 금 | 토 |
|---|---|---|---|---|---|---|
| 1 | 2 | 3 | 4 | 5 | 6 | |
| 7 | 8 | 9 | 10 | 11 | 12 | 13 |
| 14 | 15 | 16 | 17 | 18 | 19 | 20 |
| 21 | 22 | 23 | 24 | 25 | 26 | 27 |
| 28 | 29 | 30 |